Wednesday July 23, 2003
Power Taps Made Easy!
 One
question that I frequently receive is how to install Power Taps on your track.
Power Taps are sometimes needed on longer circuits to help provide even power,
as sometimes the track connections themselves contribute to a small loss of
power. Our smaller Artin home layout really didn't need them, but since
installing them is so easy we decided it was time and thought we would share it
with you.
One
question that I frequently receive is how to install Power Taps on your track.
Power Taps are sometimes needed on longer circuits to help provide even power,
as sometimes the track connections themselves contribute to a small loss of
power. Our smaller Artin home layout really didn't need them, but since
installing them is so easy we decided it was time and thought we would share it
with you.
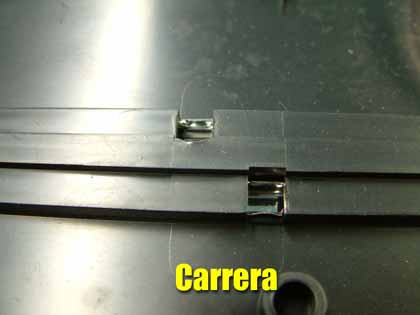
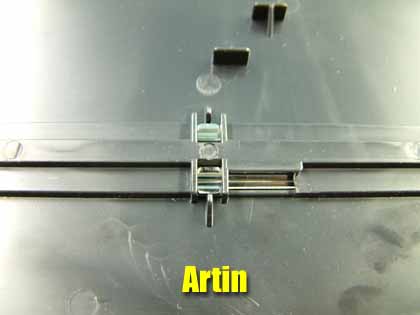
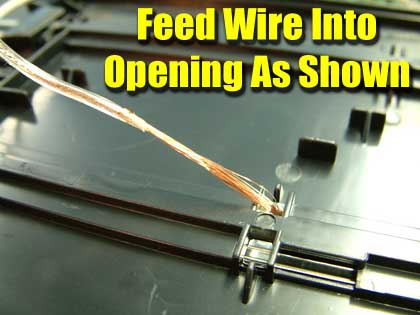
The best thing about this method is that you do NOT HAVE TO SOLDER these connections. Although soldering makes for a stronger connection, there is a way to get the same results without it. Both Artin and Carrera track systems have openings underneath the rails, allowing you to easily add taps as shown in the photos. So if you do not have a soldering iron, or you do and don't know how to use it, that is just fine...lets get started! If your working with Scalextric Sport, it doesn't have these openings, rather it has tabs bent underneath. This is fine as you can order the Scalextric Power Extension Cables (They call them Booster Cables) #C8248 and they simply snap in place to the track.
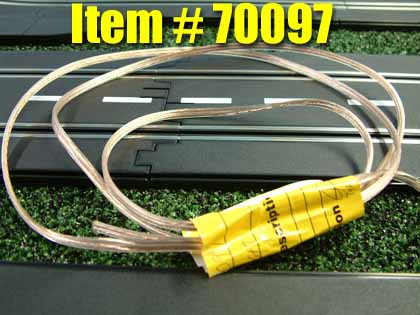
Although there are many different types of wire that enthusiasts choose, I have found one that is very inexpensive and works perfectly. It is standard 18 gauge wire that we found in Lowe's Home Center, (they say you can buy things for your house there) and we buy it in 5 foot sections. You could use just about any wire, in fact for the longest time we have used old scrap extension cords with excellent results.
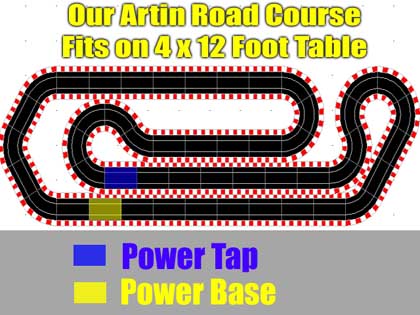
So where do you install them? Well, there are several "unwritten laws" that advise one Power Tap for every 25 feet of track, then some dictate these every 15 feet. Our track is 23.5 feet so ours is even smaller, and we picked a spot on the track that was close to the Power Base, yet pretty close to the half-way mark.
Before we go any further, some of you might be constructing a more permanent layout and do not want these wires to be exposed on your layout. Well we are the same way as you, so when we find where we want the Power Tap installed, we remove that piece of track and mark areas to drill holes so the Taps can be installed from the underneath of the track. It is very easy to do if you just use the existing track as a guide like shown. With the size wire we are using, you don't need a hole any larger than 3/8, so after getting our drill out and making these holes, it was time to prepare our wire.
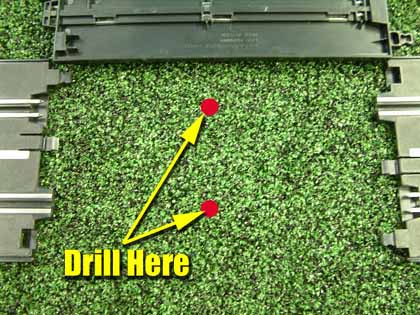
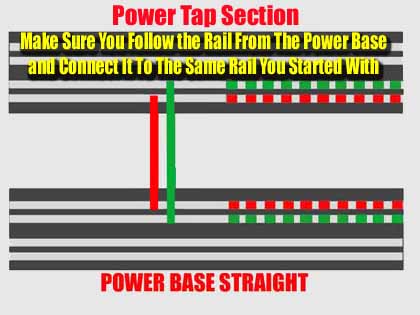
The one thing I have to stress is connecting the Power Taps to the correct rail. Each lane has 2 separate rails that need to be wired independently and although you might think this is automatic knowledge, but just to be sure I'll cover it quickly for those that are just joining us and perhaps are like me, being virtually ignorant of electricity. Simply looking at your track, follow the rails around from your Power Base to where you want to install the Power Tap as shown in the diagram. I like to mark this rail from the underneath with a marker just to make sure I don't make a mistake, and then its time for cutting and stripping our wires.
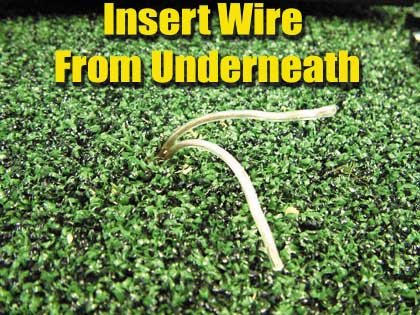
If you are using wire such as the kind we use, I suggest either splitting the wire apart into 2 sections as we do, or mark one end of the wire, and then mark the other end to make sure you do not get confused. Using color-coded wire would be the easy way, however it does cost a little more, and as usual I try and show modifications completed with the least amount of investment.
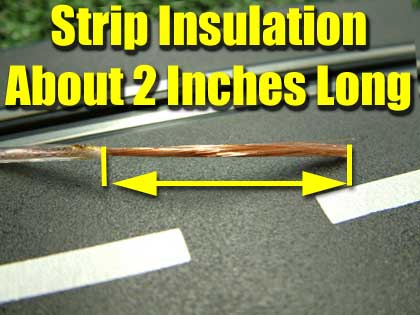
Once this is completed, I strip both ends of the wire around 2 inches long. This might seem a little extreme, but in a second you will see why we do it this way. Starting at your power Base, take the wire and insert it into the opening under the track. Don't worry if some of the strands of wire get a little bent going in, in fact, that is perfect. Continue to feed the wire into the track until you reach the part where the insulation is still on the wire. From here, I like to go about another half inch and that is it. Now repeat these steps for each corresponding rail opening at your selected Power Tap location, and you have successfully installed Power Taps on your layout. Once installed this wire makes good contact on the inside of the rail and is quite secure. In addition, if you ever change your layout, they are easily removed and can be used repeatedly.
Now before you re-install the track, lets test it to see if you have a good connection. You can do this 2 different ways, one with a Multi-meter, and the other by using any slot car handy. We just use the slot car method as it is faster and easier, and for this article some of you may not have a Multi-meter. Starting at the Power Base, place the car with the rear wheels raised in the air above the track, and pull the trigger on the controller for that lane to see if the car has power. Then go to your Power tap track and perform the same, you should get the same results. If you do, you are ready to re-install the track. Once you have re-installed the track, test it one more time.
If you do not get any power, double check your connections to make sure they are correct. Try removing the wire from the Tap and re-installing it as well. I can say that in all the Power Taps I have installed this way, it has worked perfectly every time, so I am pretty sure you will be on your way quickly. Speaking of that, I timed our effort here and it took less than 30 minutes to complete, so you won't spend all day working.
 We
hope this helps shed a little light on how to perform this simple modification.
Most projects like this really are this simple, yet add so much to your racing
fun. As I always say, the way I choose to do things may not always be the best
way. So again, if you have more questions or you have your own suggestions on
how to perform this modification, by all means drop me a line and we will
include it here to help make this article even better.
We
hope this helps shed a little light on how to perform this simple modification.
Most projects like this really are this simple, yet add so much to your racing
fun. As I always say, the way I choose to do things may not always be the best
way. So again, if you have more questions or you have your own suggestions on
how to perform this modification, by all means drop me a line and we will
include it here to help make this article even better.
Harry
As always feel free to contact me about this article or just the hobby in general at wiseone@yhti.net, or better yet drop into our Message Forum and share your thoughts with other enthusiasts!
Make sure to check our PIT ROW Section often as we try to update it frequently!