
Adding Realistic Walls to Your Layout
13 December 2002
![]()
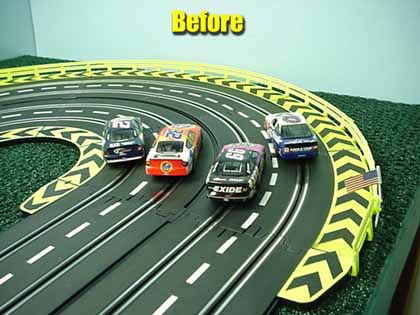
 Lately, I have been
hearing a lot of enthusiasts asking about realistic scenery and track details
for their slot car layouts. Many of you do not care for the colors or the design
of today's guardrails and turn borders, so I thought I would pass this method
along to those looking for inexpensive alternatives.
Lately, I have been
hearing a lot of enthusiasts asking about realistic scenery and track details
for their slot car layouts. Many of you do not care for the colors or the design
of today's guardrails and turn borders, so I thought I would pass this method
along to those looking for inexpensive alternatives.
This method is just one of many out there, but I have found it to be extremely easy...on both your time and your wallet!
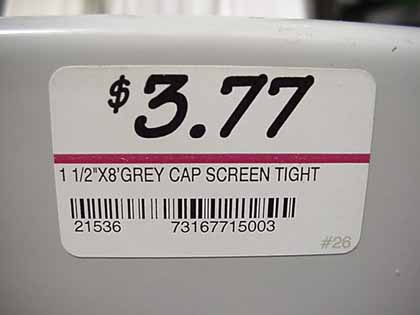
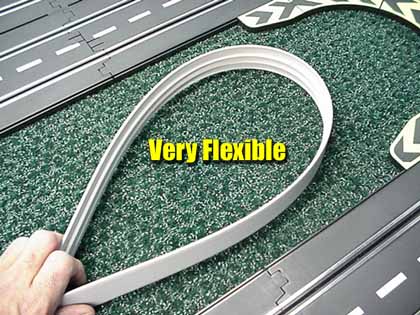
Lets get started with our bill of materials shall we? First and most importantly is the "walls" themselves. I discovered these vinyl screen door borders used to attach screen to outside doors at Lowe's Home Center. When I first looked at them, I knew these were what we have been looking for to simulate the concrete walls found on many tracks across the country. As I wanted to build a layout that had some degree of scale realism, these would work perfectly. Very flexible to curve around the tracks without breaking and VERY durable as well.
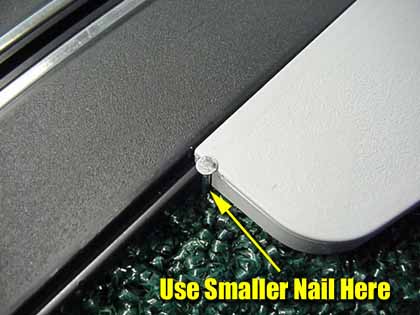
The rest of our materials are very commonly found anywhere, but I purchased all of it at once for the sake of those who may, or may not, have different sources available. I used 2 types of nails, one smaller for mounting track to the table, and a larger one for mounting and bracing the walls themselves. You don't have to use these exact types, but these are just the kind we found to work the best, and again, inexpensive.
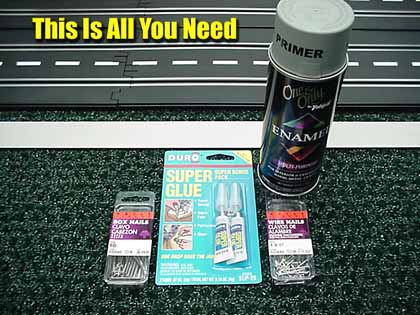
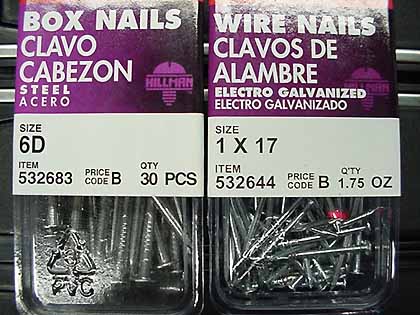
The paint is a gray primer that very closely matches the color of the walls themselves. This makes things a great deal faster, and easier on you. Shown in the photo is good old fashioned Super Glue, but again, you can use any brand you like.
I used 2 each of the 1 1/2 by 8 foot walls @ $3.77 a piece, The nails were $0.78 a box, 1 can spray paint was $1.96, and the 2 pack of Super Glue ran us $1.64. This brought the grand total to $12.70.
That's not bad is it? Leaves plenty of funds left over for perhaps another slot car right? Sure it does!
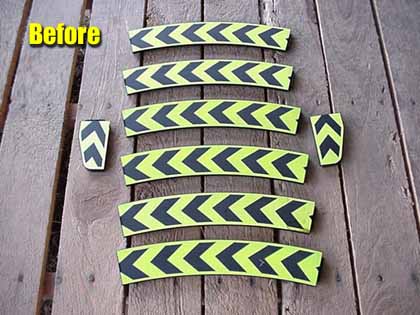
Now it was time to start construction. The first thing you might want to do is remove the turn borders and give them a good first coat of paint. While this first coat dries a little, you can keep busy measuring and cutting your walls the proper length. After cutting, return and give them the final coat. I used 2 full coats to get the yellow completely covered. Some may like the "construction zone" yellow markings on the borders, but I didn't. I chose gray instead of black because it just made a better looking transition form the track to the wall in my opinion. You could use black if you prefer it, this was just my personal preference. In any case, I think they looked a lot better after painting.

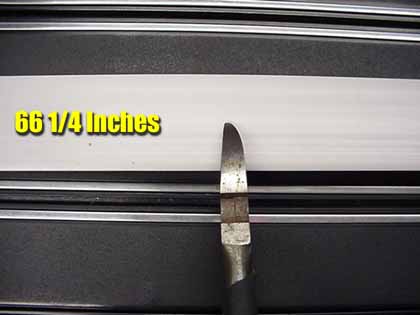
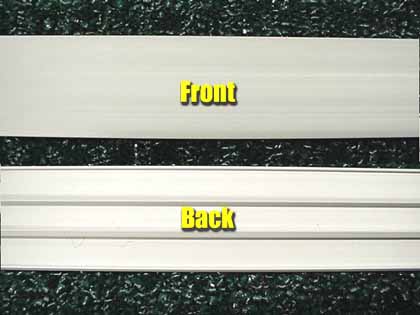
While the paint was drying, it was time to cut and fit the walls. I simply placed the wall on the track and wrapped it around from end to end, then marked my cut. The total length of the border for the Artin track was 66 and 1/4 inches from the flat side of each end border. The neat thing about these vinyl walls is the smooth texture on the front side, and the edges on the back side for easy mounting,. Almost as if they were made for us huh?
With the wall measured and cut, it was now time to mount my track a little more permanently to the table. This step is NOT required, but it does help reduce the track from moving around on the table while you attach the walls to the outside border. First we get our freshly painted borders and re-install them exactly the way they were originally. It only takes 2 of these nails placed as shown in the photo to keep your track secure. One on one side of the track, and one on the opposite side. I leave my nails in place, as sometimes people may bump the track retrieving a slot car, and these 2 little nails secure it better than you might think.
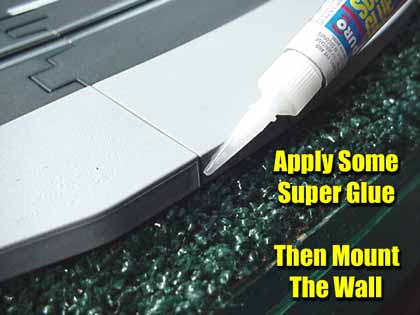
Next, I use the Super Glue as shown in the photo to aid you in mounting the walls. I run about a 5 inch long bead of glue from the area shown, back around the border. No need to hurry here, you have a few minutes before the glue starts to set, but don't take too long, after all it is Super Glue. I do this because it adds more strength to the wall while you wrap and pull the border tightly around the track.
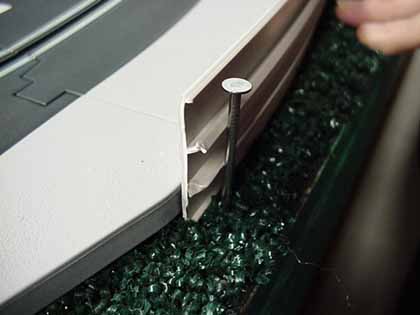
Time to install your wall. Place the wall as shown in the photo, and hold it tightly against the border until the glue sets. This usually takes about 30 seconds, then time for your first nail. Closely place the nail as shown and hammer away. I bring mine to the height even with the top of the border. The ribs on the back of the border really help in this process, and allow you to secure this wall without the heads of the nails over-lapping the wall. Again you can go deeper, but I have never seen the need to yet.
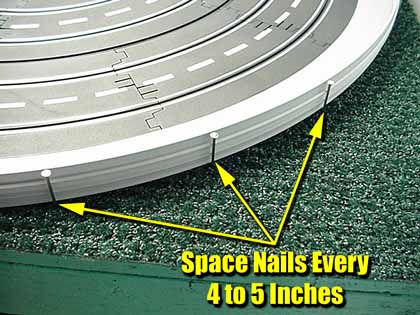
Now, simply bend the wall around the outside edge of the turn, placing nails every few inches, and securing them. Guess what? Your finished!
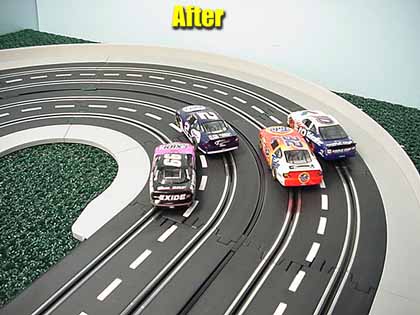
It took less than 30 minutes to have both corners completed on our small, but exciting Artin oval. We think it adds a nice level of detail, and improves the overall look and feel of the track. Not only does this improve things aesthetically, but these walls are TOUGH and can withstand some really hard hits. I have had these identical walls on my larger Carrera track for quite awhile now, and let me tell you with confidence that they will last you quite some time.
I hope this small project helps give you some ideas on your layout, and that it shows you how easy it can be to add that little extra detail.
Harry
As always, feel free to email me at wiseone@yhti.net about this article or just the hobby in general.
Or better still, drop into the Home Racing World Message Forum and let us know your thoughts.