
The Storm Continues…
Tuning The Fly Lister Storm
 Another
hot rod from Fly that has caught the eye of a lot of enthusiasts is the Lister
Storm. This car has been out for quite some time but new liveries keep coming
and give the home or club racer even more to choose from. This car is a winner
in 1/32nd scale as it is in real life, and worth a closer look.
Another
hot rod from Fly that has caught the eye of a lot of enthusiasts is the Lister
Storm. This car has been out for quite some time but new liveries keep coming
and give the home or club racer even more to choose from. This car is a winner
in 1/32nd scale as it is in real life, and worth a closer look.
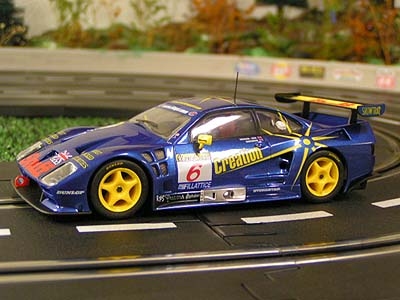
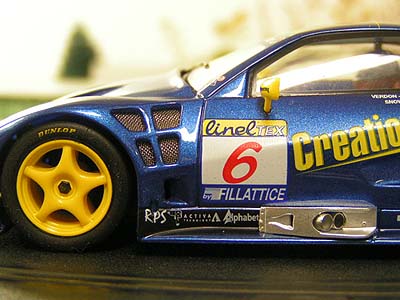
The first thing that strikes you is the looks of this car. Either you love it or hate it! I happen to like the overall look of the car and it gives me the impression that it is going 100 miles an hour sitting still. Detail on this car is simply outstanding. From the front grill and nose work to the metal etched grills and exhaust...we just think these are VERY well done and have become favorites of ours over the years. Of all the Listers we have in our collection, all of them have excellent fit and finish with Tampo stampings near perfect.

Some of the small details is maybe the one thing some racers don’t like. The small mirrors and antenna are fragile and won’t withstand a lot of hard tumbles and neither will the rear wing. Nevertheless, if Fly didn’t make them with this detail then others would complain of them lacking in scale authenticity. I like them the way they are and if I break a mirror...well I glue it back on and keep going. If you want you can also remove the mirrors before racing.

Under the hood is the standard Fly front motor configuration. Again, some racers dislike this setup but I find it reliable, smooth and very quiet compared to some sidewinder Fly cars I have. Maintaining this setup is not that difficult (if I can do it...) Moreover, once you complete a few simple steps you will have an even smoother, more enjoyable slot car.
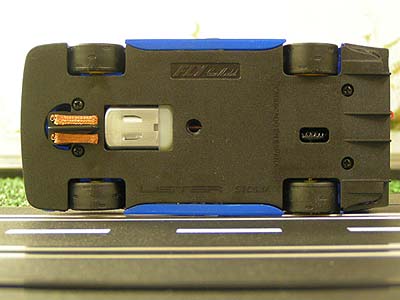
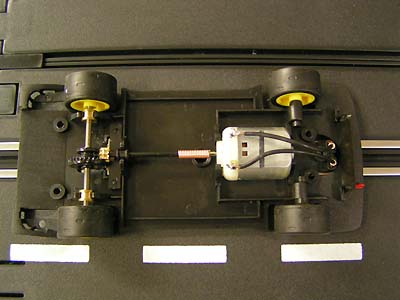
First, remove the 4 body mount screws and remove the body from the chassis. This chassis and body has a nice clean fit to it and removal is easy with no excess pressure or prying needed on the body. Once removed you can see the chassis detail consisting of the motor and wiring, spring mounted drive shaft with a 9 tooth pinion driving a 27 tooth crown gear and rear axle assembly.
Now depending on your style of racing dictates the next step we are going to cover. Underneath the magnet is a small, removable plastic shim. This shim can be left in place, or if you want more magnetic down force, you may remove it. I like the fact Fly included this shim, for it gives more diversity for the different driver preferences that exist today. In my case, I chose to remove this shim. I did so because my Carrera track is almost 3 times less magnetic as Scalextric or Ninco track, and it gave the car a little more solid feel in the corners, plus still mandating that you DRIVE the car, not escort your favorite magnet around the track.
I have changed to Artin Track and we still have kept the models in this same configuration.

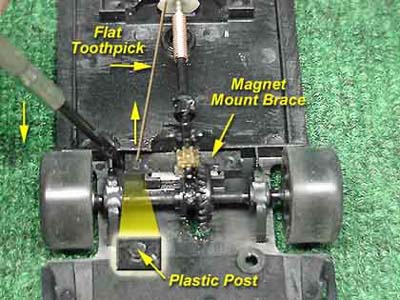
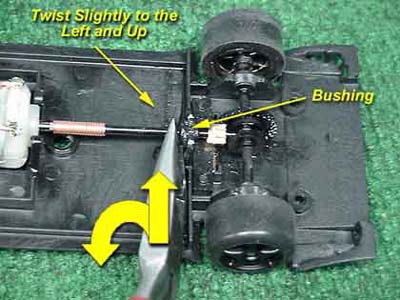
Removing this shim is accomplished by first removing the drive shaft assembly. Different methods are employed accomplishing this but I simply use needle nose pliers and place them flush with the front of the drive shaft bushing and while pulling up I twist the end of the pliers to the left as shown in the photo. I have used this method on all my front motor cars and not once have I damaged the shaft or spring assembly. Next, it is time to remove the magnet hold down bracket.
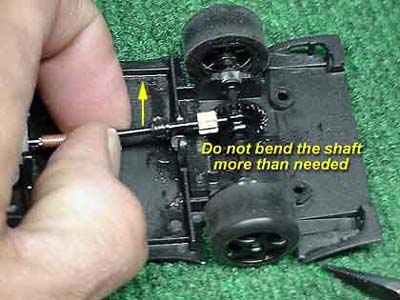
This bracket needs some care when removal, as there is small plastic shafts molded from the chassis, that the bracket mounts to. You can break this shafts of you apply too much pressure, or if you try twisting the ends of the bracket. To get good results, I use a small jewelers flat tip screwdriver and place it on the side of the bracket as shown. Then, I gently pry upwards until the bracket breaks free a little, then I go to the other side and do the same. Do this process evenly and in just a few seconds it will come off with no damage to the shafts.
Now the magnet should come right out...in fact will probably come out on its own sticking to the drive shaft. If not, use your needle nose pliers and the magnet will stick to them and come out freely. Now it might be difficult to see but the shim is directly underneath where the magnet was. Using the same small flat tip screwdriver you can pry the shim out easily.
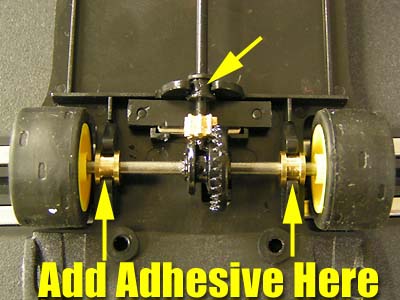
Now that this is done I use a small drop of Super Glue Gel in the magnet pocket, then place the magnet back in its original position then re-install the magnet bracket and snap the drive shaft bushing and shaft back in place. Once re-assembled I take a small drop of Super Glue Gel on the top of all 3 bushings to secure them. I use the Gel version because I only use this on the tops of the bushings because it holds them very well, and in the event you want to change motors, axles or gears it is fairly easy to remove them. If you use the regular Super Glue it could run into and around the bushings making it VERY difficult to remove. If you are not pressed for time try using “Shoe Goo” a clear silicone found in any discount store on the tops of the bushings to secure them. This works great as well and removal is just as easy. I have tried both ways with excellent results. Next, take some plastic compatible oil and add a drop or two to the bushings, motor shafts, and motor itself. Now you are ready to re-install the body and let the rubber meet the road!
 There
are a lot of different methods out there for doing this and most all render the
results the user wants. This is in no way the perfect way but it is the way that
has worked for us for years, giving us smoother running...more enjoyable slot
cars.
There
are a lot of different methods out there for doing this and most all render the
results the user wants. This is in no way the perfect way but it is the way that
has worked for us for years, giving us smoother running...more enjoyable slot
cars.
- Harry
As always feel free to contact me about this article or just the hobby in general at harry@homeracingworld.com, or better yet drop into our Message Forum and share your thoughts with other enthusiasts!