
Tuesday January 13, 2004
Fly Ferrari 365 GTB/4
24 Hours Le Mans 1974
 The
latest Ferrari effort by Fly Car Model has found its way to our shop and we
looked forward in getting it to the track quickly. Arriving safe and intact from
Scalextric-USA it was time to see what all the talk has been about regarding
this model.
The
latest Ferrari effort by Fly Car Model has found its way to our shop and we
looked forward in getting it to the track quickly. Arriving safe and intact from
Scalextric-USA it was time to see what all the talk has been about regarding
this model.
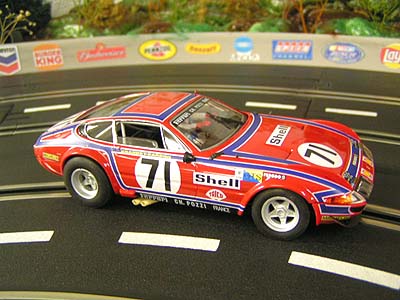
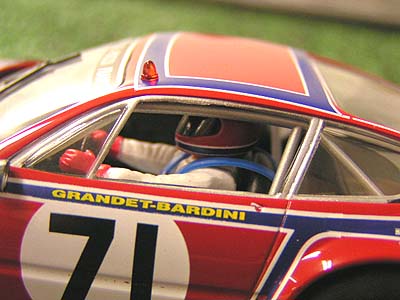
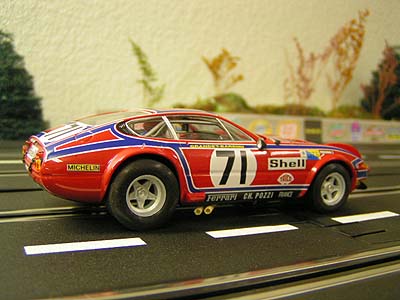
Out of the box I found this model to be stunning. Fly certainly can make beautiful models when they want to and this one is no exception for me. As far as overall shape, from the prototype photos I have seen Fly has done a great job...or I should say good enough for me. Some scale enthusiasts had concerns to the overall low appearance of the roof and possibly that it is too wide. Hopefully the photos provide all the information you need to make up your mind on these issues.
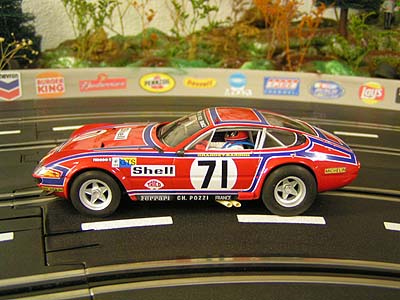
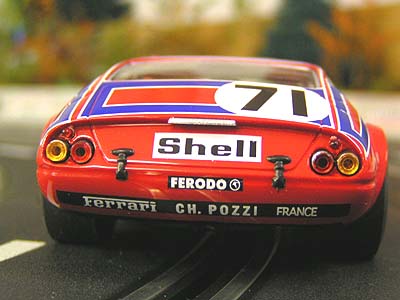
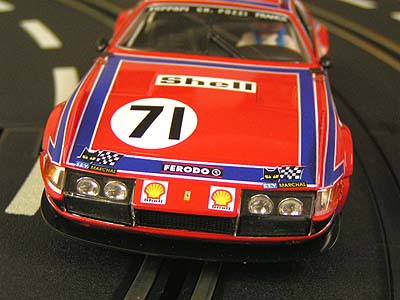
Tampo-stampings were very well done although I did notice some fades inside the door line on both sides of the model. Again it does seem that the clear-coat was applied before the markings leaving them unprotected, but this is nothing new and adding this clear-coat is not that difficult. Body fit is fair although I did notice that the front clip was slightly out of place, showing small gaps on each side of the model. The front spoiler is a very flexible plastic part that has so far shown itself to be durable enough to take some hard crashes, of course time will tell just how much it can take.
Detail level is enough to satisfy almost anyone in the hobby with a full interior including driver, roll cage assembly and although it is hidden, the dashboard has excellent markings to it. This interior is post-melted in place as usual, but I found out quickly that it will pop loose from the 2 rear posts rather easily. This is fixed with minimal effort applying some adhesive but can cause an excess rattle within the car during operation so if this happens to your model, check the interior tray.

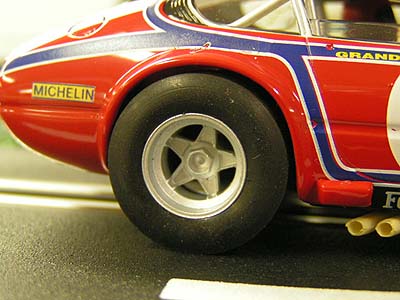
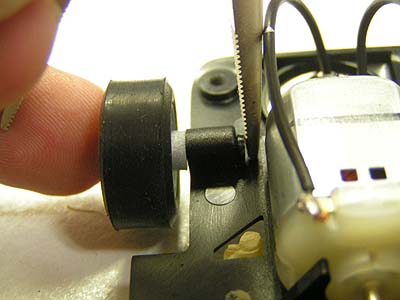
Wheels and tires on our model were a decent effort and the wide rear tires provide excellent grip. They did require a good sanding to true them up where we like them but this can be said for almost any model released today. The front axles are of a stub design due to the front-motor configuration and have some excess free-play to them out of the box. On our model we simply pressed on the front wheels a little more to make sure it was secure on this shaft and this eliminated a good portion of it. We do this by removing the body and placing one end of our needle nose pliers behind the stub axle head and then push on the wheel by hand.
But the big question was: "Will it run out of the box?" After adjusting the braid slightly to fit our Artin track rails this model did run. In fact it ran rather well with no tire truing and we clicked off about 25 laps before the drive-shaft bushing finally popped out of the mount. I didn't notice any wheel rub in the rear although it is VERY close due to the size of the tires. Again, a good tire sanding will bring these down a little but the important part was that out of the box...this car functioned as intended.
So what do you do when this happens? Well if you are just joining us in this hobby, front-motor configured cars have a long history of this issue but it is easily fixed. You have to get inside and snap this bushing back in place and add some adhesive on top. To get inside we see 3 screws that mount the body to the chassis and they were easily removed and I found the chassis to body fit to be surprisingly good.
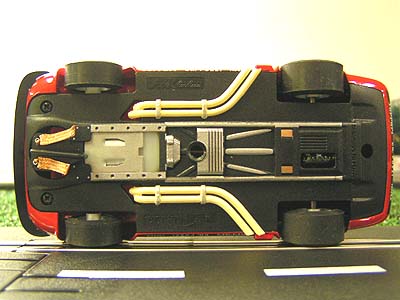
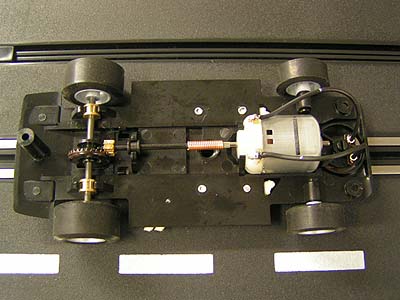
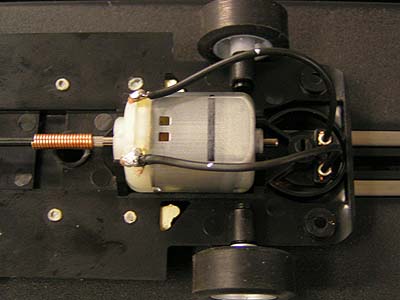
You now see the standard Mabuchi motor sitting in this front motor configuration with a drive-shaft assembly to the rear. The drive-shaft is equipped with a 9 tooth brass pinion driving a 27 tooth plastic crown gear. Also below the drive-shaft you see the Fly standard bar magnet that is held in place by 2 tabs on the chassis. The best way to remove this magnet (if you want to) is to just bend the chassis slightly in your hands allow these tabs to spread out and the magnet will pop right out and stick itself to the drive-shaft.
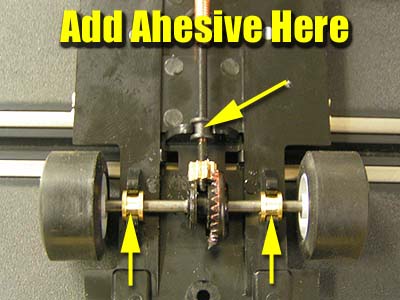
The rear brass bushings were very snug in the chassis, but as a preventive measure we added a small drop of clear silicone on top to help prevent any future problems. As stated earlier, here is where you can fix your drive-shaft bushing the same way by snapping it back in place and adding some adhesive to the top to keep it secure during racing. While you are under here, go ahead and add a few drops of oil to each bushing and each end of the motor.
Suggestion: I advise opening this model and securing these bushings BEFORE you ever race it. This is a quick and easy preventive measure that will help you get the most out of this model.
Now that the bushings were secure it was back to the track for another run. We sanded the tires up slightly and set the timer for 50 laps and I let my wife give this car a good thrashing and then it was my turn. With the magnet in place we posted average lap times of 4.8 seconds with a best time of 4.6. Time to take the magnet out and try it again. With the magnet removed and no additional weight we posted average times of 5.4 seconds with an overall bets time of 5.1 (how she did that I don't know).
Adding lead here and there will help matters but the thing that stood out was a presence of a VERY slight wheel hop in the front end. Well I looked around my collection and could not find a tire to fit this wheel perfectly. The tire will not fit on the rear for quick sanding as the wheel rib is wider at 6.45mm with the fronts at 5.52. I took the tires and one wheel off and mounted them on a spare axle I have just for this purpose and fitted the assembly in my Dremel. After truing them up, the model really smoothed out and with more break-in it will only get better.
 So
in the end is it worth $69.95? That is up to you to decide of course, but I have
to say this model from Fly was not a bad effort compared to releases before it.
It did run out of the box and after 300 plus laps it is still going strong with
no signs of stopping. Die-hard Ferrari fans will no doubt be adding this to
their collection soon and based on our findings it might be a great addition for
you as well.
So
in the end is it worth $69.95? That is up to you to decide of course, but I have
to say this model from Fly was not a bad effort compared to releases before it.
It did run out of the box and after 300 plus laps it is still going strong with
no signs of stopping. Die-hard Ferrari fans will no doubt be adding this to
their collection soon and based on our findings it might be a great addition for
you as well.
- Harry
As always feel free to contact me about this article or just the hobby in general at harry@homeracingworld.com, or better yet drop into our Message Forum and share your thoughts with other enthusiasts!
Thanks go to Scalextric-USA for providing us with this model.
