
Wednesday March 17, 2004
MATCH UP!
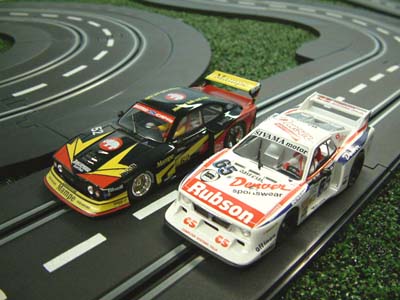
The Fly Capri VS The Fly Lancia
 If
there are 2 cars in our collection that we like to try and match evenly, the Fly
Capri and Lancia are near the top. The main reason is simple: We love these
cars. Since both of them first appeared, we have tried to collect them all, and
now Fantasy World is making it a little easier for you to grab a pair yourself.
If
there are 2 cars in our collection that we like to try and match evenly, the Fly
Capri and Lancia are near the top. The main reason is simple: We love these
cars. Since both of them first appeared, we have tried to collect them all, and
now Fantasy World is making it a little easier for you to grab a pair yourself.
For the most part in our home racing, we don't really spend a lot of time trying to match cars evenly. Years ago we certainly did, given the fact we had no where near the choices and selection we have today. However these 2 models logically seemed destined to battle it out here, and after a few different methods we settled on one that is not only easy, but inexpensive.
Both of these models are very attractive to us. Most all in our collection have excellent markings and smooth paint, although a couple here and there have had small issues such as lack of clear coat, which was easily cured. Although employing different drive-line set-ups and magnets, these 2 rivals can be tuned closer than you might think. However, before we get to the matching part, there are a few things you might want to do in order to get the most out of each model.
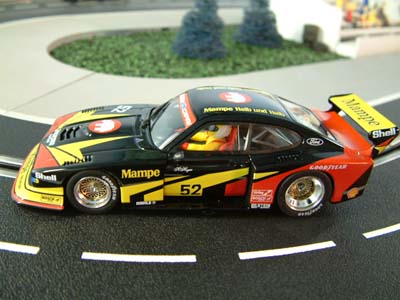
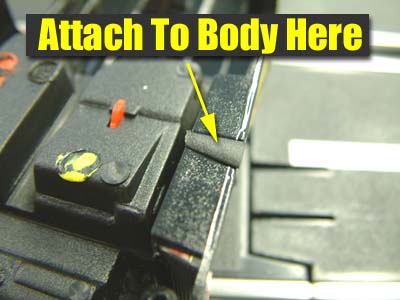
The Capri has been a long time favorite here, and for good reason too. Once this car is tuned, it offers you some great driving, and of all the front motor models Fly makes, this one ranks right up there with the Lister Storm for us. Yet, nearly all these front motor models need a little elbow grease on your part, and the Capri might need a little more. The Capri has a molded exhaust on the chassis that seems fragile while you are trying to work with it, and sometimes it will break. The best way to fix this is to simply glue it on the body as shown in the photo. This is just the way it looks when you have re-assembled the car, and at least for us, we cannot tell it was ever broken.

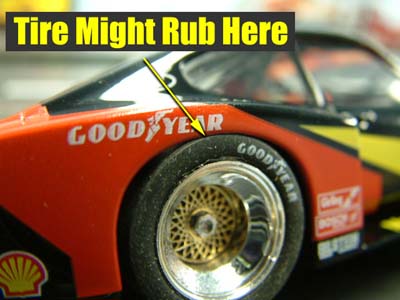
The main issue you might find is that the rear wheels on the Capri might be rubbing on the body as shown in the photo. I have some models that are just fine, but every now and then I get one that needs to be modified. There have been many ways other enthusiasts have cured this problem, from just sanding down the tires, or replacing them with silicones, while others have resorted to sanding the inside of the body. I take a slightly different approach, and the results have always been very positive.
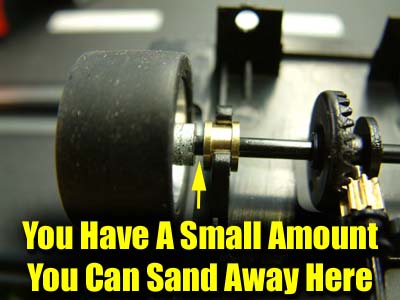
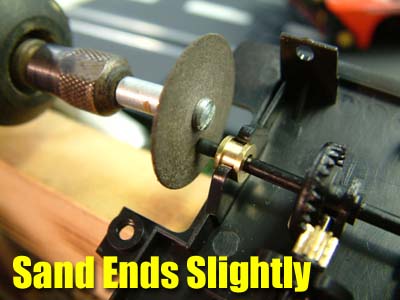
After removing the body, I use a twisting motion and remove both wheels from the axle. Then using a standard cut-off disc in our trusty Dremel, I lightly sand the ends of both axles. I am sure some folks might advise removing the axle for this modification, however the sanding required is very minor and what little heat you cause by sanding will not harm the chassis or bushings, and while it is in the chassis it is held in place rather tightly so it is easy to work with.
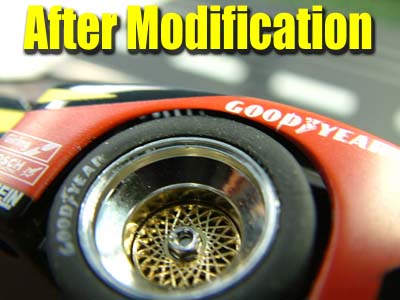
It usually only takes about 10-15 seconds on each end of the axle, and you are ready to test fit your wheels. As you can see in the photo, you have enough room before the wheel will touch the inside of the chassis to sand away. This is just enough to give you the clearance you need on the outside to prevent this rubbing. Continue to do this until you get the wheels where you want them, you can see easily if you place the body back on the chassis temporarily. Sanding these tires true also helps, and combined with this modification has given us trouble-free racing for a long time now.
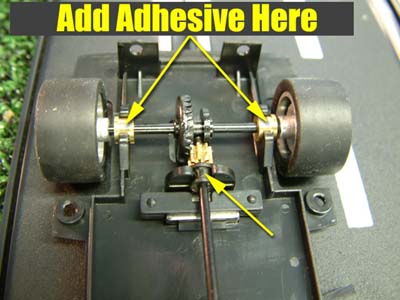
After you have completed this, it is time to address the bushings. As with all front-motor cars you will most likely need to add adhesive to the bushings to prevent them from spinning in their mount, or popping out altogether. I use regular Super Glue for my models, but there different adhesives other enthusiasts like to use as well. A clear silicone adhesive such as "Shoe Goo" or Black Silicone Gasket Adhesive works just as well once you allow it to dry, and if you plan on replacing these components later, they are much easier to remove.
![]()
Now depending on your preference, the magnet in this model can be lowered even closer to the rails by simply removing the shim. For matching this car to the Lancia, we leave the shim in place and do not perform any other modifications. You can of course add, or take away, the magnet (s) if you so desire to suit your tastes, this again is just the way we prefer them.
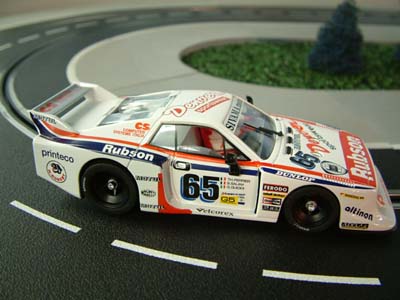
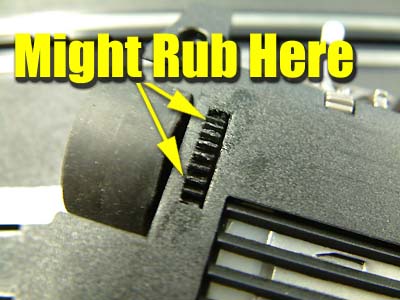
Now that you have completed the Capri, it is time for the Lancia. This model utilizes the Fly B34 rear pod assembly and the B21 button magnet. This magnet is plenty strong enough, and we leave it in place with no modifications. However, this model also might need a little tuning in the rear to get it as smooth as possible. In some of the Lancias, the major culprit seems to be the amount of free-play in the rear axle, causing the spur gear to rub slightly against the chassis as shown. This is not present on all models however, as our first 5 models didn't seem the have this issue, so of course check your model to see of this modification is needed.
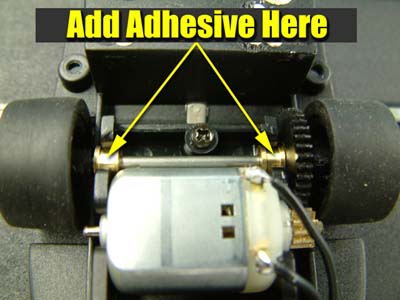
Luckily, the cure for this problem is very easy, and in just a few minutes you will be on your way. First, I would suggest using the Fantasy World Slick 7 axle spacers # SLIS738. They are 3/32 inside diameter and .015' thick and are a perfect fit for your Fly and other 3/32nd axles. We place one spacer right between the spur gear and bushing as shown in the photo. You must remove the axle assembly completely to perform this, and once you have completed this side, you will find you might need one more on the other side as well. Simply install this between the bushing and wheel as shown, and re-install the wheels.
![]()
![]()
Also, you might want to again add some adhesive to the rear bushings as you did with the Capri. Our Lancia didn't show any signs of these bushings spinning, however we glued them anyway for a preventive measure. Now this model will run much smoother, combined with some tire sanding to true them, or at least it does in our testing. The only problem we seem to find is that the front end of the model is very light, causing sometimes erratic electrical contact and reduced performance. You can simply add lead weight here if you do not want to use magnets, however, we have found that the use of a Tweaker magnet works perfectly.
![]()
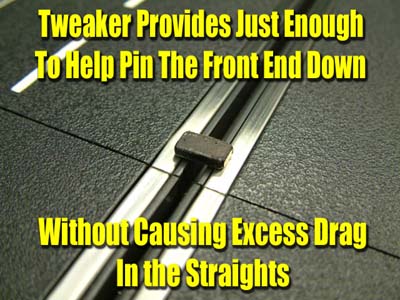
We place the Tweaker right behind the front body post using Super Glue. This magnet, although rumored to contain Alien qualities found at Area 51, does not add that much magnetic drag, especially given its placement and distance from the rails. As you can see, the magnet on Carrera track covers a slight amount of the rails down the straights, preventing excess drag. It does however provide just enough down-force to help keep the front pinned down, and when this car begins to slide, and the button magnet breaks free, allowing a little more cushion as the Tweaker is slightly wider. It allows you just enough added correction time to very closely match the Capri's driving characteristics.

This is all we do to match these cars, and once performed, you should find the Lancia and Capri to be VERY competitive. On our Carrera track using the DS Timer, we have an average of 3.4 seconds for the Capri, and 3.5 for the Lancia. This is about as close as we could get, and it is certainly close enough for our home racing. Each car still has its own distinct handling given the wheelbase difference, drive-line configurations and magnets, yet we have managed to have hours of close, satisfying racing pitting them against one another.
 Of
course given the amount of liveries that Fly has brought us in both of these
models, you could just skip this whole process and race them Capri against
Capri, Lancia to Lancia. But for those who enjoy the tuning process and don't
mind taking a little time, you can in effect double your fun.
Of
course given the amount of liveries that Fly has brought us in both of these
models, you could just skip this whole process and race them Capri against
Capri, Lancia to Lancia. But for those who enjoy the tuning process and don't
mind taking a little time, you can in effect double your fun.
Harry
As always feel free to contact me about this article or just the hobby in general at wiseone@yhti.net, or better yet drop into our Message Forum and share your thoughts with other enthusiasts!