
Upgrading Artin!
Improved Power and Control
PART ONE - USING ORIGINAL POWER BASE
November 24, 2002
![]()
As mentioned before in my Artin Review, two weaknesses of this track system is power and control. The time may come when your interest grows, and you want to upgrade both these components. Well, there are a great many ways to do this, some are more expensive than the other, and you will have to decide which route is best for you.
The following upgrades listed here are ones that I found to be both rather easy, and/or inexpensive. Some may appear difficult due to wiring, yet with a little patience, you can be finished in a couple hours. The first upgrades are based USING THE ORIGINAL ARTIN POWER BASE, and later, will offer you some alternatives in using different power systems in Part 2.
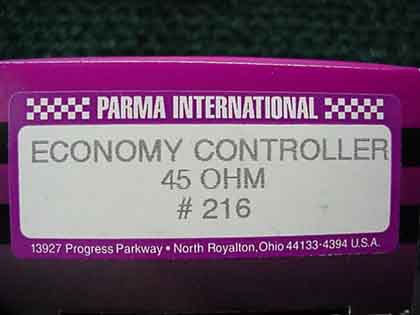
The first items I will address are the hand controllers. For this article, I will be using the PARMA Economy 45 ohm hand controllers #216, as they offer exceptional quality and value. Some might want to use the 25 ohm model, and that is fine, the wiring for the controller is all the same. For the price of $20.00, these controllers offer you excellent quality for very little investment. We have used these same controllers for 3 years+ on our larger Carrera track, and they have never failed us, so they were a natural choice.
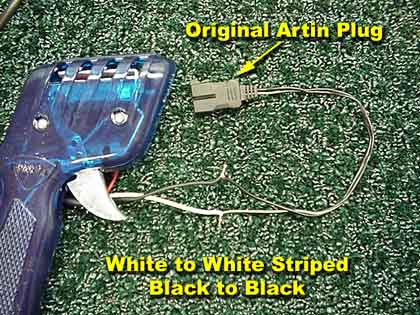
Using your original Artin plug, hook-up is very easy. Simply cut the Artin plug at the desired length, then spread the ends and strip them around 3/4 of an inch or more. The Parma ends are already stripped, so all you have to do is remove the cut insulated ends. The white wire on the Parma attaches to the white-striped wire on the Artin plug, and black goes to black. Using the Artin plug and power base means you will not have brakes, so the red wire on the Parma is not used. Simply fold this wire back out of the way. We used a soldering gun and soldered these wires in place. You could easily just use electrical tape to secure this connection, or you could use electrical shrink tubing. In either case, I highly recommend soldering your wiring for the best connection and strength possible.
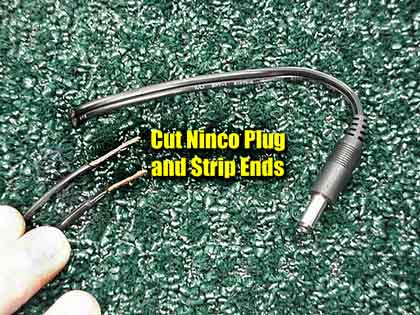
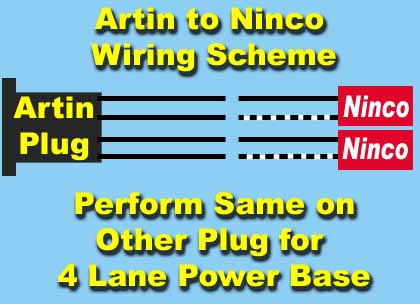
Now it is time to move on to power supplies. Again, there are many ways you can choose for this upgrade, however for this first suggestion, I used standard NINCO Transformers. I chose these as I feel they are an excellent upgrade, giving you plenty of amperage at a decent price ($19.95). Rated at 17.2 Volts DC and 800ma gives you a great increase in amperage. The fastest way to attach these to your Artin 4 Lane Power Base, is by using the original Artin plug.
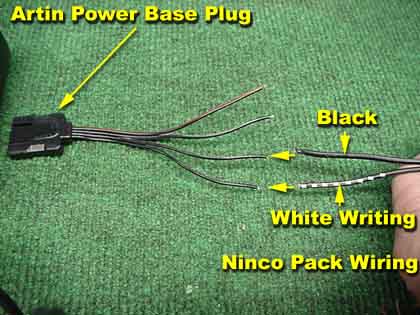
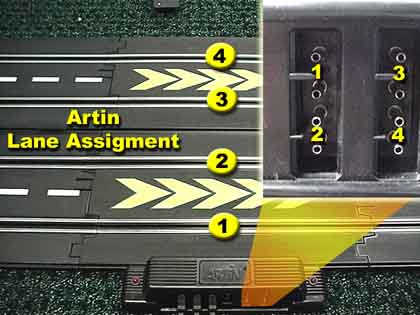
The Artin 4 lane power base IS wired for individual power per lane. The 4 prong male receptacle on the power base splits power for 2 lanes. Just by keeping all 4 wires flat, separate them as shown above, or follow the wiring diagram shown below. We disassembled the Artin 4 Lane Power Base and researched the wiring, and the diagram shows you how to separate the wires on your standard Artin plug to provide independent power per lane.
This upgrade is the exact upgrade we performed on our current 4 lane NASCAR oval. Even without the added braking feature, the racing is smooth, fast, and competitive. There are other methods as mentioned, but for a fast, easy, and economical upgrade, this worked very well. It took less than 2 hours from start to finish to complete our 4 lane upgrade. Not bad for an afternoon, which left plenty of time for racing:)

This is in no way the best way, just the route we chose. Regardless, this upgrade improved performance and our enjoyment of the system. Thanks to Artin track being as easy on the budget as it is, it makes upgrading it kinder on your slot car budget.
As always, feel free to email me about this article or just the hobby in general at wiseone@yhti.net or drop in our message forum and let us hear from you!
Harry
Parma controllers and Ninco Transformers acquired from Slot Car World.
