
Friday February 20, 2004
Roll out the Borders!
A quick, easy and relatively cheap way to add borders to any track
by Nils Frederiksen
 As
I worked over the winter to re-build my basement track, replacing the old
Scalextric Classic surface with new SPORT track, I ran into a problem many of us
grapple with: How do you add borders in an easy, good looking and economical way? I
race a fair number of cars without magnets, or with very light down force, so my
cars need plenty of elbow room around the corners!
As
I worked over the winter to re-build my basement track, replacing the old
Scalextric Classic surface with new SPORT track, I ran into a problem many of us
grapple with: How do you add borders in an easy, good looking and economical way? I
race a fair number of cars without magnets, or with very light down force, so my
cars need plenty of elbow room around the corners!
I’m not knocking the ready-made borders from Scalextric and other manufacturers. They are good looking and do a nice job widening the track and containing errant cars with guardrails. But, the standard borders fell short of my needs on several counts:
1. They looked a bit too “modern” for me – more like a current F-1 circuit than the “vintage” look I was going for.
2. While they widen the track a good bit, most border/guardrail combos are still not wide enough to allow many longer cars to swing out fully on sharp corners without clipping the rails.
3. Stringing together many separate sections of border pieces can result in a bumpy or choppy surface – interrupting those nice, smooth power slides.
4. Adding inner and outer borders around an entire track can easily match or exceed the cost of the track itself (ouch!).
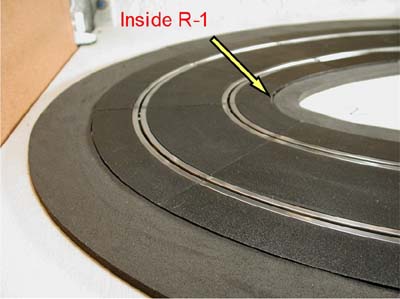
Thanks to a tip from Jim Butt, a wonderful racer whose 4-lane Scalextric track I’ve had the pleasure of driving on several times, I checked out Neoprene Foam Rubber Tape, and I love the results. The tape is a soft, smooth, flexible material that comes in numerous lengths, widths and thicknesses. The color and surface texture is a very close match for Scalextric track, it bends and curves very easily (I used the 1-inch wide border on the inside of several R-1 hairpin corners), it cuts cleanly with a sharp X-Acto knife and it comes with an adhesive backing that sticks to just about any clean surface.
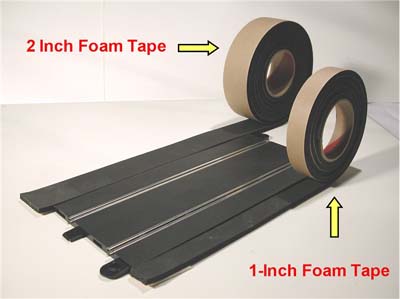
The foam tape is also fairly economical. For less than $30 bucks, including shipping, I bought two 50-foot rolls of tape (one roll of 2” wide and one roll of 1” wide) which was more than enough to wrap borders around my entire track. That works out to about 30-cents per foot to add borders to BOTH SIDES of a track. If anybody can find ready-made plastic borders for double that price I’ll eat a chunk of my neoprene foam!
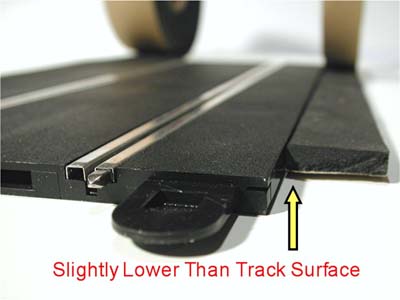
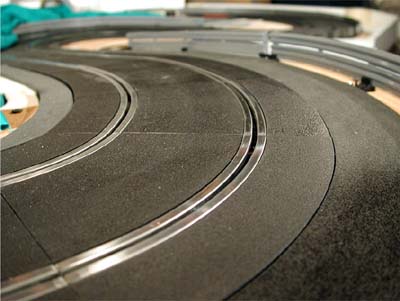
I used quarter-inch thick foam tape, which is just slightly lower than the surface of my Scalextric track. It’s not enough of a drop to cause any car to bottom out (at least none that I have tried), and the small drop doesn’t seem to upset the handling of cars. Instead, the cars I run seem to be much happier with the nice, smooth surface they can slide out onto.
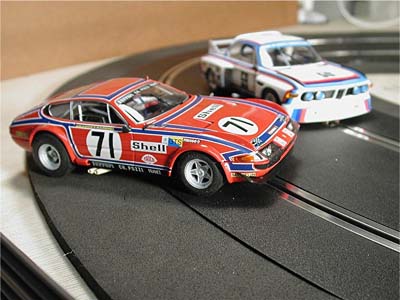
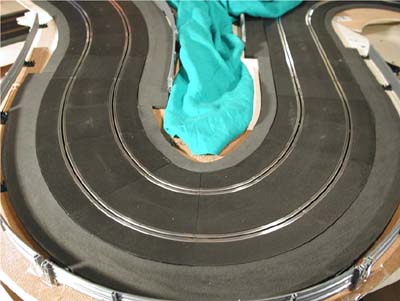
I laid 2” wide tape around the outside of all my corners as well as anyplace else where cars might be prone to slide. I haven’t found a car that is long enough to stay on the track and drop its rear tires off the edge of a 2” wide border, so that’s wide enough for my tastes. Still, if you wanted wider borders you could always add another strip outside the first strip. I used the 1” wide border on the inside of all corners as well as along most of the straights.
The tape is fairly firm on the roll, but most of that stiffness is because of the paper backing to protect the adhesive. Once I started peeling the backing paper off the foam I found the foam to be extremely flexible and easy to curve, even inside the sharpest of corners. One tip: The adhesive on the back of the foam is VERY sticky and does not like to be relocated once you have it stuck down. I found it easiest to guide the foam tape into place with one hand while peeling the backing off with the other. After the first couple of feet you’ll quickly get the hang of it and then the process goes REAL FAST. I laid all the inner and outer borders around my entire 50’ track in a little less than a half hour.
As I start working on my scenery I have also experimented with painting some of the foam. I have found that standard acrylic model paints work fine. I plan to bring my plaster hillsides right up to the edge of the foam tape, and will then blend the dirt and grass colors of my trackside scenery into the borders. In addition, I have found that white vinyl striping tape sticks very well to the neoprene foam. I am placing those stripes along the inner and outer edges of the borders to simulate painted lines along the edges of the road.
I also plan to use some leftover strips of foam to add a bit of extra padding to the walls of my layout around certain key corners, taking some of the “thump” out of any off-track excursions. Finally, another benefit of the foam tape borders is that they keep my track from shifting around, but still allow a little room for temperature-related expansion and contraction and I can still lift up the track if I ever need to replace a section, replace power feeds or do anything else to the underside of the track.

I purchased my neoprene foam rubber tape from McMaster-Carr Supply Company (http://www.mcmaster.com/), which has a huge wide variety of hardware supplies available to both wholesale and retail customers. My box arrived the day after I placed my order on-line, which helped me get rolling with the border project even faster!
I hope this helps get you moving on a border project, especially if you’ve been sitting on the fence, trying to decide how best to go about it. As I move along with my scenery I will share some more pictures of how the foam can be blended into the landscape. Feel free to drop me a line of you have any questions or comments (nilshf@earthlink.net) and happy racing!
Nils