Friday December 14, 2007
Friday December 14, 2007
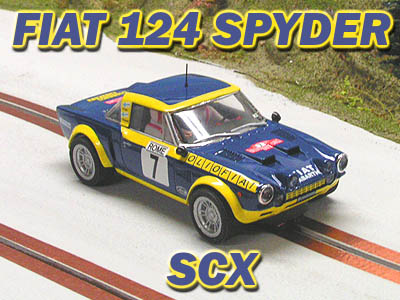
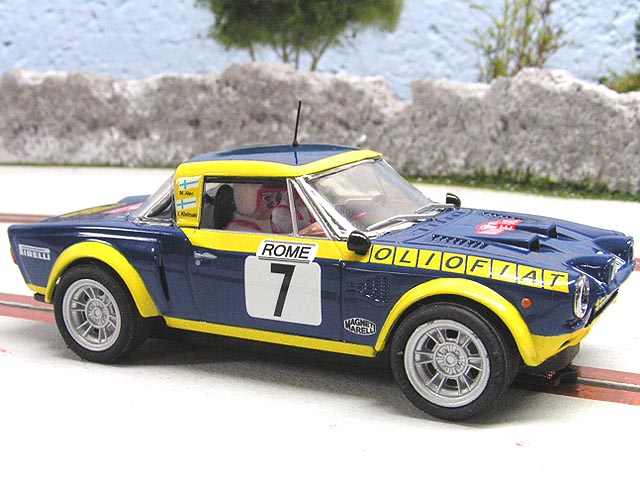
Although I do not have much interest in the 1:1 Rally series, I do enjoy the models in our scale. For years I have collected a few here and there but not once have I chosen an SCX. Why? Given all the other releases and series I collect, Rally cars are usually the last on my list and when I would see one I liked, it was by NINCO. But when I noticed this model in the SCX classic series it peaked my interest and it just arrived safe and sound from Slot Car World.
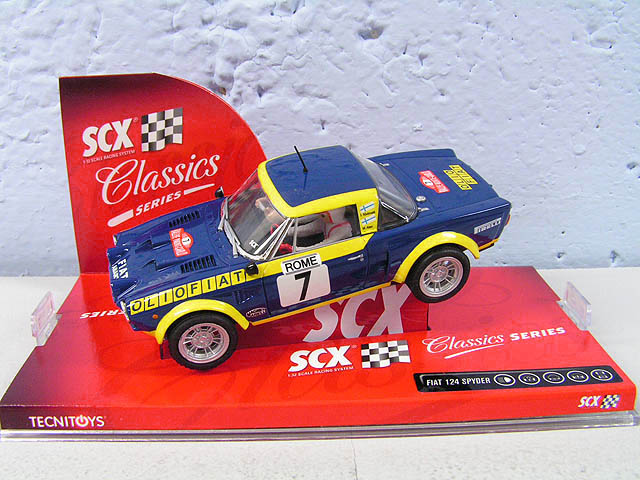
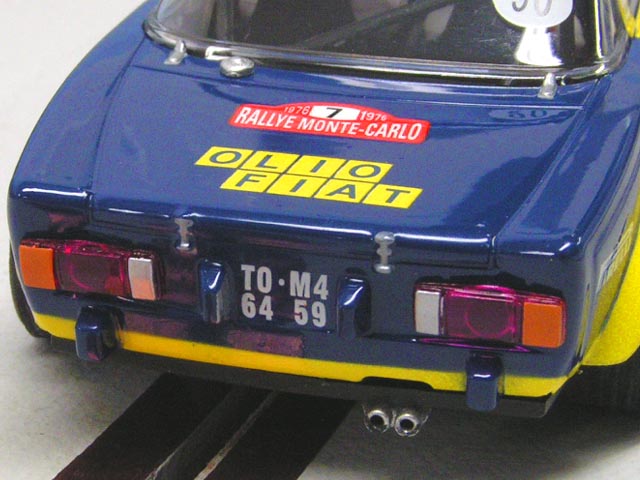
First impressions of this model were very positive as I immediately noticed a very high gloss clear coat sealing it. The paint is attractive and SCX has done a very good job in the overall finish. You can see a mile in the deep blue color and other racers here were equally impressed and surprised.
Surprised? Why? Well it was not that long ago that SCX just did not impress many people with overall fit and finish. I had no complaints really with my older Audis or Dome Judd but nothing ground breaking. On this little machine the effort put forth is certainly note worthy. Is it perfect? Of course not. I noticed very small areas of some over spray and slight bleed on some markings. Is it horrible? Not a chance.
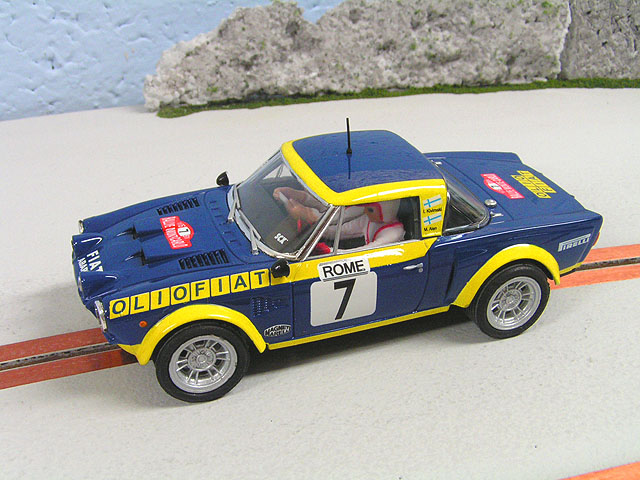
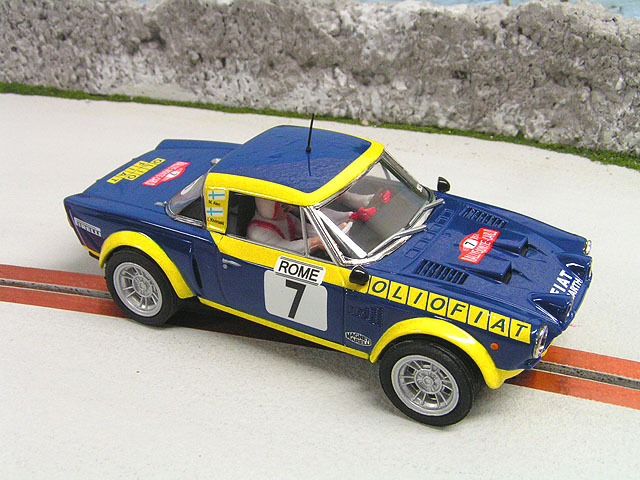
Looking around the rest of the model it appears they have done a fair job of bringing it in 1/32nd scale. A few prototype photos show some issues of course, but still close enough for me. Some of the front flood lights I have seen vary in sizes and it looks like these are on the small side, but nothing offensive.
And honestly, almost every person I showed it to did not even know what kind of car it was let alone if the front lights or fender flares were "off". This might sound incredible to some of you, but not everyone in my neck of the woods are experts in mid-70's Rally cars. In any event, for those that are hard core fans I will hope that the photos help you come to your own conclusions.
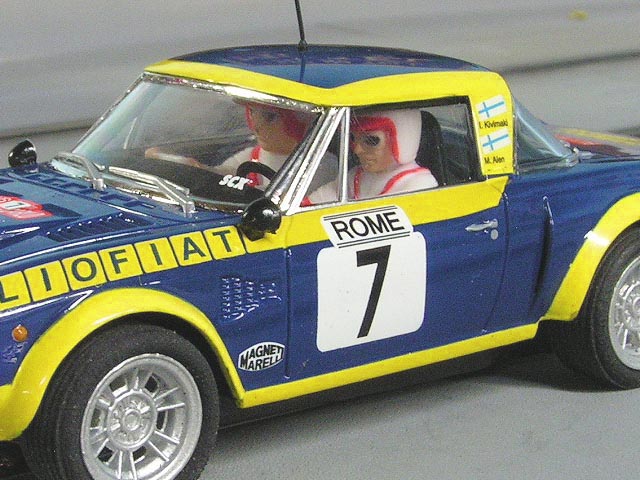
Detail level is nice enough as we have a driver and navigator present although the interior is little more than a flat tray. They still add realism to the model and it suited me well enough. I am one of those enthusiasts who fall in the middle on interior detail, where I appreciate the fine scale efforts put forth in this area, yet sometimes too much just interferes with the models' intended purpose: To be raced! Some of us appreciate the extra room an interior like this provides for our tuning purposes. Room for lead, or even magnets is much easier to find in these cases.
The wheels appear to be close enough according to photos I have seen, but you will notice the tires need some cleaning up. Our model had some fine flash molding all around the tire edges and they also needed some adjustments to sit on the wheel cleanly. Sanding tires is a task most all ready to run models need, so no major issue.

Box Stock Testing
Artin Plastic Track - Aftermarket Power @ 12 Volts - PARMA 25 OHM Control
Our first few laps with this little car were very pleasing although with the magnet in place your correction window for spin recovery is very limited. Acceleration and braking are crisp enough and it functions as intended. This shorter car will take some time to get used to and practice here is the first upgrade. We posted a 3.9 second average which is pretty good for a car right out of the box.
The only issue for myself is that I prefer a light, or non magnet action with my models, especially Rally cars. They just do not look right to me stuck down to the rails. They need to slide! However, we will get to that kind of action on the wood track. If you want more magnet, you can loosen the magnet pocket screws and drop it even lower to the rails. Inside there is room to add even more if desired.
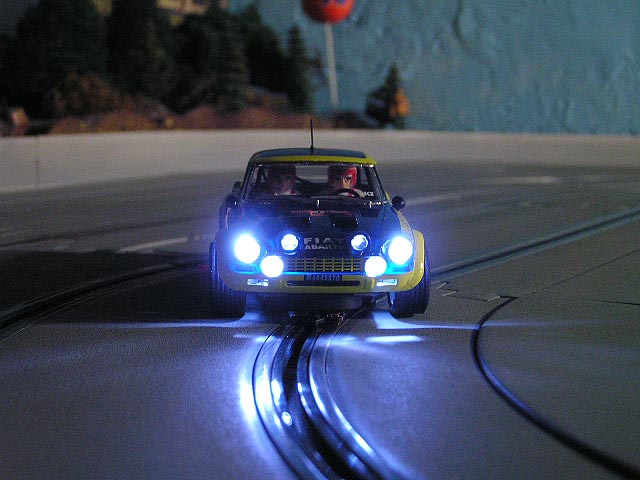
NOTE: This model is full lighted - Front & Rear (No brake lights). This added touch pleases me as we enjoy night racing and now this car will find a place in the rotation without the added expense of a light kit. This model is slowly proving to me to be a very good value.
Wood Track
Testing
3 Lane MDF Routed Wood - Flat Latex Surface
Copper Tape Conductivity - Aftermarket Power @ 12 Volts PARMA 25 OHM Control
Although the car was smoother than expected, there is some tire sanding and tuning needed. Operation through the corners is smooth enough but when you accelerate hard, a slight wheel hop is present. Many other brands of cars do this as well so I cannot be too critical here. Usually tire and/or wheel sanding cures this issue so we will perform this and see how things change. Lap times were in the 5.9 range and although not impressive, I did see signs of life with tuning.
Out of the
box the model works fine and you could have hours of fun with it.
If you would like to go a little further and try some simple tuning methods,
please read on.
Under The Hood -
Simple Tune Ups
(Fix It Again Tony)
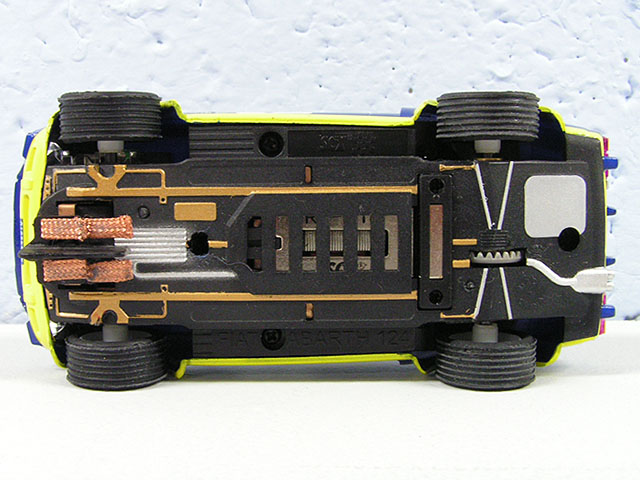
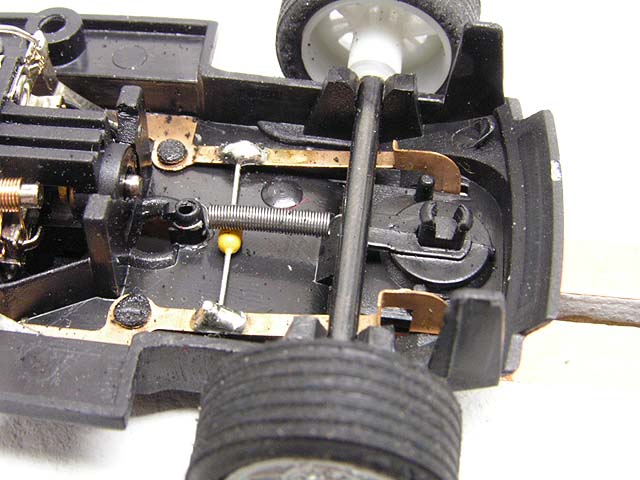
3 screws hold the body to the chassis and were easily removed. Inside we see the RX-41B motor that has a 9 tooth pinion turning a 27 tooth crown gear. Gear mesh was surprisingly smooth for a model with little break in time, so things should only get better.


The front has a standard guide with over-lapped braid. It does have some excess free-play to it and the power strips do hold it away from the chassis. This can be adjusted easily enough to allow things to ride better. I took a small screwdriver and pried up at the strips and this helped matters. This is only an issue when running non-magnet so if you keep the magnet in place, the car sits nicely. The guide has a spring at the rear that allows it to function as a self centering system and it functions as it should.
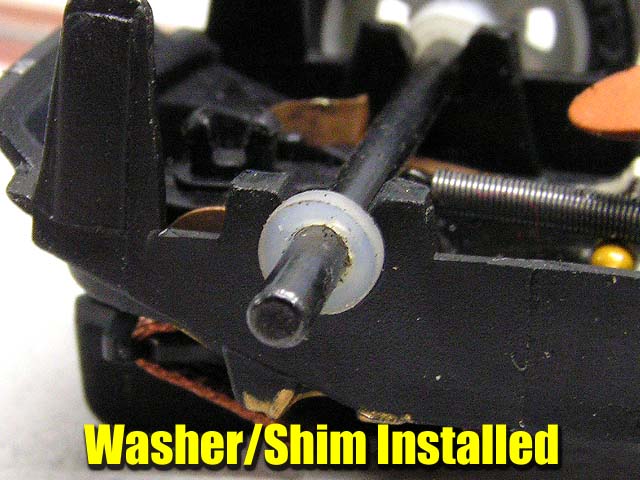
The front axle has a little more side to side free-play than I would prefer. You could trim the axle here but I added washers to each side to clean this up. There are a wide variety of washers and shims on the market so shop around and get yourself a good selection of them in various thickness. Many can simply be found at your local hardware store or home center.
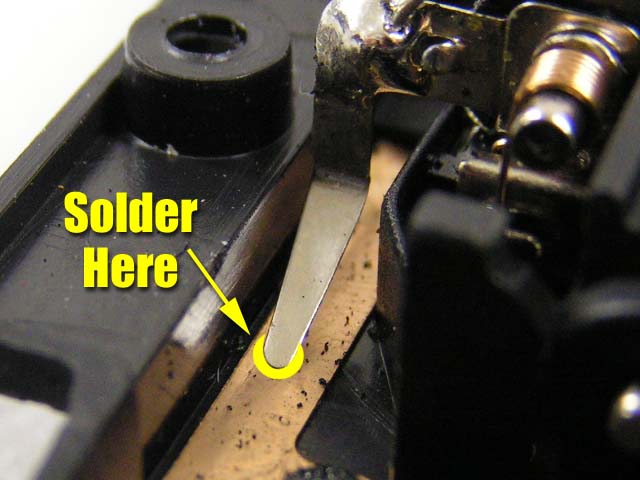
The next item is not really necessary, but I do it as a preventive maintenance step. The motor gets power from tabs that touch the power strip and although ours worked just fine with no signs of power loss, I soldered them in place to make sure. Again, you do not have to perform this step. It can be tricky and not all have a soldering iron. If you do see a power issue, just snap the motor out and bend the tabs downward to increase the pressure. Then make sure the areas where the tabs meet the strip are clean and you will be just fine.
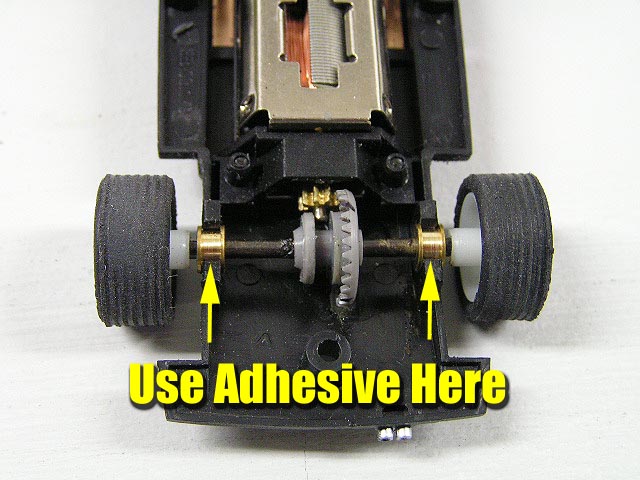
Next I observed the rear axle and one of the bushings would vibrate and spin under power. A simple light application of adhesive here will cure this issue. I used hot glue on our model s it holds the bushing securely, but is removed easily enough if you need to.
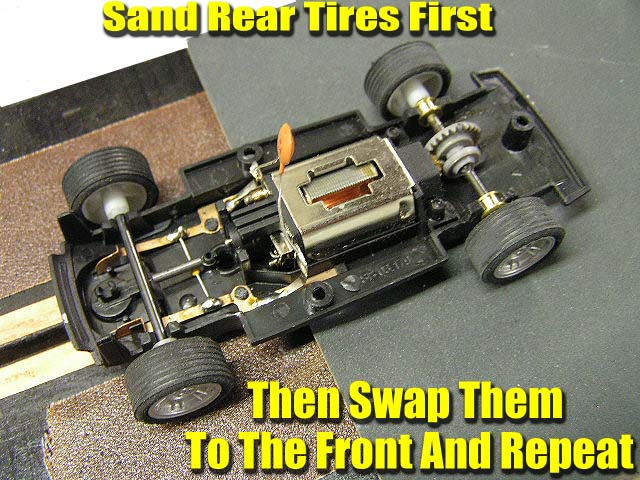
Finally tire and wheel time. I removed the tires and noticed some light flash molding on the inner ribs of the wheel. Nothing really glaring, but sanding this area will make sure all is clean and as round as possible. I have a sanding station which is just a block of wood with copper tape attached. (you can use an old section of track). I have a old set transformer hooked to it and I just pressed the rear wheels on fine grit sandpaper for a few seconds. This was that was needed to clean them up. NOTE: Try not to use a very abrasive paper. 500 to 800 grit fine sandpaper is ideal for wheel clean up.
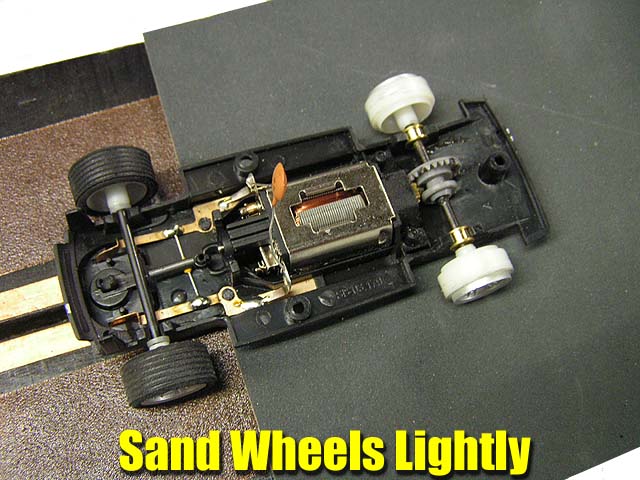
Now time for the tires. First, sand the rear tires and get them nice and true. After sanding, roll them across masking tape to clean any "crumbs" away. Now remove the front tires and move these clean sanded tires to the front. Install the front tires on the rear and repeat your sanding procedure.
Advanced Track
Testing
Wood & Plastic Tracks
The first lap told me we had hit a home run with our simple maintenance. On both tracks the model was much smoother and our wheel hop had virtually disappeared. Lap times fell too as on our Artin track we cruised to a 3.7 second average and the wood track seen much improvement with a new average of 5.4. The car is much more fun through all the corners and acceleration is much smoother with a nice quiet feel to it.
Final Thoughts
Years ago I purchased a couple SCX models (which will remain nameless) and they were very poorly designed which showed. Scale detail also suffered and overall I was not impressed. This was mostly why I ignored later SCX models and concentrated on brands that I was pleased with. Well, this is not the same SCX. First the NASCARS arrived and told me things have gotten better. Those releases prompted me to investigate further and try other models. I am glad I did. This little car has a lot going for it not only in fit and finish, but performance as well. No, it is not at the levels of some other brands but it is not far off. And that brings me to a very key point: OVERALL VALUE
Looking at some other brands of models with costs easily over $60.00 or more, SCX models at this time are well under this. Most are all under $45.00 if not even less. This to me makes these cars good choices for newcomers and also those veterans enthusiasts who have tighter budgets. They run and look nicely and will provide just as much fun as models costing almost twice as much. I will have another one of these, possibly a third for a re-paint. I think anyone in this hobby owes it to themselves to take a very close look at what SCX is offering.
- Harry
As always feel free to contact me about this article or just the hobby in general at harry@homeracingworld.com, or better yet drop into our Message Forum and share your thoughts with other enthusiasts!
Thanks Go To Slot Car World For Sponsoring This Review!