HO Penske Camaro Project
Part II: Prep and Painting
 This
is the second installment of my article on modeling HO slot car replicas of the
1968 Penske Racing Sunoco Camaro Z28 driven by Mark Donohue in the SCCA Trans-Am
and Bobby Allison's Coke-sponsored short-track race car. This segment covers
body preparation and painting.
This
is the second installment of my article on modeling HO slot car replicas of the
1968 Penske Racing Sunoco Camaro Z28 driven by Mark Donohue in the SCCA Trans-Am
and Bobby Allison's Coke-sponsored short-track race car. This segment covers
body preparation and painting.
Most of what I know about painting I have learned from books, Internet articles, and trial-and-error experience. I am certainly not an expert on these subjects, and there are many who are much more skillful and knowledgeable. This is just what works for me.
|
|
The steps in painting a slot car body are virtually the same as painting a real car, but on a much smaller scale. Preparation is the key to success – and fortunately, it's much easier to wet sand an HO slot car than a full-size car.
The first step was to sand the body with 600-grit paper, removing mold marks and seams. The 1970 Camaro started life as a Johnny Lightning pull-back car. I removed the orange Z28 stripes to prevent them from bleeding through the paint.
|
|
|
I was unable to find good reference photos for the Allison Camaro, although there were two black-and-white shots on Bobby Allison's web site that gave me a general idea of the paint scheme and graphics. Since this wasn't intended to be an exact duplicate of the real race car, I just wanted a guide to the car's overall appearance.
|
|
|
I use automotive lacquer to paint my slot cars. Unlike enamels, lacquer dries quickly and can be sanded and polished to a mirror finish. Companies such as Model Car World and Cobra Colors sell small quantities of automotive lacquer already thinned for use in an airbrush. MCW also lists paint colors for many 1:1 race cars.
The solvents in lacquer will attack styrene plastic, so a low-solvent primer must be used as a barrier between the color coat and the plastic. I spray a mist coat, a color coat, and then a wet coat of primer. When painting resin bodies, the primer is unnecessary.
|
|
|
Lacquer fumes are flammable and not very healthy for humans to breathe. This is my homebuilt spray booth, made from 1/2" MDF, fluorescent light covers, and a 16" x 20" furnace filter (which just happens to be the same size filter as our house heater). A squirrel cage blower on the back of the booth pulls the fumes and overspray through the filter and an aluminized clothes dryer duct vents the exhaust outside of the garage workshop. Clip-on lamps with daylight balanced bulbs illuminate the model during painting.
|
|
|
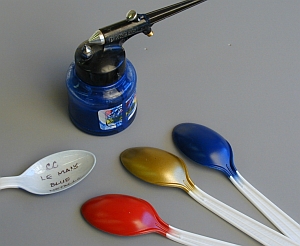
I read a tip in a modeling magazine about using plastic spoons to test paint. The spoon's curved surface mimics how the paint will appear on a car body. I record the paint number and name on the inside of the spoon for later reference.
I used Model Car World 2027 Sunoco blue for the Penske Camaro, and 2061 Coca-Cola red with 2002 universal gold for the two-tone Allison Camaro. The Sunoco blue looked too dark to me, so I added 40 drops of white to lighten it.
My airbrush is a dirt-cheap ($15) Badger single-action, external mix airbrush. It's more like a lawn sprayer than an airbrush, but it works well for my simple paint jobs. It can be cleaned in about 10 seconds when switching colors. I have a high-dollar double-action airbrush that stays its box because I use the cheapo Badger instead.
|
|
|
The first coat of primer revealed some seams and parting lines I'd missed when sanding the Camaro the first time. A little work with some 1000 grit paper removed the lines.
I also realized that the vent windows found on 1967 Camaros needed to be removed to create a 1968 model. I removed the window frames with a hobby knife and then smoothed the tops of the doors with a file and sandpaper. Then I shot another coat of primer, sanded with 1000 grit paper, washed the body in hot soapy water, and blew it dry with compressed air.
|
|
|
My original plan was to make the Penske Camaro's front spoiler from a piece of Lexan and sandwich it between the body post and the chassis. I thought that spoiler would be an early casualty on the race track, so this mounting method would allow the spoiler to be replaced easily after the inevitable crash. But the spoiler just didn't look right, so I came up with Plan B.
I cut a groove in the front valance panel with a .015" thick razor saw. Then I made a styrene spoiler that will be glued into the groove after painting. I had one chance to cut the groove in the valance panel correctly, and fortunately I got it close on the first try.
I found some pin holes in the front valance panel and the rear fenders where I had blended the new rear panel. I filled the holes with Tamiya putty and sanded the trouble spots after the putty had cured. Then I sprayed another coat of primer, sanded with 1000 grit paper, and declared the body ready for paint.
|
|
|
The Allison Camaro has a simple two-color paint scheme that required masking. My choice for masking is Tamiya tape. It has a low-tack adhesive and is very thin. I buy 1/2" wide rolls and then cut it into thin strips on a glass plate with a new blade. This produces a clean, sharp edge on the tape.
After applying the tape, I burnish the edges to the body with a plastic stylus and a metal embossing tool that's used for pressing paper into dies. I found the tool in the scrapbook section of a craft store.
Burnishing the edges of the masking tape is essential to getting a good edge and preventing bleed-under. A fingernail just doesn't apply enough pressure to seal the edge of the tape.
|
|
|
Here is the Allison Camaro after I sprayed gold lacquer on the hood, roof and rear deck. I removed the masking tape as soon as the paint was dry to the touch, then let it gas out for a few hours. |
|
|
Then I masked over the gold using strips of Tamiya tape. The body seam lines around the hood and trunk provided a good guide and a hard edge to burnish the tape. I masked the roof so that the red color would just butt against the gold.
|
|
|
Before spraying the red, I shot a coat of clear lacquer on the car. This seals the edges of the tape and prevents the second color from bleeding under the tape.
Then I sprayed red over the entire body. I applied three coats: a light mist coat, a medium color coat, and then a heavy wet coat.
I've learned that temperature and humidity have a big effect on how the paint goes on. On humid, foggy days, the paint looks dull and hazy. Although the haze can be polished out, it never looks quite right. On hot, dry days, the paint starts to dry before it hits the body, causing the surface to be rough and uneven. When that happens, I move the airbrush closer to the body and put on a heavy wet coat that will "flow out" as it dries. Too much paint can cause some orange peel as shown in this photo, but that can be fixed in the next stage.
This car was photographed under incandescent light, and the red looks rather orange in the photo. In reality it's a deep blood-red color.
|
|
|
After removing the masking tape, the two-tone paint scheme is revealed. There was a small bit of red bleed-under at the front edge of the hood. A little flaw adds some character to a race car – at least that's my story.
|
|
|
This next step requires a leap of faith. After the paint has dried overnight, I use abrasive polishing pads to color sand the surface. I start with 3200 grit, and sand lightly until the entire body is dull and all of the orange peel is removed. It's important to avoid sanding the body edges and character lines at this point – if you sand through the color and expose the primer, the body must be repainted.
Show cars typically have more coats of paint so there is less chance of sanding through. But for a race car project, I try to use as little paint as possible. Even a simple lacquer paint job adds .3 to .6 grams to the weight of the body – and more if a heavy metallic paint is used.
After the initial sanding with 3200 grit smoothes the surface, I use progressively finer abrasive pads: 4000g, 6000g, 8000g, and 12000g. About the time I begin to think the paint is ruined, it suddenly begins to shine when I sand with 8000 grit. And then a miracle happens with the 12000 grit – it looks as smooth as glass!
|
|
|
I finish up the paint preparation with Novus No. 2 scratch remover, applied with a polishing cloth made from an old cotton T-shirt. |
|
|
At this point I set the car aside overnight, enjoy an adult beverage, and prepare for the final assembly and detailing.
Continued in Part III of the HO Penske Camaro Project. |