HO Penske Camaro Project
Part III: Detailing
 This
is the final installment in a series of articles describing how I modeled Penske
Racing's 1968 Camaro Z28 and Bobby Allison's short-track Coke Camaro as HO slot
cars.
This
is the final installment in a series of articles describing how I modeled Penske
Racing's 1968 Camaro Z28 and Bobby Allison's short-track Coke Camaro as HO slot
cars.
This segment covers detailing and final assembly.
|
|
They say the devil is in the details, but detailing an HO slot car can be an enjoyable project if you keep the right perspective. At the end of the day, they're just toy cars, so they don't have to be perfect. I wanted to model as many elements of the real race cars as possible using materials I had on hand.
|
|
|
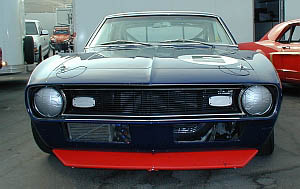
There were several items on the front of the real car that I thought I could model on my slot car: the headlights covered with silver tape, the aluminum-covered turn signals, the hood pins and the bright red spoiler that identified the car driven by Donohue. (The No. 16 car driven by Sam Posey and others had a yellow spoiler.)
|
|
|
I selected pins with small heads and then filed them to a rectangular shape for the turn signals using a diamond fingernail file.
|
|
|
The pin heads for the headlights and the trunk-mounted fuel filler assembly were sprayed with Tamiya aluminum synthetic lacquer from a rattle can. I was in a hurry and didn't prime the pins first – that was a mistake, because the silver paint didn't adhere well to the smooth metal.
|
|
|
The Model Motoring grille is chrome plated, while the real race car's grilled is matte black with chrome accents. I painted over the plastic chrome with flat black bottle paint. Before the paint dried, I scraped the edges with a toothpick to expose the chrome trim. This was only semi-successful because the textured grille surface didn't provide a sharp edge line. Looking back, I should have sanded the edges smooth before painting – something to remember next time.
|
|
|
I inserted small sewing needles in the hood pin holes and then looped No. 34 gauge armature wire though the eyes to simulate the hood pins and retaining wires. (This armature wire is sold for beading in craft stores.) I gently pressed the pins into the holes and pulled the armature wire through the hood. After securing the pins and wires from underneath with a drop of CA glue, I trimmed the ends of the pins with a wire cutter.
|
|
|
The spoiler was made from .020" styrene, painted with Model Master Guards Red enamel, and then glued into the slot in the front valance with CA glue. I held the spoiler in place with masking tape while the glue set. I figure the spoiler will last about five minutes on the track before it's knocked off in a crash.
|
|
|
One of Penske's "unfair advantages" was a quick-fill fueling system. The crew super-cooled the gas by using dry ice and acetone in a barrel around the fuel rig – the denser fuel allowed them to put 23 gallons of gas into a 22-gallon tank. In 1969 the Penske team mounted the fuel tank on top of a 19-foot scaffold so that gravity would pressurize the system. The high-mounted fuel rig was promptly banned by SCCA officials.
|
|
|
To model the fuel filler/vent assembly, I cut an oval from Bare Metal Foil matte aluminum and applied it to the trunk lid. Then I pushed the needles through the foil and then burnished the foil to the body with a wooden toothpick. |
|
|
I cut the pin head fuel filler caps to length and attached them with CA glue |
|
|
The rear taillights were glued with CA after scraping off the chrome on the back. After seeing this photo, I realized the red on the passenger side taillight covered the chrome trim on the bottom so I carefully scraped it off with a toothpick.
|
|
|
The stainless steel tubing exhaust pipes were glued to the grooves in the rocker panels with CA glue. |
|
|
A friend vacuum-formed the front and rear windshields from .010" Lexan using the original clear plastic windows as a male mold. The Camaro Bash rules allow replacing the windows with any material, so this was an opportunity to remove weight and lower the body's center of gravity.
I simulated the rear window straps on the race car by cutting thin slices of Bare Metal Foil black chrome and applying it to the Lexan.
|
|
|
The interior of the real Penske Camaro is stark – a roll cage, a single bucket seat, and lots of gray paint. The original red vinyl door upholstery seemed an odd touch to me, so I wanted to model the door panels in my HO version even though they would be difficult to see when the body is mounted on a chassis. |
|
|
I brush painted the inside of the body with medium gray acrylic. Then I painted Tamiya masking tape with flat red and cut out rectangular door panels. |
|
|
The masking tape door panels were applied to the inside of the body. The masking tape has just enough texture to suggest vinyl. I briefly considered making window cranks and door handles from metal guitar strings, but discarded the idea as being over the top.
|
|
|
Road Race Replicas offers five-spoke American Mag-style wheels that duplicate the wheels used on the Penske Camaros in 1968. The real racer has 8" wide rims on the front and rear, so I used two sets of RRR wheels to come up with four narrow wheels.
The RRR wheels are vacuum chrome plated, and looked too shiny. I sprayed them with Model Master Dull Cote flat lacquer to give them the appearance of machined aluminum. The spokes on the No. 16's wheels are painted gloss black, but I didn't have the patience or skill to attempt that.
|
|
|
Patto's Place offers decal sets for the '68 and '69 Sunoco Camaros. This was my first experience with Patto's "super quality" two-piece decals. White decals are first applied to body.
|
|
|
When the white decals are dry the colored decals are applied over them. The solid white base makes the decals more opaque than standard decals made on an ALPS printer so the body color does not show through.
|
|
|
While the decals were drying on the Penske Camaro, I went back to work on the Allison car. I'd read about using washes to accent body panel lines and decided to give it a try. A wash is thinly diluted paint that flows into the panel lines. I used the wash to accent the hood and trunk lines. I didn't like the look of the wash on the door lines, so I removed it with a Q-tip dipped in Windex.
|
|
|
I admit that I am a lousy painter. I find it very difficult to paint round details such as headlights and taillights. If I manage to get one side right, the other side is never the same size and in the same relative location.
My solution is to use Bare Metal Foil instead of paint. I use pieces of brass rod to cut out small foil discs. I sharpened the edges of the rod in a lathe, and then use the rod like a cookie cutter to cut through the thin foil.
|
|
|
Most short-track racers remove the headlights and cover the holes with sheet aluminum held in place with pop rivets. I simulated this on the Allison Camaro with matte aluminum foil applied over the headlights. Then I applied black foil to the grille and burnished it with a toothpick to pick up the texture in the grille opening.
|
|
|
The taillights received the same foil treatment, using 1/16" brass tubing to cut the foil circles. Strips of foil were applied to the door handles; I can't paint those little lines, either.
|
|
|
I also used Patto's two-piece decals on the Coke Camaro. Without the white underlay, the white decals would appear pink when applied over the red paint.
I use Micro Set solution when applying Patto's decals. The Micro Set softens the decal and allows it to conform to the body curves and panel lines. The solution actually begins to dissolve the decal, so touching the decal while it's wet will usually ruin it. I only had to redo a couple of decals on the Camaros after I'd made a mess of them.
|
|
|
I use Future floor wax as a clear coat over the decals. Future is a self-leveling acrylic paint that can be applied by painting it with a brush, spraying with an airbrush, or dipping the body in a jar. Unlike some solvent-based clear coats, Future doesn't attack the delicate decals.
After the decals dried overnight, I washed the bodies in detergent to remove the water residue around the decals and quickly dried them with compressed air. It's important not to handle the bodies after the final wash; oily fingerprints can repel Future and prevent if from covering the surface evenly.
I sprayed three coats of Future – a light coat to seal the decals and then two medium coats to build up some thickness over the decals. Even with three coats, the decals are still liable to be scratched in a crash.
|
|
|
Any dust that falls on the Future while it's drying is very noticeable on the finished car. After each coat I cover the bodies with a plastic storage bin to keep off dust and dirt while the clear coat dries. |
|
|
After the Future dries overnight, the bodies are nearly completed. |
|
|
The final step is to install the Lexan windows. I have ruined more windows and paint jobs at this point than I can count. After much trial and error, I have found a technique that works most of the time.
I carefully scrape off the paint and primer around the inside of the window so the glue has a clean surface to bond with. A slip of the knife at this point can destroy a paint job, so I take deep breaths and work slowly.
After trimming the Lexan windows to fit the openings, I tape them in place with strips of masking tape. All adjustments in position are done before the glue is applied.
I put a drop of thin CA glue on a piece of paper and let it sit for a minute. Allowing the super glue to "gas out" seems to eliminate the problem of the CA fumes fogging the Lexan.
Then I apply a tiny drop of CA glue to the edge of the windshield with the tip of a toothpick. Capillary action pulls the glue between the windshield and the body. I press them together with the tip of a tweezers and count to 20 while the glue bonds. Then I put another small drop on the next section and repeat the procedure. After the windshield has been glued in four or five spots, I carefully remove the masking tape and finish gluing the windshield in place.
|
|
|
I was 18 years old when Penske and Donohue dominated the Trans Am series in 1968. I couldn't afford a Z28 back then, and I certainly can't afford a vintage Penske Camaro race car now. But with a few days of work and very little investment, I was able to recreate a car that I had admired for nearly 40 years.
The placement of the Goodyear and Champion decals varied from race to race, probably depending on what body panels had to be replaced or repainted before the event. I modeled my slot car after this photo of Donohue's winning car at Bridgehampton. I think it's a pretty good likeness.
|
|
|
The finished Camaro slot cars are ready for some quality time on the track. I boxed them up and sent them to Virginia for the HO Slot Car Modeling proxy race. I only hope they run as well as the real race cars that inspired them.
-Rick |