
Tuesday February 05, 2008
Tuesday February 05, 2008

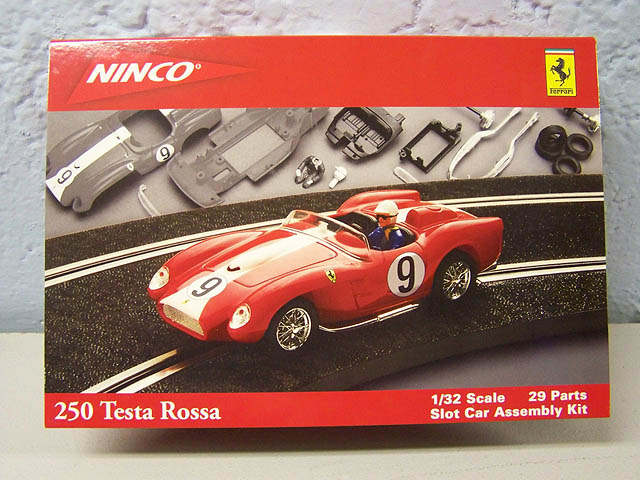
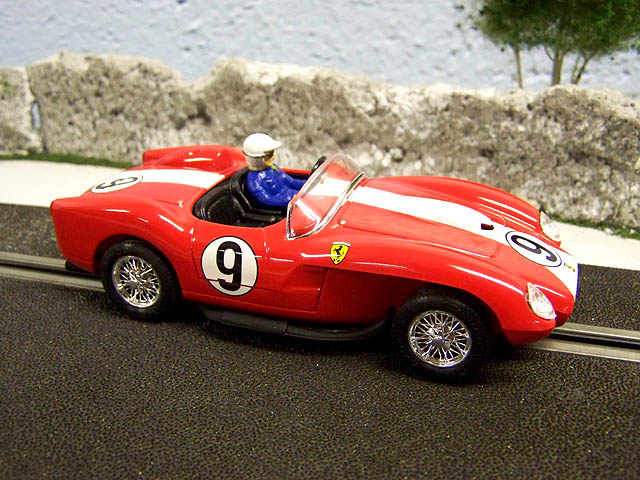
NINCO Ferrari 250 Testa Rossa
This latest kit from NINCO is one that I could hardly wait to get my hands on. The Classics that they produce are not for every enthusiast out there, but over the years they have become one of our top shelf favorites. Some of the most satisfying slot car racing I have had has been with these cars so I looked forward to building this legendary Ferrari and start mixing it up with the others in my collection.
It is sort of ironic for me that this particular model was chosen as a release. With all the classics I have in my collection, I did not own any of the Ferrari. Of course I had plenty of chances over the years but as usual I passed them up for other models. By the time I really wanted some of them the collectors prices they were now bringing spoiled my chances of having any.
This is why I was like a 5 year old at Christmas when the box arrived safe and sound from MRC. I eagerly opened it up and dove right in to get started in construction. I like these kits because it offers something a little different, but it also combines 2 great hobbies; Model building and slot car racing into one.
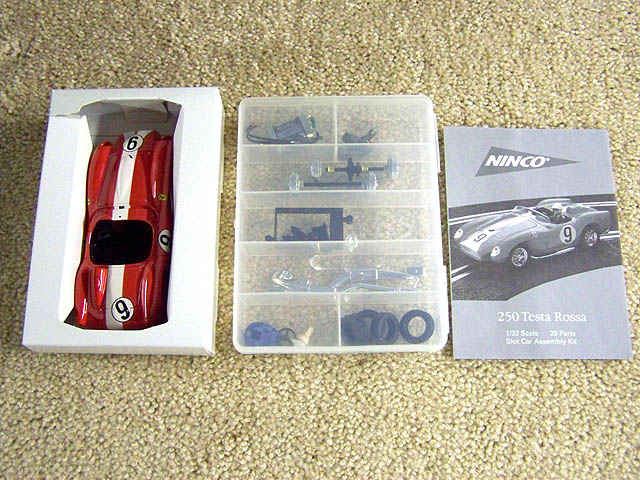
The box comes with a nice plastic case that holds all of your parts and a separate area for the body. I inspected all the parts to make sure it was complete and then it was time to check out the body.
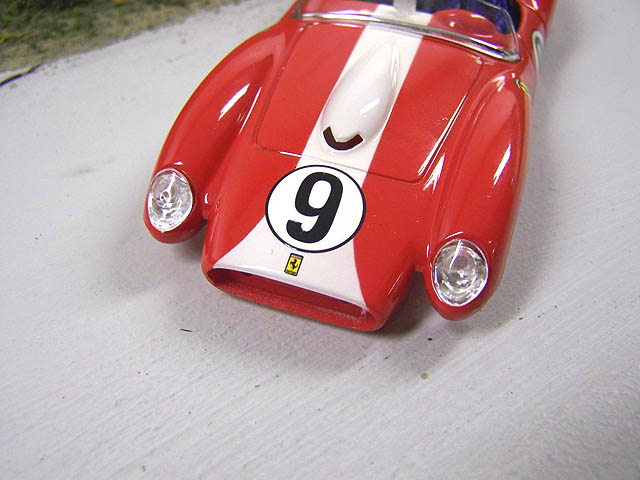
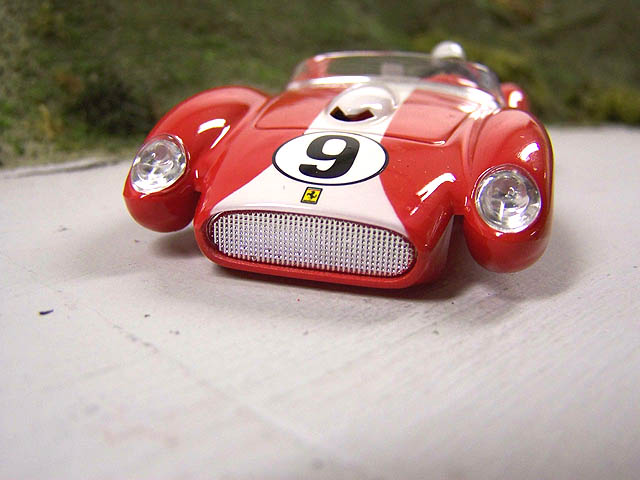
Some may not agree, but I find the livery on this model very striking. The deep red with the white contrast just appeals to me. Overall the paint work is great except there were very small wrinkles in the number boards, perhaps a reaction to the clear-coat. It is not too offensive as it is very hard to spot, but I must mention this for those that care. It certainly will not stop me from enjoying the model on the track.
This is my 3rd kit in this series and like the ones prior to this, assembly is pretty straight forward and easy enough for just about anyone to accomplish. The directions included are simple to follow so it was time to get started.
NOTE: You will need a few tools and materials to complete this model as shown. Make sure you have a good quality small cross tip screwdriver, modeling adhesive (such as Testors Brand) or hot glue gun, and some fine grit sandpaper. A small needle nose pliers is not required but advised. Also have some light oil on hand for lubrication.
STEPS 1-2-3
Motor Assembly
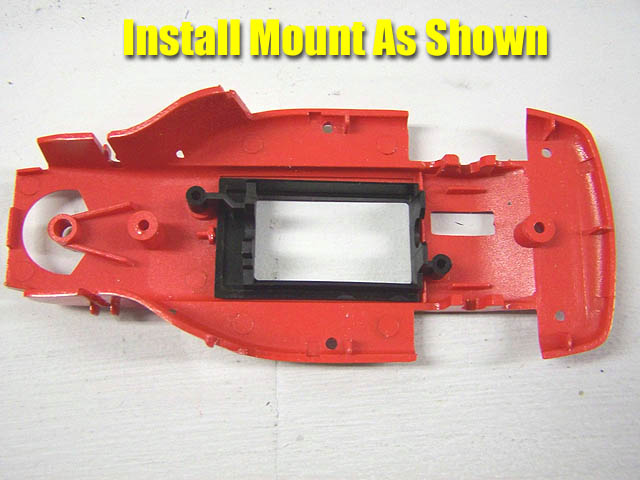
Following the instructions we locate the motor mount and place it in the chassis. Then we attach the motor mount using the 2 screws provided.

Next we install the rear motor bracket by snapping it in place.
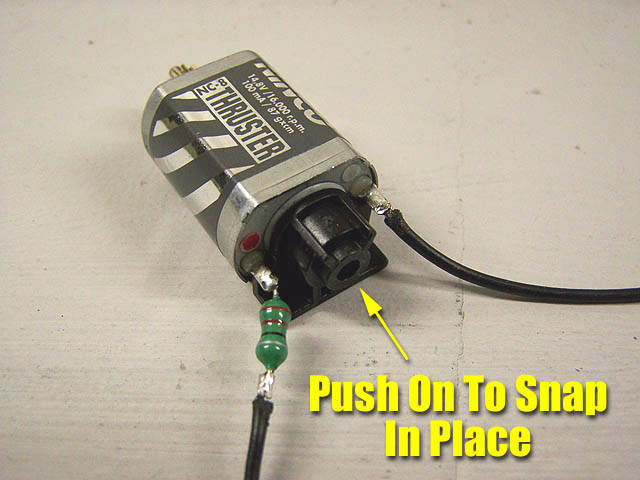
Finally we snap in the complete motor assembly into the motor mount and secure the front motor bracket by pushing down and snapping it in place.
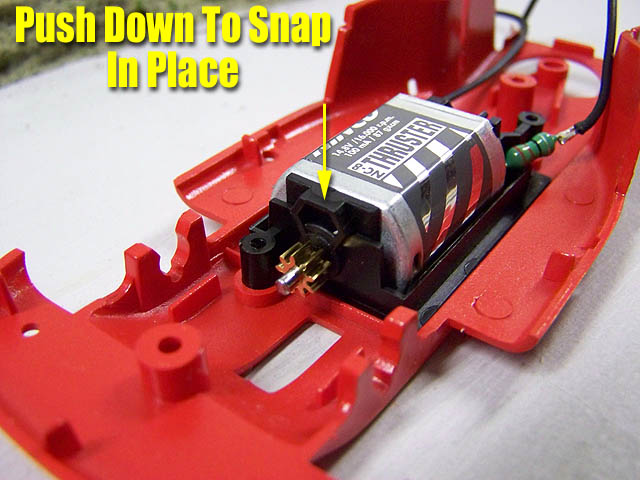

Assembly is now completed for this step and time to move on.
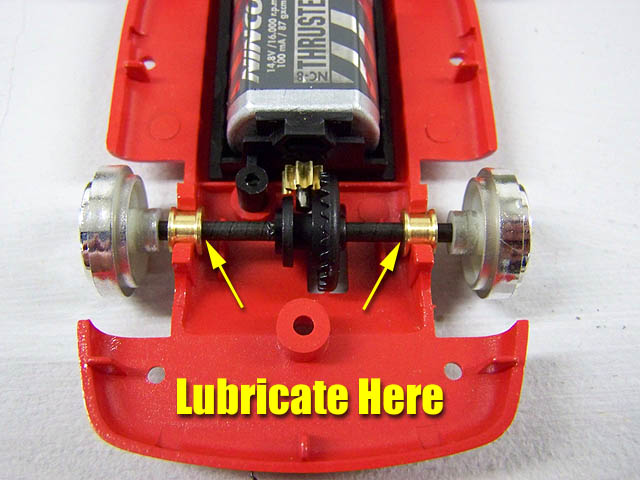
NOTE: Add a drop of oil to the motor shaft area to make sure it is lubricated.
STEPS 7 then 4-5-6 (STEP SEQUENCE CHANGE)
Front Guide
Although the instructions list the assembly of the guide after the wheels and axles, because of a maintenance procedure go ahead and assemble the guide at this point.
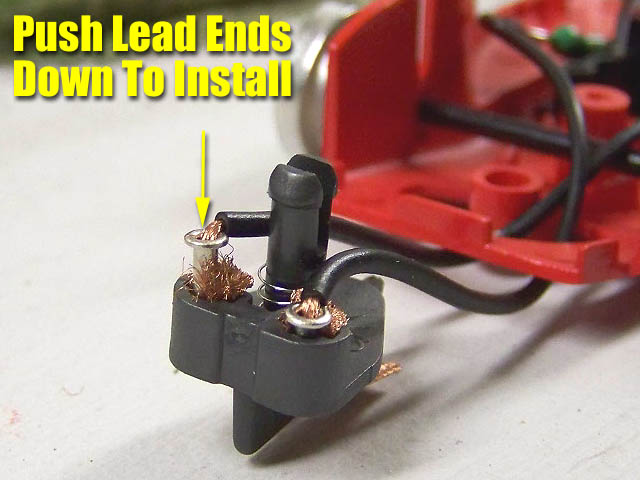
Feed the lead wires through the chassis and then get your guide which has the braid pre-installed. Push the lead ends down into the guide as shown to secure a tight fit. This is where needle nose pliers might come in handy as sometimes these can be a very tight fit.
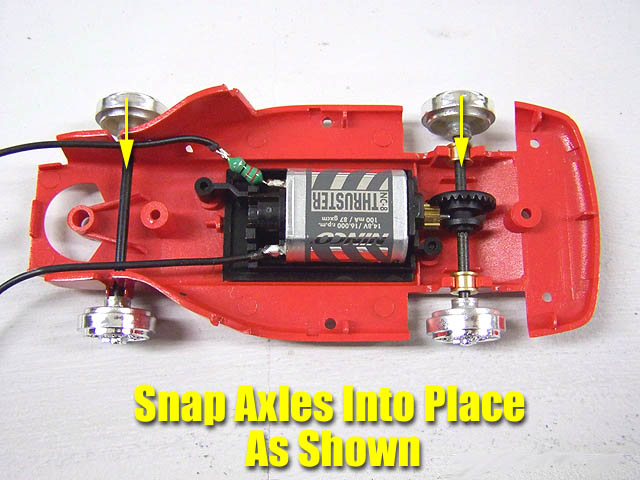
Axles & Tires
This step is very simple as you simply take the rear axle and snap it into the chassis. Next comes the front which snaps in as well. Here is where you will want to add a light drop of oil to the rear axle bushings to make sure they are properly lubricated.
ADDITIONAL STEP
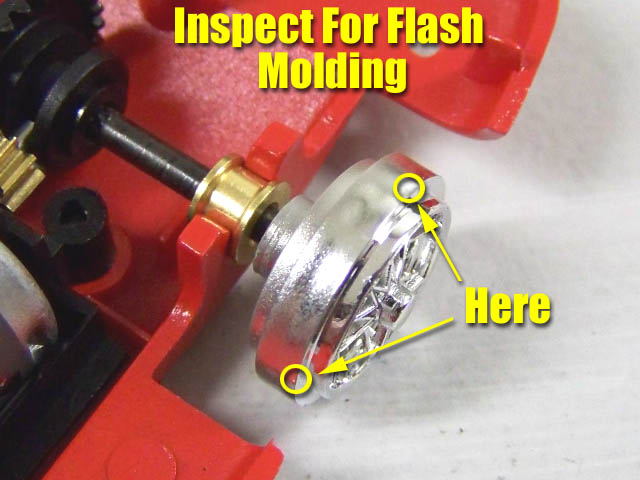
Before we install the tires, it would be a good idea to inspect the wheels for any excess flash molding. A good rule of thumb to follow is to always lightly sand the wheels even if you cannot see any to make sure they are as clean. This ensures your wheels will provide a smooth and even fit for your tires. A light sanding also makes sure the wheel is as round and true as possible delivering much smoother operation after you have installed the tires.
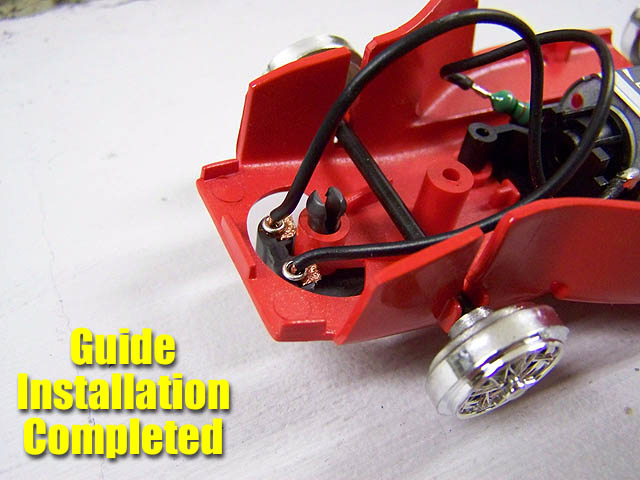
NOTE: You can now check to make sure you have your lead wires seated correctly in the guide and that the wheels are turning in the right direction for your tack. If they are not, just swap the lead wires at the guide.
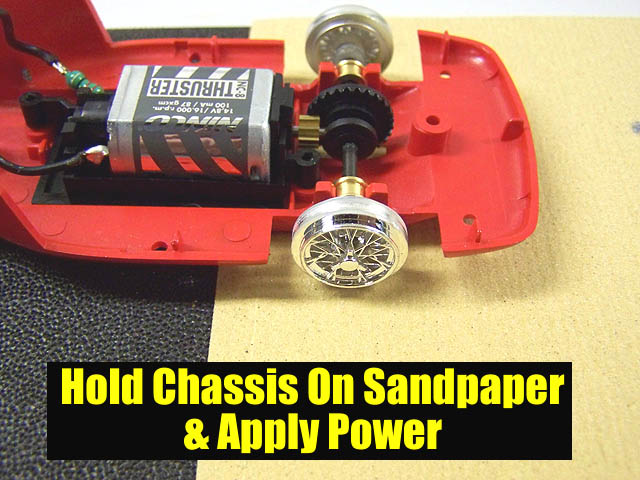
Place a piece of fine grit sandpaper on your track. You can tape it in place to help keep it secure if needed. Then lower the chassis down until the inner rib of the wheels are touch and slowly apply power using your hand controller while holding the chassis in place.
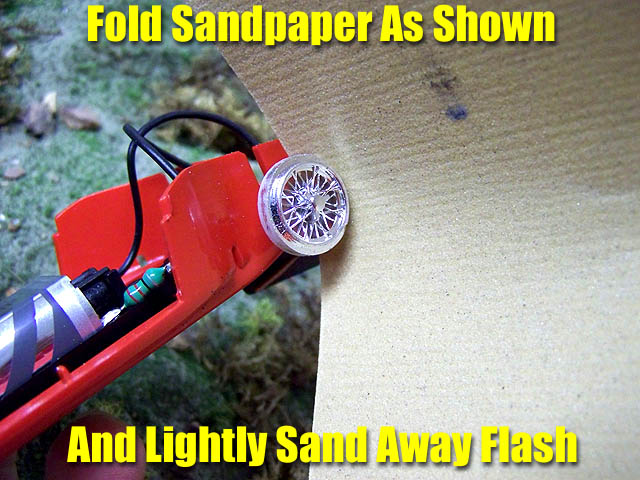
The front wheels can be sanded by hand using the same sandpaper. Just hold the sandpaper in an arc like shown and sand 2 to 3 times and then turn the axle and repeat the process until the entire wheel is clean.
Next inspect your tires for excess flash molding. Sometimes they have just a light amount that is easily tore off with your hands. Now you are ready to install your tires and get them sanded and trued.
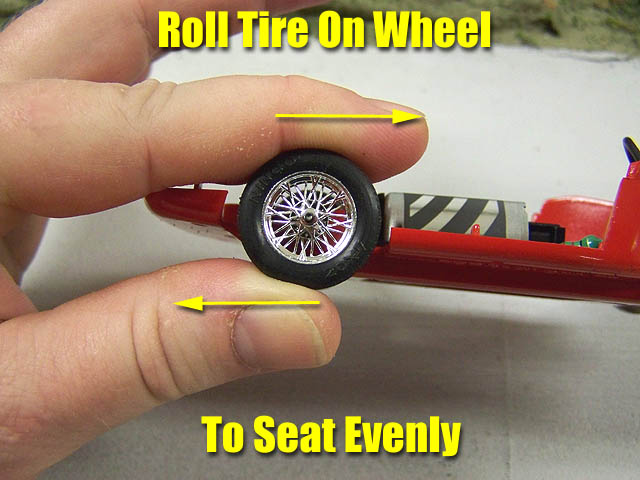
Almost every slot car in our hobby can benefit from tire sanding. There are numerous ways to do it, but we will utilize the same method we used with the wheels. Mount the tires by stretching them over the wheel and then rotate the wheel and tire in your fingers to make sure the tire is seated as true as possible.
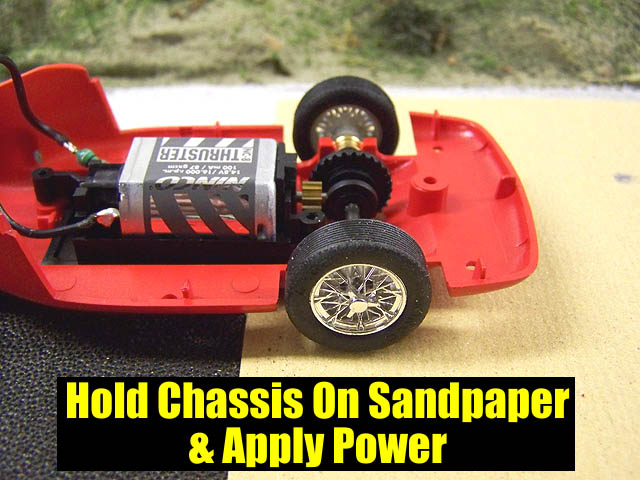
Next, place the chassis on the track like before and apply power with your hand controller. I like to use 10 to 15 second bursts with NINCO classics and then check my progress. Once you have cleaned these tires up remove them from the wheel and transfer them to the front. Now install the second set of tires and repeat the process. Once completed you should have a good platform to tune upon if desired.
STEPS 8-9-10-11 PLUS 15-16 (STEP
SEQUENCE CHANGE)
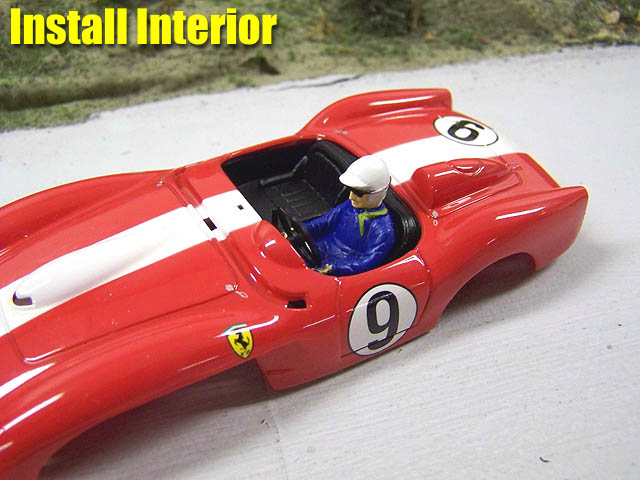
Interior
Next we have the interior assembly. The directions have you perform steps 8 through 11 and then skip to side pipe and headlight assembly. This does not make much sense to me as you are already working with the interior so you might as well perform steps 15 & 16 and install the rear view mirror and windshield.
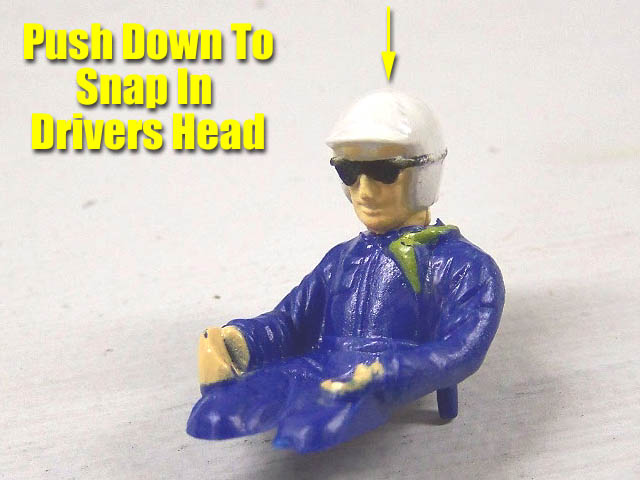
Have your adhesive handy and start by snapping the drivers head into the body. This is going to be a tight fit and you might not think you will need and glue, but it is always safer just to add a light drop.
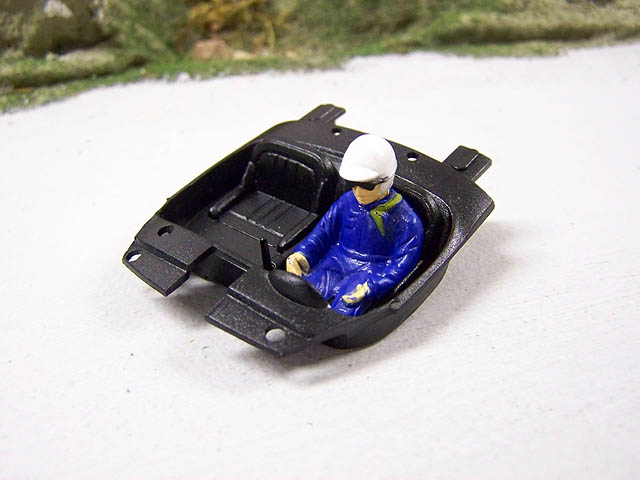
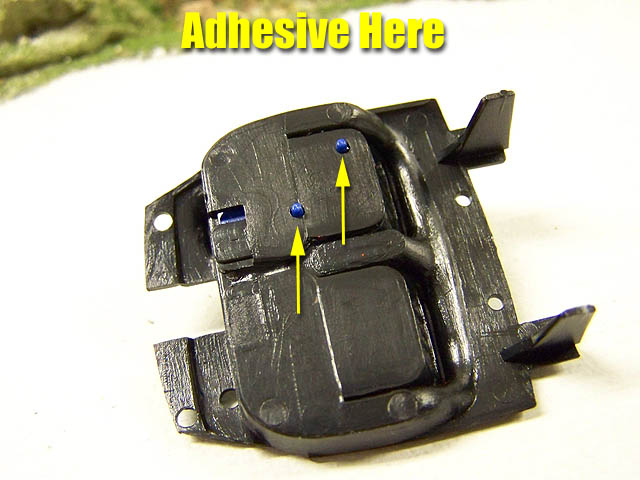
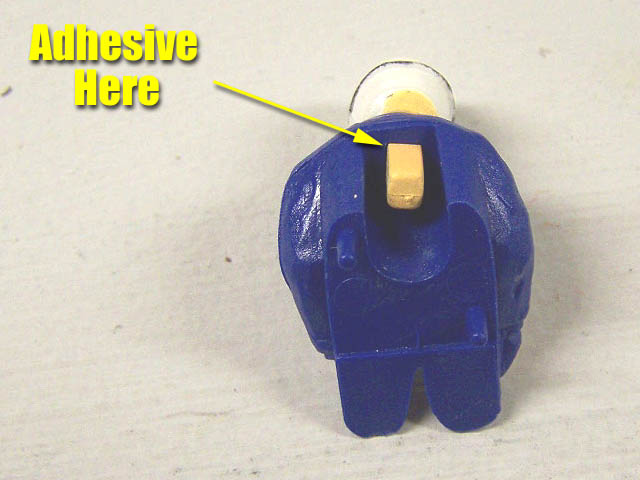
Now we install our driver into the interior tray. You can add a light drop of glue to the bottom of the driver and then set him in place. You can see the mounting pins sticking through and here is where you can add 2 more drops of adhesive to keep our driver happily in his seat.
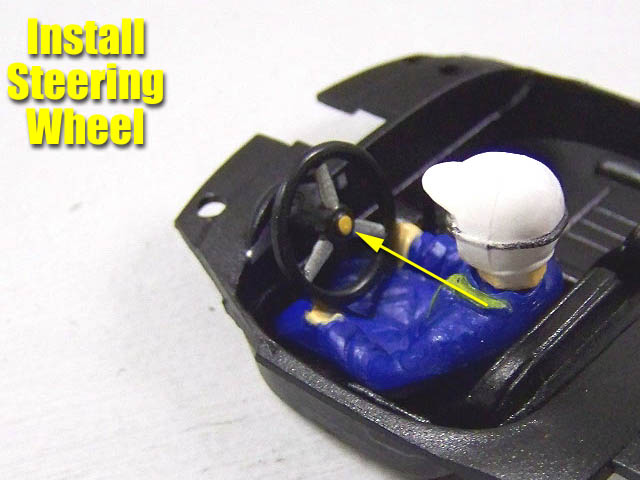
Time to give our driver something to control this beast. Push the steering wheel into the interior tray and set the wheel where it fits and looks the way you want. Then turn the interior over and add adhesive.
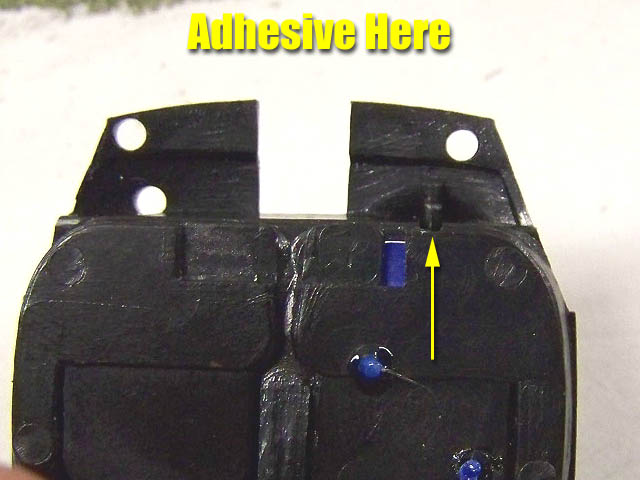
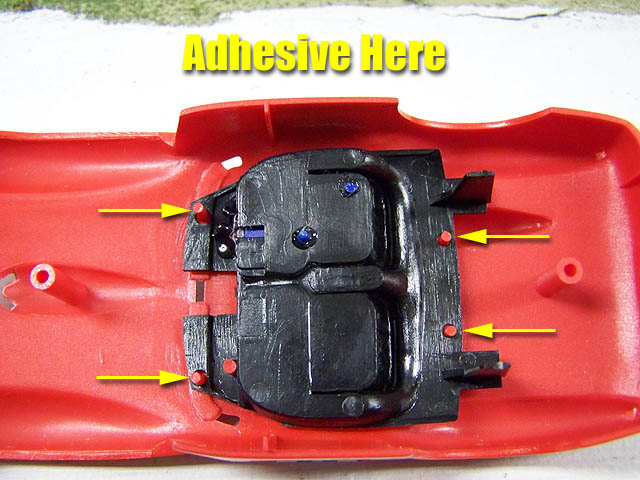
Then it is time to mount the interior tray assembly. Turn the body over and insert the tray carefully following the tray guide pins. Make sure it is seated fully to the body and then use adhesive underneath to hold in place.
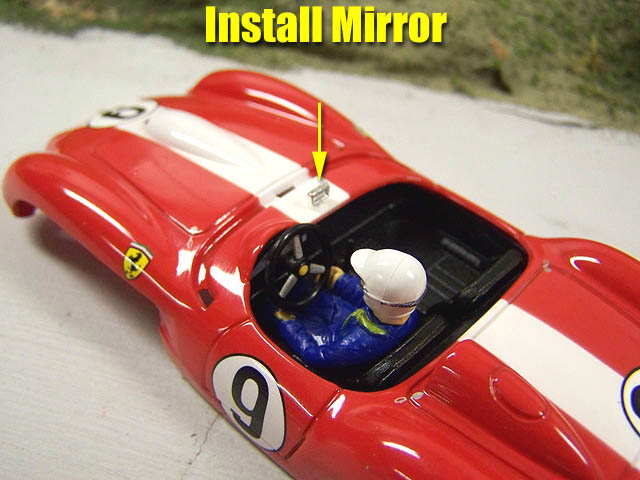
Finally it is time for the rear view mirror and windshield. Carefully mount the mirror as shown. If it too tight of a fit, lightly sand the edges of the mirror to remove and flash molding or mold lines. Your small needle nose pliers can also help make this step easier if you have a bad case of big fingers like myself.
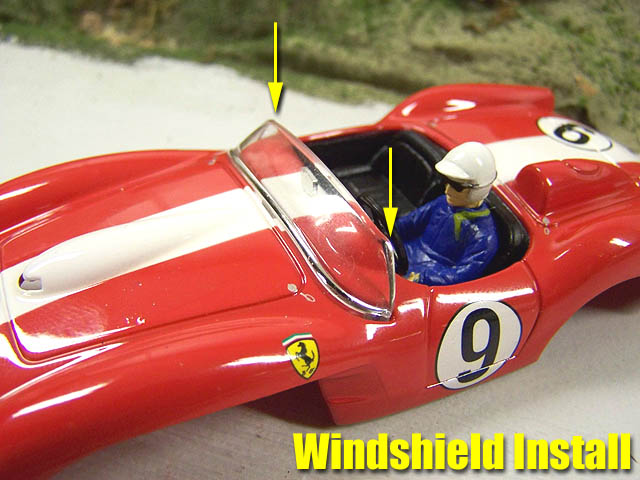
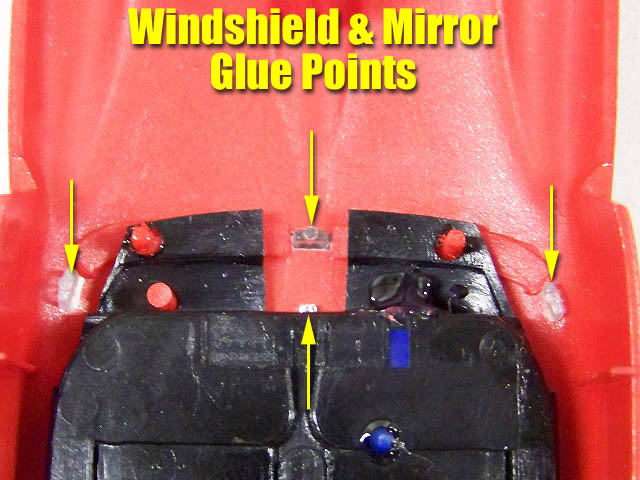
Onto the windshield where it simply snaps in place and should sit quite snugly. Once installed, turn the body over and add adhesive as shown.
STEPS 12-13-14-17-18
Final Assembly
MODELER NOTE: Before installing the exhaust pipes you can spray paint them a flat black to increase realism. You could also use silver or gray primer but I chose black. My preferred paint is Krylon Ultra-Flat Part#1602.
Before you attempt to install the exhaust check the mounting ends of the exhaust for excess flash molding. Next, check the areas on the body where they mount to make sure they are free of excess flash. This will make installation a lot easier. Now simply install your exhaust as shown in the photo.
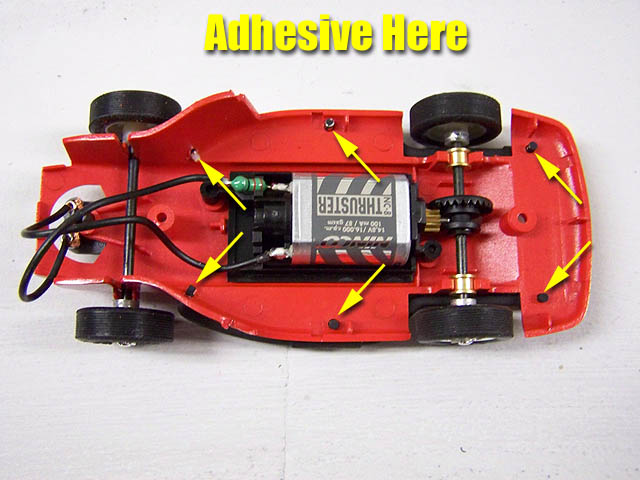
Now you can turn the model over and add adhesive in the proper areas.
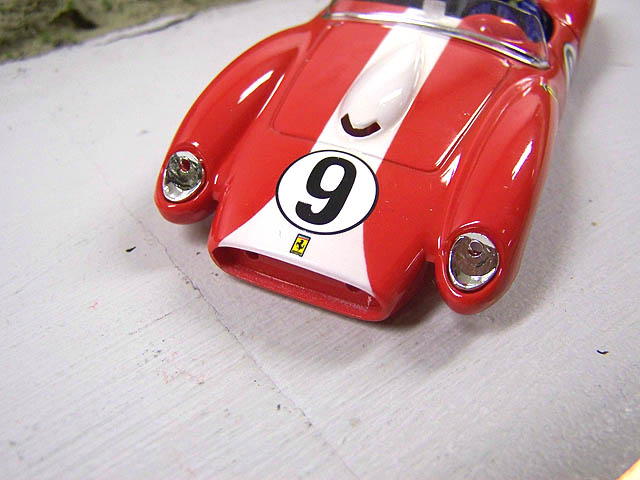
We are ready for the front now so grab the 2 chrome headlight bezels and set them inside the headlight cavity. Next, take the 2 lenses and push them through the holes provided. Finally, insert the front grill as shown.
Again you can turn the model over and add adhesive in the proper areas. Make sure to hold the headlight assembly tightly against the body while applying your adhesive.
Getting to look like a car now! Your final body assembly is the rear tail lights and license plate. Insert them as shown in the photo.
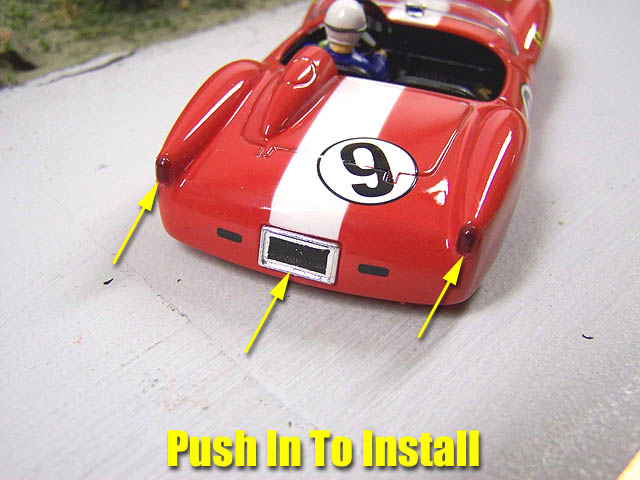

Add adhesive to the proper areas and you are complete!

Now you will mount the body to the chassis using the 2 screws provided.
ASSEMBLY COMPLETE!
We are finally finished with our model and we are ready to race. Before we hit the track let us take a closer look at what we have built. This Ferrari is not perfect scale wise but still has managed to fit the bill for most enthusiasts over the last 10 years. The car looks well enough for my tastes and fits naturally into the classic line. By today's standards it is not as accurate as it should be, but 10 years ago we felt very lucky NINCO decided to make it.
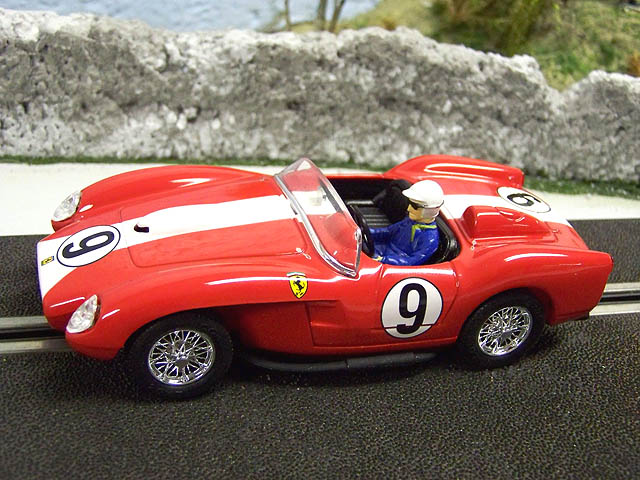
The performance of this model is pleasing to me simply because I appreciate non magnet racing. The motor inside is the new NC-8 rated at 16,000 RPM which is slightly faster than the NC-1's I have in the other classics, but it is still a mild motor that keeps this car running like I feel they should. On our routed wood track we posted lap times of 5.4 second averages which is actually quite impressive.
Some enthusiasts would have liked to see this car kept with the NC-1 simply due to all the others having it. However, this is the motor it comes with so if you have a large collection of classics be forewarned that a motor swap will be needed to keep the racing even. The NC-8, like it or not, appears to be the future for NINCO classics. So newcomers to our hobby could build a new collection of models that will still offer the same close, mild mannered racing that these classics are famous for. Although the price of these kits are higher than some care for, they are what they are and you will either feel it is worth the investment or not. I had ordered one prior to attaining this kit for review as I simply had to have one to increase my series selection and that I really enjoy how the drive.
In the end I am pleased with this kit and happy to finally have a Ferrari in my stable. If you enjoy these models as much as I do, you will most likely end up with one sooner or later. If you are just joining us in this great hobby and the idea of classic non-magnet racing action sounds like fun, I highly suggest you take a close look at these NINCO classics.
- Harry
As always feel free to contact me about this article or just the hobby in general at harry@homeracingworld.com, or better yet drop into our Message Forum and share your thoughts with other enthusiasts!
Thanks Go To MRC For Providing Us With This Sample!
Check With Your Favorite NINCO Dealer For Availability

Copyright © 2008 HomeRacingWorld.com All Rights Reserved