
Sunday September 21, 2003
Tuning your Fly Classics
The Ferrari 512s and Lola T70 MkIII
 I'm pretty sure a whole new breed of 1/32nd
scale slot car enthusiast keeps joining our ranks. Hopefully some of them are
finding deal after deal on these older Fly releases. Which means right now they
should be having the time of their lives racing their new cars and learning
about the world’s greatest hobby.
I'm pretty sure a whole new breed of 1/32nd
scale slot car enthusiast keeps joining our ranks. Hopefully some of them are
finding deal after deal on these older Fly releases. Which means right now they
should be having the time of their lives racing their new cars and learning
about the world’s greatest hobby.
With that being said, I know how they must be feeling looking at the vast selection of highly detailed models and saying: “I just have to have that car!” I know I did it when I joined the ranks. With all the new releases coming and those already available, the good part is that there are still some older models that are well worth the purchase, and will bring plenty of enjoyable, competitive racing to the new model car racer.
2 cars that seem to stand out for me are the Ferrari 512S Berlinetta and the Lola T70 MkIIIB Coupe from Fly Car Model. These cars have been out for quite some time, yet, I feel some modelers would enjoy these classics. They are fun to drive, have outstanding detail, and are quite competitive.
The performance of these cars are pretty similar, with the Lola having a bit more tail out action, being longer of the 2, and the added rear spare tire adds weight here as well. Still this car feels more stuck down than the Ferrari and they are very close. And although I always like to recommend buying 2 of the same model when available, in this case you can get one of each model and get a chance to try both models, still have competitive racing, and most importantly learn more about these cars and their characteristics. Both have the standard Fly rear motor pod setup, being sidewinder drive and round magnet. The new standard of brass rear axle bushings are not here, but with a few drops of plastic-compatible oil, they endured some hard racing with no trouble.
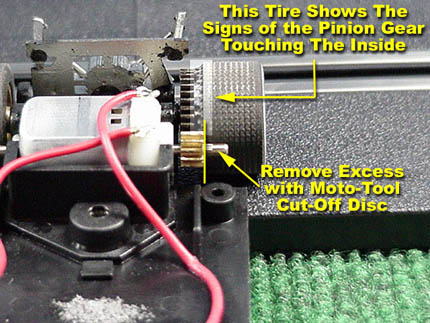
Now, on to the bad part. One thing you will see, that you will probably not like is the rear axle slop issue, common with these Fly cars. It causes the car’s rear tires to end up rubbing on the inside of the body, or the inside of the tire on the geared side rubbed by the pinion, causing some damage to the tire. In addition, the motor shaft is very close, and commonly rubs on the tire, again causing damage to the tire, usually flat spots. And last but not least, some of these tires are less than perfectly round, causing wheel “hopping” and really degrades the running ability of these nice looking models.
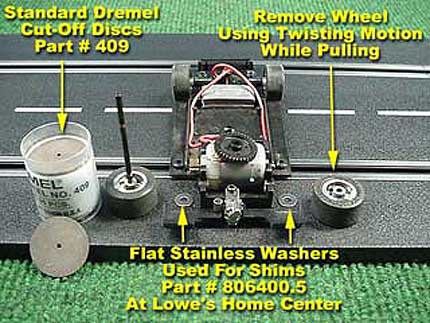
Well thankfully, there is a fix. With a little time and effort, you can make these into very smooth running models. You can shim these axles to remove most all side-to-side action, thus preventing the tires from rubbing, and doing some adjustments on the motor as well will cure the other problem. Finally, sanding your stock tires to get them as true as possible. In this modification, I used stainless steel washers found at Lowe’s Home Center, part # 806400.5, coming in packs of 5. There are better shims available, ones that are a exact fit, but I chose this one because it was readily available, and if some racers are not close to their favorite dealer, they can still complete this modification. They have worked perfectly, and well worth the 42 cents invested.
First, examine your car to see if this modification is needed. Turn the car upside down and attempt to move the rear axle back and forth, checking to see if its making contact anywhere on the inside of the body. Next, check to see if the tire on the geared side is showing any “chewing” by the smaller pinion gear. Even if there is no contact, but have excessive play, shimming this will improve the smoothness and performance of the car. Take care to notice WHERE the gaps are, so you know where to place your shims.
Removing the wheels is very simple. With a turning motion, slightly pull and twist the wheel assembly, and work it slowly off the axle. Then pull the other half of the assembly completely out. Next, remove the larger spur gear from the axle using the same motion. Now, you can slip on your first shim, letting it rest on the wheel you did not remove. Now, reinstall the spur gear, and if needed, install another shim on top of that. Install the axle assembly, and place a shim (if needed) on the other side. Install the other wheel you removed first and check for fit. Do not place the assembly on too tightly, using the same twisting motion, slightly turn the wheel until the axle feels free, yet no large amount of play.
 Now, when you had
the axle removed, its time to fix the other problems related to the motor.
Removing the motor is a simple matter of popping it out of the brace. Once
removed, grab your trusty Moto-Tool and attach a standard cut-off disc #409 on
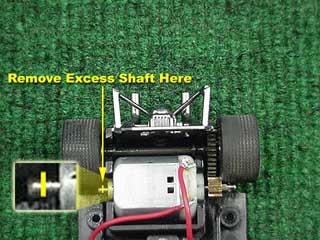
the end. First, remove the excess shaft on the geared side of the motor, cutting
it off flush with the pinion gear. Next, as shown in the photo, angle the motor
slightly against the wheel and gently sand a bevel in the pinion. The gear is
brass, so it is softer than the steel shaft, so you don’t need a lot of pressure
here. A rule of thumb I use on how much bevel to give it is to make it just
slightly wider than the spur gear.
Now, when you had
the axle removed, its time to fix the other problems related to the motor.
Removing the motor is a simple matter of popping it out of the brace. Once
removed, grab your trusty Moto-Tool and attach a standard cut-off disc #409 on
the end. First, remove the excess shaft on the geared side of the motor, cutting
it off flush with the pinion gear. Next, as shown in the photo, angle the motor
slightly against the wheel and gently sand a bevel in the pinion. The gear is
brass, so it is softer than the steel shaft, so you don’t need a lot of pressure
here. A rule of thumb I use on how much bevel to give it is to make it just
slightly wider than the spur gear.
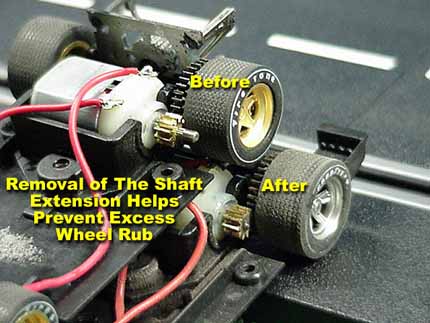
The shaft in some motors have some side to side play in them, so make sure you leave enough on the pinion to compensate for this. This really isn’t that hard, I do this just based on “eyeball measurements” and have not had a single problem. If I can manage to do this, I am positive you can too. Now go to the other side of the motor and cut off the small excess there if needed. My Ferrari did not need this trimmed, but the Lola did.
It’s time to replace the
motor, again very simple, it just snaps in place. Now re-install the axle
assembly described before and check your work. Look to see if you have beveled
the pinion enough, if not, remove and give it a little more. It might take a few
times, but in the end its worth it to get it right. Once you are satisfied with
your results and fit, remove the axle assembly one more time.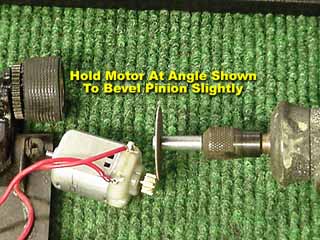
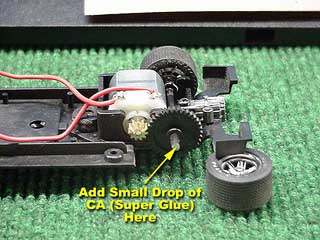
Now that your spur gear is aligned correctly, add a VERY small amount of Super Glue on the front of the gear, then a drop on each end of the axle and re-install both wheels. The last thing to do is add a very small drop of super glue on top of each of the rear bushings. Why do this? Well on some models, these bushings sometimes work loose and spin in the chassis. Adding a small drop of glue helps prevent this.
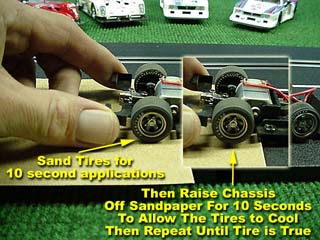
Well you are finally ready for the last step. Sanding the tires is very easy. I chose 150 grit aluminum oxide ¼ sheet resin sandpaper, found in any hardware or discount store and it worked well. Holding the rear of the chassis, I give the car some good throttle, not full blast, but enough to turn the wheels quickly. I lower the chassis onto the paper, adding enough pressure to seat the tires flat on the track and paper, adding throttle as needed and sand for around 10 seconds. Then lift the chassis to allow the tires to cool. Not allowing them to cool results in a “greasy” feel to the tire, with sometimes chunks of it coming off. Art almost imitates life here, so cooling them assures you of a good, clean tire. I repeat this as necessary, examining the tire to see when its sanded all the way across the tire. It’s quite easy to tell, once you have done it, you will see the color difference in the rubber on the tire.
That’s it. Add a few drops of oil on the axle assembly near the inside of the bushings, and a very small drop one each end of the motor at the shaft. Install the body, and you are ready for your test drive. You should see and feel a better slot car now. Doing this kind of modification is not for everyone. Some feel the beveling of the pinion is not needed, and in some car’s it isn’t. In cars that have a wheel opening large enough to allow the wheel to be moved outward with additional shims, beveling is not required. Of course adding silicone tires to the rear negates the sanding issue. However, some like the original tires, so I covered it here.
There are other methods out there, and this by no means is the perfect approach, it is just the method I chose, and have used for years, it works for me and has had great results.
-Harry
As always feel free to contact me about this article or just the hobby in general at harry@homeracingworld.com, or better yet drop into our Message Forum and share your thoughts with other enthusiasts!