
Sunday March 12, 2006
Sunday March 12, 2006
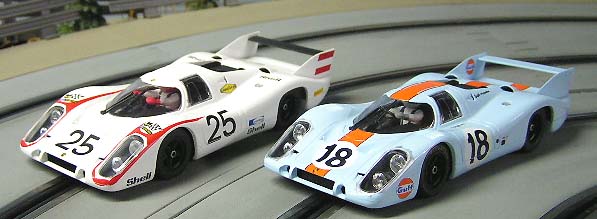
Fly Fight!

A Classic Face Off
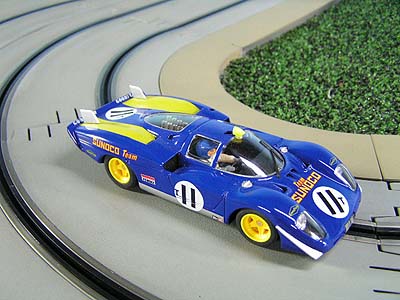
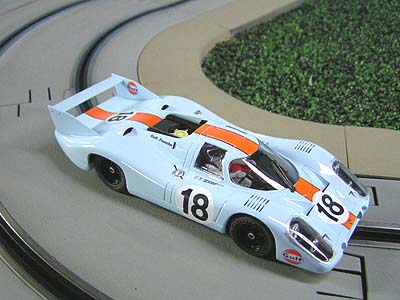
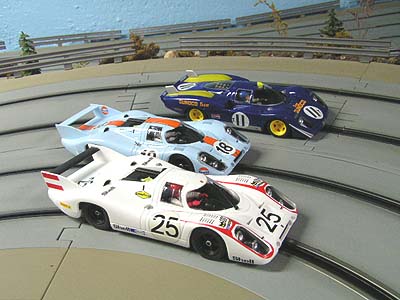
Ferrari 512 S Coda Lunga & Porsche 917LH
 I will be the first to say that regardless of any issues there are with the
models made by Fly, I still like them. The Fly Classic series is hands down one
of the longest running series of models in our hobby and I own plenty of them to
say the least. However, some releases just seem to spark my interest more than
others and such is the case with the Ferrari 512 Coda Lunga (Long Tail). Not
only is this model a favorite, but the latest release of the Porsche 917LH has
now added even more fuel to my classic fire.
I will be the first to say that regardless of any issues there are with the
models made by Fly, I still like them. The Fly Classic series is hands down one
of the longest running series of models in our hobby and I own plenty of them to
say the least. However, some releases just seem to spark my interest more than
others and such is the case with the Ferrari 512 Coda Lunga (Long Tail). Not
only is this model a favorite, but the latest release of the Porsche 917LH has
now added even more fuel to my classic fire.
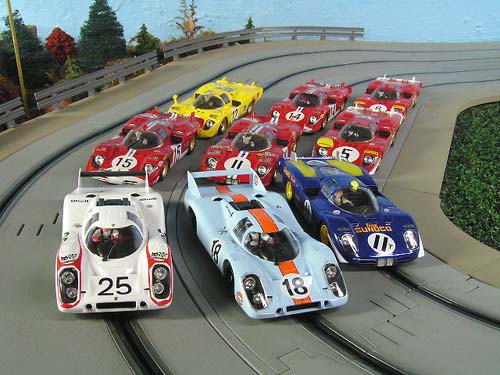
These cars are not the class favorite of every racer, and it is true that they are not as fast as others in the series. The extra long rear end certainly enjoys swinging and sliding out and shorter models in the series just seem to be better performers for the most part. This has not stopped me from collecting many of them and the main reason I do is simply how they look. For some reason, I really like the looks of the lines of this car and hence my love affair with them.
There are some enthusiasts that have really made these models very competitive with other classics, so don't think you have to just race them by themselves. Racing these longer models against my 917's provide a very close race and sometimes the Long tail prevails in the end. It seems on my smaller layout that they just seem a little more forgiving in the corners, especially coming out under speed. In these cases where I have tuned and worked with these models, they become a very formidable foe.
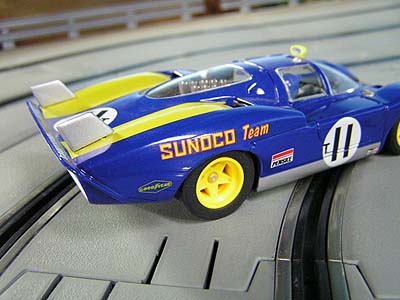
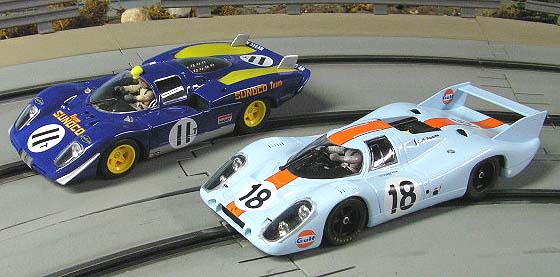
And with that said, it was no surprise that this latest Ferrari ended up here. This car is the "Sunoco Edition" and is simply a fantasy livery, or at least I cannot find where it ever existed in the 1:1 world. But if you think that would stop me from having it, you are mistaken. Regardless of any scale accuracy, I think the model looks beautiful and looked forward to its arrival.
Enter The Porsche
I have waited quite awhile for this latest release of the Porsche 917LH. Not only did I want it as I thought it would be a great addition to the Classic line, but I was convinced that I could now have a better running mate for my Ferrari stable. Think of it...recreating the legendary battles between these two famous car makers right in your own home! When they were finally available I called SlotCarPlace and had one on its way into my greedy little hands...ok well make that two, I simply have no willpower when it comes to the Gulf livery.
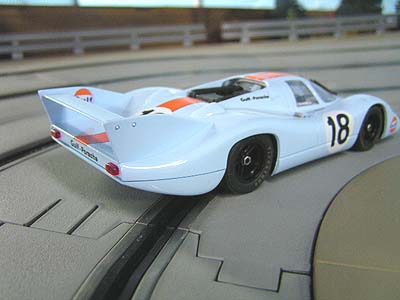
As far scale detail is concerned, Fly usually brings us models that are very close to the prototype and spare no expense on small details. However, the Porsche 917LH is not Fly's best work. The entire front of the car is off in scale, and many enthusiasts have commented on it. I have to admit I was surprised by this as usually Fly brings us a very accurate model in 1/32nd scale.
So is it a big issue? Only YOU can answer that. Although I am a little disappointed, it is not going to stop me from enjoying the model. In fact, I ordered the second #18 Gulf model shortly after getting the first. I still think the model looks great sitting on the track, and at speed it looks even better.
Differences
Although they seem nearly identical, there are some differences. First, the wheel bases are not identical with the Ferrari having a 74mm length while the Porsche comes in just shy at 71mm. The chassis are different as well with the Porsche having the familiar B21 separate pod assembly while the Ferrari is the solid chassis.
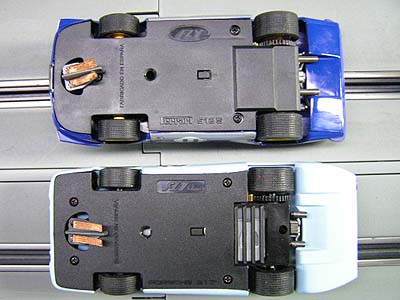
Weight was surprisingly even as each car tipped the scales at 72 grams. Overall length goes to the Porsche with 150mm and the Ferrari at 145.85mm. So will these differences make for an uneven match-up? Which one will prevail? Time for the first out of box test to find out if there is any advantage at the start.
Performance
Some of you may have heard that cars made by Fly, especially those in the Classic series, do not run well out of the box. Sadly, what you hear is mostly true as they do require some work to get them running as smoothly and reliably as you would expect. In some cases there are models that need even more than others and this has certainly given Fly a notorious reputation to some enthusiasts.
All 3 of these models needed attention, but all of them ran out of the box. Not very well mind you, but they did function. It only took a few laps on each car to see that some work was needed to get them where I felt they needed to be. I could not form an opinion on which car was dominant as the issues that plagued them were different and caused too much interference. It was time to perform what we like to call "Fly Standard Mods"...so if you are ready, let us get started shall we?
Quick Tip
If you have not already guessed it, you will need some tools to perform some of these checks and modifications. A good quality gear and pinion removal tool, small cross-tip screwdriver, sandpaper, adhesive, etc are important. Most online retailers carry these as well as other tools, so check with your dealer and invest in the right tools for the job.
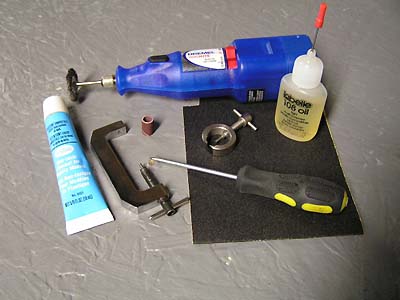
Also items such as a moto-tool like those made by Dremel are almost priceless. These moto-tools can perform a variety of jobs and I can safely tell you that no enthusiast in this hobby should be without one.
Phase 1 - Inspection
The first thing you will want to do is simply look over the model and find what needs attention. Sometimes you do not even have to run the car to find problems. An out of round or wobbly wheel is easily seen just while you have it in your hands.
But the track test is where things get exposed much easier. After a few laps you should be able to detect items such as intermittent power, tires or wheels out of round, and even tire to body rubbing. You might also find that the tire is rubbing the pinion or even the motor shaft. All of these items really expose themselves rather quickly and luckily you can remedy most of them without spending another dime.
Phase 2 - Lack of Power
After just 3 laps on each car I noticed all of the cars seemed to lack power in certain corners as well as other issues. You might have seen models that run fine in the straights but seem to cut out in the corners. Sometimes it is the other way around. Lack of power such as this can be contributed to different things such as dirty track rails, or even your track connections need attention. In this case as with many others, it is a simple matter of checking your braid.
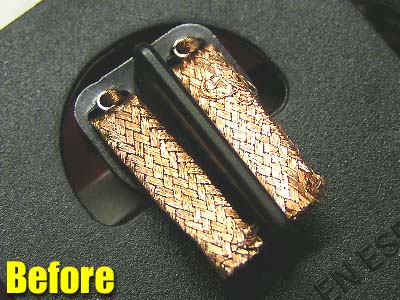

The first thing I do is take the braid and lift up on it slightly to give it a little more pressure towards the rails. This helps a great deal, but on some tracks you will need to spread (comb) out the ends of them for maximum contact. If you have small enough hands you can spread these with your fingers. Given that my fingers are too big, I use 2 small needle nose pliers and grab the end of the braid as shown in the photo. I then pull (spread) the braid out as shown and get it ready for the final step. Once this is completed I attach the small wire wheel brush from our Dremel kit to the Moto-Tool and turn the power on.
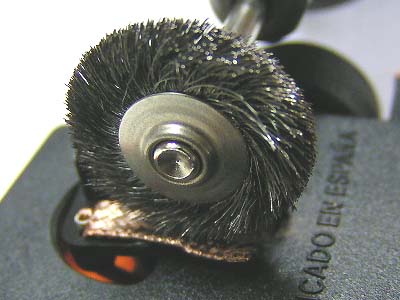
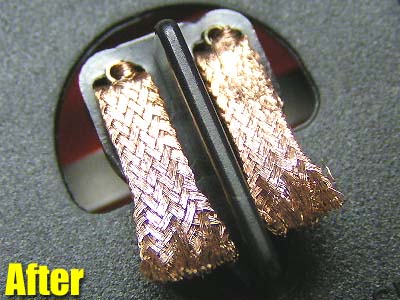
I start at the top of the braid and move down towards the ends. At the ends you need to apply a little pressure and you will begin to see the braid comb itself out. Make sure you place the wire wheel as shown so it rotates the right direction. As you can see, I started with the left braid and then I will just move over and do the right, keeping the Dremel in same direction. After this is finished, just make sure you have a slight arc to the braid and you are ready for the track. Sometimes you still might need to adjust the braid to work for different brands of track, but performing this braid maintenance gives you a good head start in correcting power issues.
Phase 3 - Tire Rub
Another issue that seems to follow many Fly Classics is tire rub. This occurs in different places and is one of the biggest causes of degraded performance. On models such as these, you first should check for the tire rubbing on the inside of the body. This usually occurs due to the fact that many of the rear axles on these models have excess side to side free-play. In turn, when the axle shifts to either side while racing, the tire rubs the body.
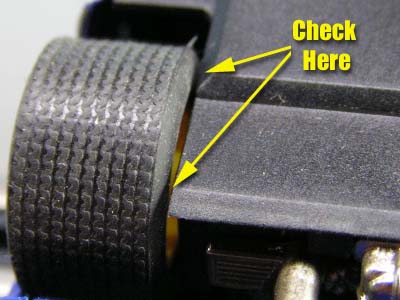
Another area is the tire contacting the inside of the pod assembly (chassis) due to this same free-play issue.
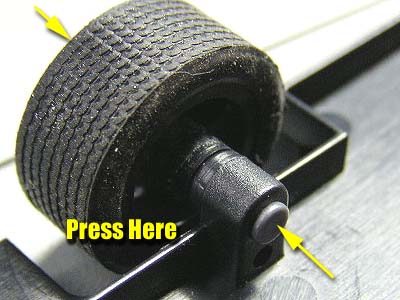
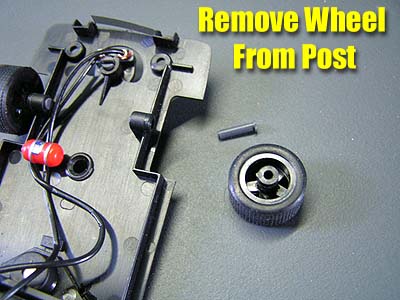
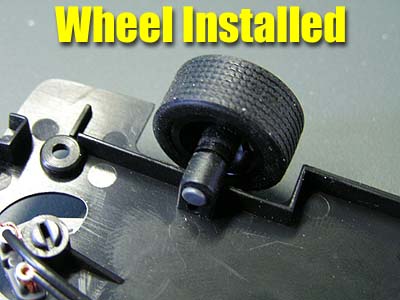
Before you remove the body, check to see which side the tire is making contact. This tells you where to install your shims to eliminate that excess free-play. All of my models needed a small shim between the spur gear and the chassis to prevent the wheel from rubbing the body. After removing the body I then snapped out the rear axle assembly and removed the wheel as shown in the photo.
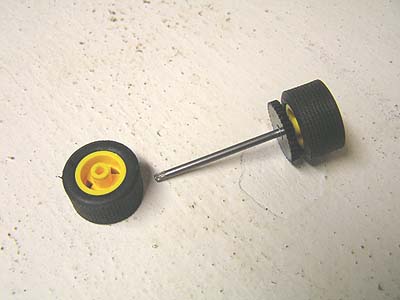
You can use almost any small 3/32 inside diameter washer or shim for this fix. There are many other ways to shim this axle, this is just my preferred method. You can make shims from very thin sheet styrene or order very thin metal ones from Slick 7 and other after-market companies. You can even find small washers from local hardware stores. Over time I have simply found it easier to use a correct sized shim as they are inexpensive and give me the best results.
![]()
I installed the shim as shown and then re-attached the wheel. Then it was time to snap the complete axle assembly in place and check for any other rubbing or binding. Next, I test fitted the body back onto the chassis to make sure the tires cleared the inside of the body wells. All 3 of my models were free of any more rubbing on the body, but they needed a final step to make them right.
Another issue is the tire coming in contact with the pinion and sometimes the motor shaft. This again can happen due to side to side free-play and because the tire or wheel is not seated correctly. Sanding and truing the wheels does help this problem, but I have found that while I am here it is easiest to just trim the excess shaft away. After inspecting all 3 models, each of them were plagued with all the above issues. So it was time to take them apart and begin our modifications.
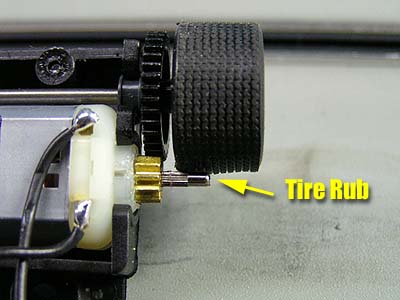
My method for curing this is to simply trim the motor shaft off flush with the pinion and then to bevel the pinion slightly to give it just a little more clearance.
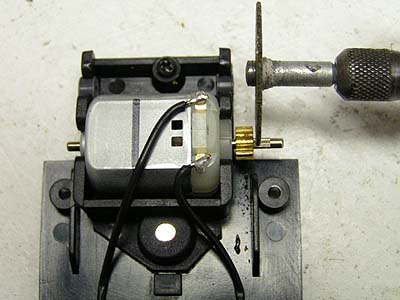
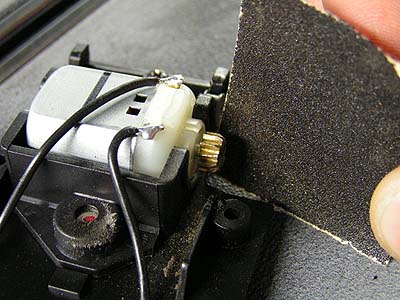
To do this you can either remove the motor from the chassis pod or leave it installed. If you leave it installed, be very careful not to cut or damage the chassis. I use a standard cutting disc in my Dremel moto tool and in seconds the excess shaft is removed.
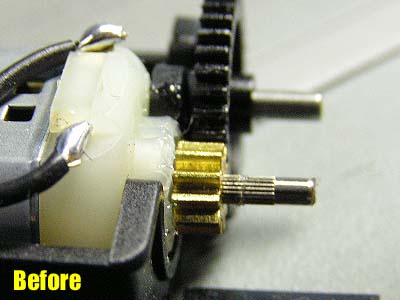

Trimming the pinion can be done many ways, but I prefer to let the motor do most of the work. By applying power to the motor using either your track, 9 volt battery or sanding station, take a sanding disc or sandpaper (anything will work here) and apply it at an angle against the pinion. In just a few seconds you will see the pinion sanded away and the process is complete. Your assembly should look something similar to the one shown in the photo. Now, install the axle and check to see if you have removed enough of the pinion, if so it is time to move on to more tire and wheel care.
Phase 4 - Axle, Wheel & Tire Care
Axles (front)
The front wheels on Fly classics are held in place by small plastic stubs that are famous for being too loose. You can replace this assembly with a solid front axle if you wish, but I can usually remedy the excess slop by simply tightening them.
Again, some enthusiasts swear by changing the whole assembly to a solid axle and you can certainly do this if you wish.
You can order any 3/32nd drill blank axles from most online retailers for around $2.00 - $3.00. and simply cut the axle to the length desired, just make sure it is not touching or rubbing any part of the body. Most of my Fly classics keep the original stub axles as once I tighten them, almost all of the slop is removed. However, the axle replacement option gives you a very solid and reliable front end so only you can decide which method is best for your home racing.
UPDATE! Some enthusiasts have asked about how to remove the slop in the front axle mounts without using a solid axle. Many enthusiasts feel that independent front wheel rotation is best for performance so using methods described by Larry Shephard and Brent Carlson, I have decided to include it here. This method will also work on the front-motor models by Fly such as the Viper, Lister Storm, Capri, etc.
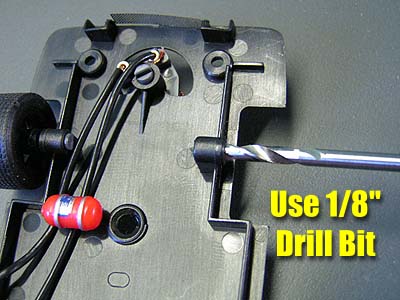
There is another method of removing the excess slop in the front axles and that is to use brass sleeves to give you a closer tolerance between the stub axle shaft and mount. You will need #127 K&S 1/8 inch brass tubing, a 1/8 inch drill bit, a small file for clean up and pliers.
Start by removing the front wheel from the axle. Next, using a 1/8 inch drill bit, carefully drill out the front axle mount. You should do this slowly by hand as not to take away too much material. I used a small pin vise for better grip but you can use any good pliers as well.
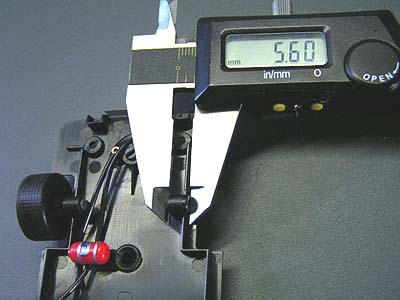
Next, measure the front axle mount using any good ruler or calipers. Mine shows 5.60mm was the thickness to trim our tubing.
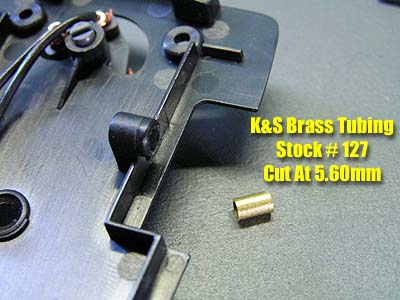
Using K&S 1/8 inch brass tubing, measure and cut the tubing to the desired length. Once you cut it, make sure the tubing is free of any excess flash from the cut. Next, press the tubing inside the axle mount. You can do this by hand but it can be a very tight fit. I used a small needle nose pliers to set my tubing in place.
Now simply re-install the wheel onto the axle. Test fit the wheel first to make sure it is spinning freely and then you can remove it if you wish and add a small drop of adhesive to the wheel to make sure it stays in place. You will now find that virtually all the excess slop is removed and you have a much more stable front end.
Axle (rear)
Wheels and tires on Fly Classics usually need a little help and such was the case with all of these models. Although many of these cars can simply run smoother by just sanding the tires, sometimes there are other hidden issues.
The first item to check is your axles. If the axle is bent, you will simply need to replace it. There is no reason to try and correct any issues on your wheels or tires if the axle is bent. You simply try to compensate for the axle and in turn you will usually do more harm than good to your tires and wheels.
You can check the axle quickly by just removing it from the chassis and removing both wheels. Once this is done, turn the axle in your hands and check for any obvious bends.
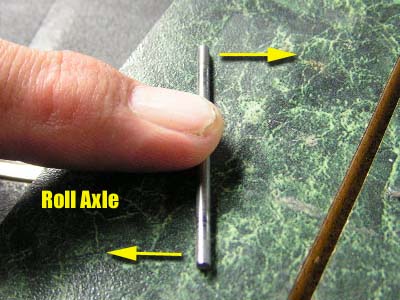
The more accurate and reliable way is to remove the spur gear from the axle and then roll the axle on a flat surface. Using anything from a table top to a mirror can give you the results you are looking for. I use a standard wooden set-up block to check mine. After I roll the axle on it and make sure it is true, it is time to re-install the wheels and spur gear and move on.
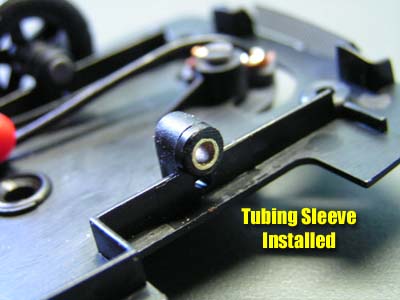
Cracked Hubs
The next item is cracked hubs on the wheels causing the wheel not to sit cleanly on the axle. This also causes the wheel to sit loosely on the axle and can contribute to numerous problems as you might guess.

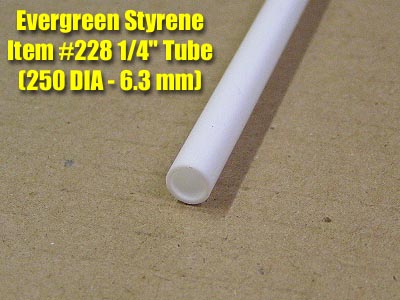
If you discover this issue, just follow the procedures we list here. This is the easiest way I have found to repair these and other brands of wheels. Evergreen Styrene makes a wide variety of plastic that is widely used in many hobbies, and the 1/4" tubing works perfectly to "sleeve" the hub and repair the crack. This process also makes the hub stronger to resist future cracking.

Then, using a rolling motion we begin to cut the tubing. Normally we cut it to around 1/8" give or take a few. Don't worry about being perfect here, as long as the sleeve sits flush with the hub end, you are doing just fine. Next, I add a small drop of Testors model cement on the outside of the hub and then just slide the sleeve over the top until it sits flush.
Wheel Sanding
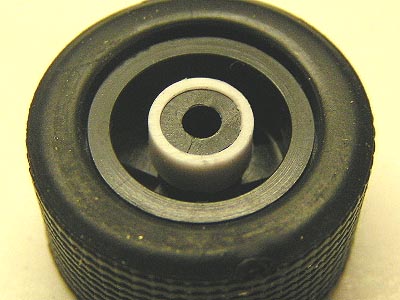
The most common is excess flash molding on the inside rib of the wheel. This causes a high spot in your tire that can take a very large amount of sanding to try and cure.
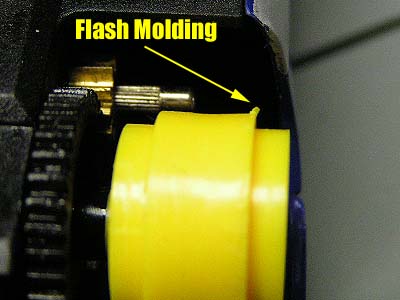
My first step was to pull the tires off the wheels and check for excess flash molding on the wheel. Sure enough there was some present so I lightly sanded them. We cover this quick procedure here in pit row.

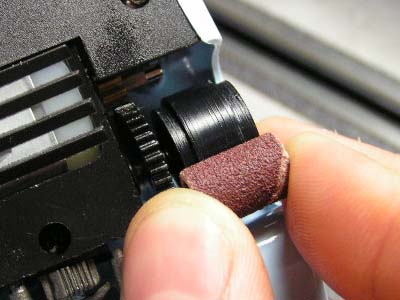
You can do this step in any number of ways, but the method that was shown to me years ago by Dave Dobner and Rich McMahon is still my preferred method. By simply using a 9 volt battery and a sanding barrel from your Dremel, you can have these wheels cleaned up in no time at all.

Other brands of models are also victim to this and I always like to check them to make sure I am starting out with a wheel that is as round as possible. So I would check all brands of models you own to see if they have this issue and correct it. You might find a much smoother running model.
Bushings
One item I find often needs preventive maintenance is the bushings that hold the rear axle in place. Although you may not see these bushings spin under load during testing, it is always a good idea to glue them in place as a preventive measure. You can use almost any adhesive, but I like to use hot glue or clear silicone as it is easily removed if you need to change them.
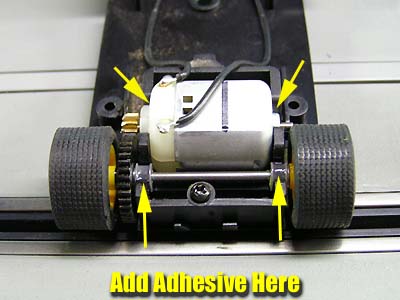
Also check the motor with the body off and apply power. See if the motor is flexing in its mount. If so, again add a light drop of adhesive to keep it from rocking in the cradle:)
Tire Sanding
Sanding the tires on your models can be done in a variety of different ways. One easy method is to simply use your existing track for power. Just take a rubber band and wrap it around your controller to hold it down to full throttle. Then, using a medium grit sandpaper sheet, place your model backwards on the track. Running the car backwards is just easier for you to control the car and hold it in place.
Next, lower the rear tires on to the sandpaper and begin sanding. I like to sand my tires is bursts of about 15 to 20 seconds. This helps make sure you don't overheat the motor or the tires. Fly tires can get warm and sometimes begin to chunk apart. This is why I only sand in these 15 to 20 second bursts.
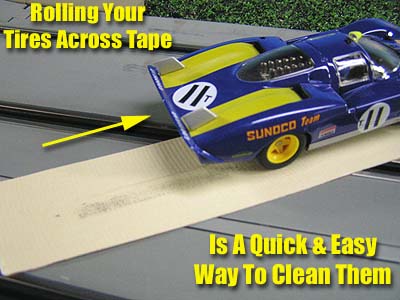
Once I sand them a few times it is time to clean them. A very simple way to clean them is to just roll the tires across some masking tape as shown. This cleans the tire of any excess tire debris from sanding. There are many ways enthusiasts like to clean tires. I have heard of just about a 100 ways from lighter fluid to WD-40 to get these tires clean. These seem to work I suppose, but simple tape seems to do the trick for us and it is the method I favor using.
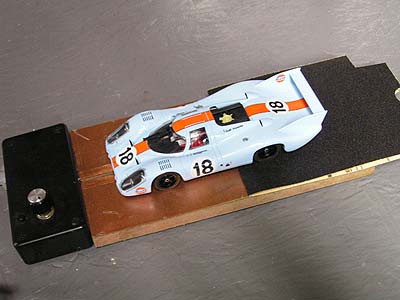
Another option is to build or purchase a dedicated sanding station. Mine came from Carlson's Slot Cars but you can easily build one yourself out anything from old spare straights to blocks of wood with copper tape. A sanding station just makes the process easier for those times when major tire sanding might be required.
Lubrication
This step is pretty self-explanatory. Use a light drop of oil on your bushings and each end of the motor. You can also put a small drop on each of the front axle stubs. Don't use too much, just enough to do the job.
After-Market Options
There are many options you can choose to add or change on these classics. Many enthusiasts simply change to silicone tires immediately. Some discard the standard wheels for turned aluminum. Others replace all the running gear including the axles and gears, sometimes even the motor.
Personally, I keep my models as close to stock condition as I can. With the people I race with on a regular basis, we just enjoy pitting our driving skills against each other instead of our wallets. Anyone can throw money at these models and make them very fast magnet (or non magnet) missiles if they so desire. Some racing clubs do just that and I have seen some incredibly fast classics that rule the local raceway. However, I simply wanted to show what you can do to improve these models with the very basics of tuning without having to invest a great deal of time and money.
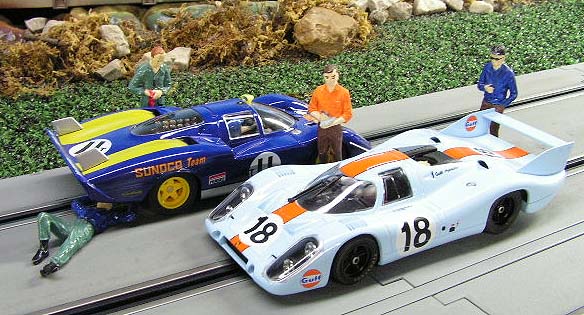
Time For Battle!
Finally it was time to see how these models compared. I soon noticed that the Porsche was hooking up a little better in the corners, in fact much better than I expected. This model felt like it was glued to the track and easily bested the Ferrari. Lap times were an average of 4.2 seconds for the Porsche and 4.4 for the Ferrari.
I took the Ferrari back to the sanding station and gave it a little more attention. Then I cleaned the tires with tape and placed it back on the track. I then just cleaned the tires on the Porsche and time for another run.
This time things were better. My Ferrari was still not there with the Porsche...but I was getting closer with lap time averages easily in the 4.3 range with a few 4.2 seconds laps posted as well.. Another trip back to the sanding and cleaning area and time for a 3rd try. Finally...there I was running neck and neck with the Porsche. The Porsche still felt like a more stable model to me, just being a little easier to control.
Braking and acceleration on both models were very crisp and the more I pushed them, the better things they became. Both cars could be shoved deep into even the R1 inner corners before I had to apply brake and would launch out of them very smoothly. Sometimes I would brake too late of course and cause the cars to almost slide out from under my control, but once I chose my braking points I was simply having some great fun pitting these two classics against one another.
Conclusions
Although the Porsche seems to be slightly dominant and I have to give it the advantage, I still think these models make for a great match-up. Keep in mind that different drivers are a huge factor. I have seen drivers with skills much better than mine (there are thousands if them!) easily beat me even when I thought I had the hot set up going.
One of the biggest upgrades you can make in this hobby is not more magnet, new motors, power or control or new wheels or tires...it is YOU. Practice is by far one of the best things you can do to reduce your lap times and become more competitive on the track. Countless times I have witnessed racers begin with a brand new Fly Classic that ran poorly and had slow lap times, but throughout the course of an afternoon they not only worked on the model, but on their driving. At the end of the day they were cracking lap times they thought they would never see.
Should you have to perform this much work on a car you just paid $50 plus dollars for? Most racers say no, of course not. I also agree that Fly could improve the quality control of their products. However, Fly has not changed much over the years (at least in the Classic line) and it has not stopped most enthusiasts from buying them. We have grown accustomed to these issues and we simply deal with them in order to race these beautiful models.
So as much as you hear and see these negative issues about Fly, they are still one of the best investments you can make in this hobby.
Why?
Because they can be tuned and transformed into some of the best running models in the hobby. They are also models that have withstood the test of time. You can purchase this brand new Ferrari or Porsche and visit my track for a day of racing. I can pull out the very first cars made in the series and we can have a great day of close, even racing. Same motor...same magnet...just me against you.
Fly classics on the most part are basically the same today as they were around 10 years ago (boy I feel old...wait I am old!!). When you look at investing in a slot car, think of how long you will own and race it with just your friends or even in larger clubs. While other companies keep heading further into "limited everything's", or making constant changes to motors, magnets and chassis in the same series of models...the Fly Classic line is still a series you can invest in that won't disappear in a few months. Nothing is more frustrating than paying $40.00-$60.00 on a slot car and when a new livery of that model shows up, you discover a new motor that makes your first investment not competitive. When you think Fly models are more expensive, think on the money you would now have to spend to match that older model with the new release. And with other companies raising their prices that sometimes surpasses Fly...in the end, the money is pretty even.
In the racing that I do, I get to visit many different tracks and have made some great friends over the years. If there is one series of models that seems to get more race time than others, it is the good old Fly Classics. With such a large variety to choose from, you can always pick a car that will compete.
These latest models from Fly are not for everyone, but I enjoy them very much. The small amount of time I take to correct some of the issues with them is well worth it and if you enjoy the tuning process, I think you will agree. Scale accuracy issues aside, I think both the Ferrari and Porsche are both worth a second look for those enthusiasts who enjoy a challenge. I have so many of these classics that one would think I have enough. If one thing is true in our hobby it is that you can never have enough slot cars, and when Fly adds another in the series, it is only a matter of time before I add it to my stable.
- Harry
As always feel free to contact me about this article or just the hobby in general at harry@homeracingworld.com, or better yet drop into our Message Forum and share your thoughts with other enthusiasts!
All models acquired from www.SlotCarPlace.com
![]()