
March 14, 2010
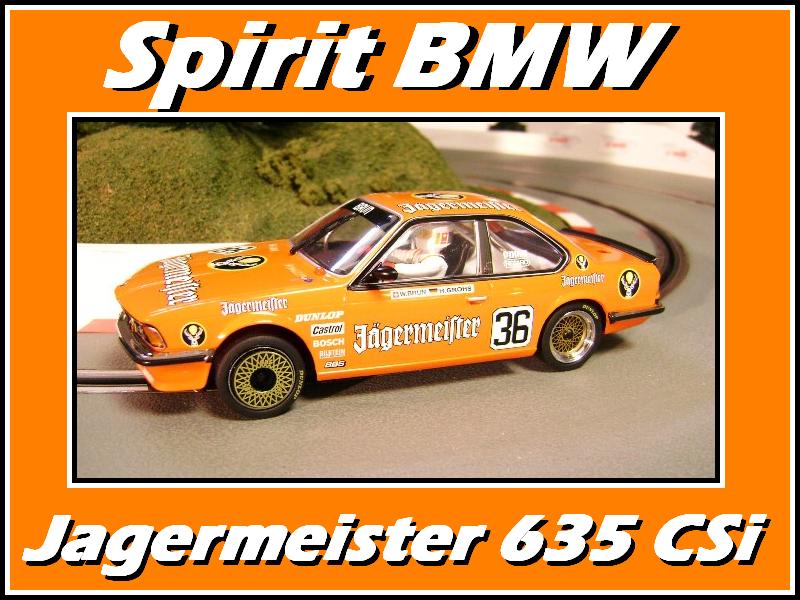 Spirit BMW 635 CSi 'Jagermeister' Monza 1984 Review By Shawn Smith Let it be said that I am a HUGE sucker for Jagermeister orange liveries. Needless to say when this little beauty arrived from SCX WorldWide my mouth immediately began to water. Sure just hearing the word Jagermeister does that for me but when its printed on the outside of a slot car it just makes the whole thing that much more special. 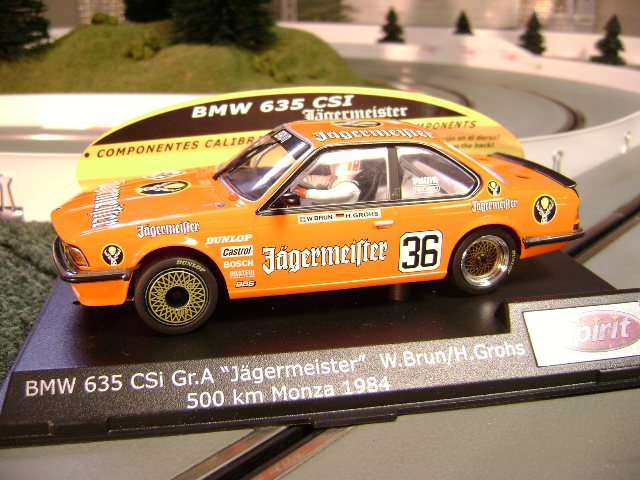 And loving Jagermeister cars as much as I do it was a 9 out of 10 bet that this car would be a hit based on looks alone. Being modeled after the 1984 Monza version makes it a little more special, as the 1980’s were really my ‘formative years’ in relation to my love of cars. Not saying that I don’t love and appreciate the more classic of cars but being a child of the 70’s the 80’s cars are some of my first memories of auto racing and it really set the tone for my love of auto-racing today. 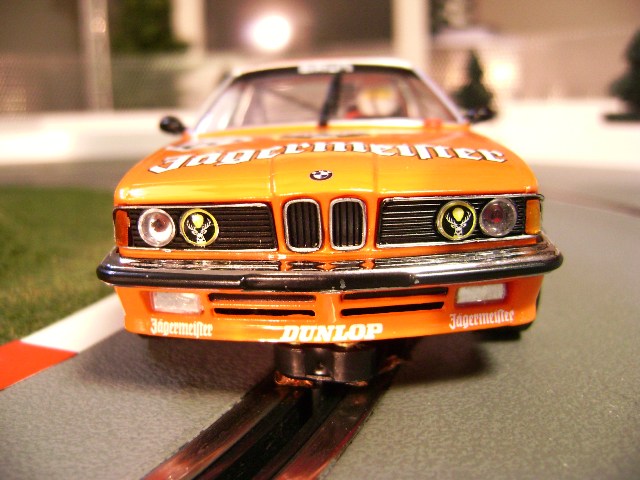 So, let’s have a look at the outside of the Spirit 635 BMW starting with the front of the car. I love the Jagermeister logos printed on the high beam headlamp lenses. I also appreciate the trimmed grill work, the amber plastic turn indicators and the chrome and black accented wrap-around bumper of the model. 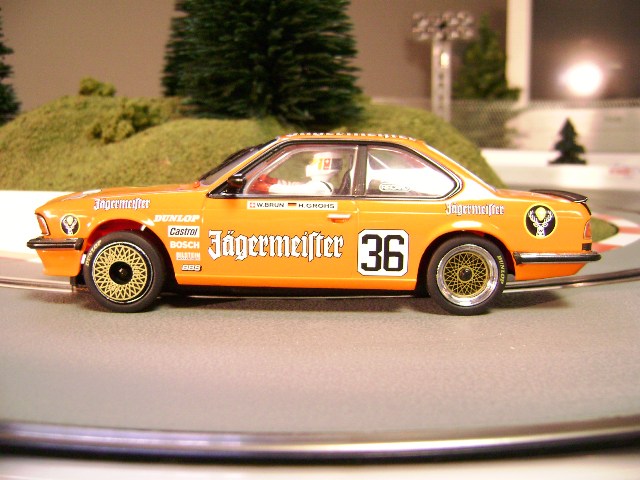 From the side on the track the first thing that stood out to me was the right height of the front wheels. Lots of fender clearance as you can see and the car has a noticeable rake happening front to back. Here you can also see how both the front and rear bumpers wrap fully around the fenders and you can also make out the upright sitting W. Brun driver figure protected by silver roll bar detail inside the cabin. Tougher to see in this shot is a tiny orange detail feature at the base of the windsheild. One of the car's wiper arms has been removed and replaced with a tiny orange cap detail, something that could have easily been skipped so I credit Spirit for making the attempt on this.  And speaking of the cabin the interior is a tray style pan with the driver being legless from the knees down and his rump has been shaved flat for him to be placed in his seat which is also only the there from the lower back of the driver and upwards. The interior does boast a bright red fire bottle mounted on the stark white tray bottom as well as a black center console with silver accented emergency brake handle and gear shift lever. And did I mention the Jagermeister livery? 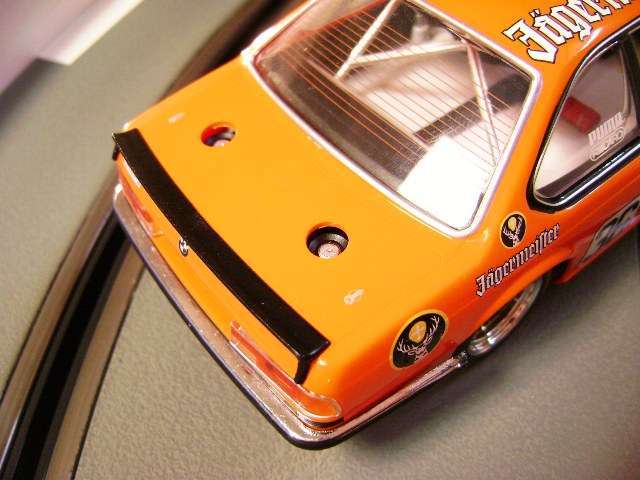 Here from the back you can see those details through the windows as well as the trunk detail of a black lip-spoiler, tampo-printed locking pins on the trunk lid as well as the simulated refueling holes cut through the trunk. 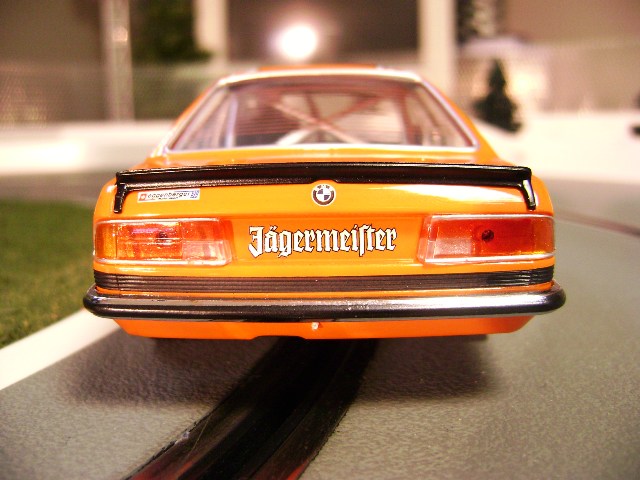 Out back the view is fairly plain. A very tiny ‘Eggenberger’ graphic, and yes its printed clear enough to be read to those with good eyes, a BMW logo and a Jagermeister graphic are all that decorate the rear of the car. A small bit of flashing can be see on the bottom of the bumper which was easily removed with the blade of my hobby knife. 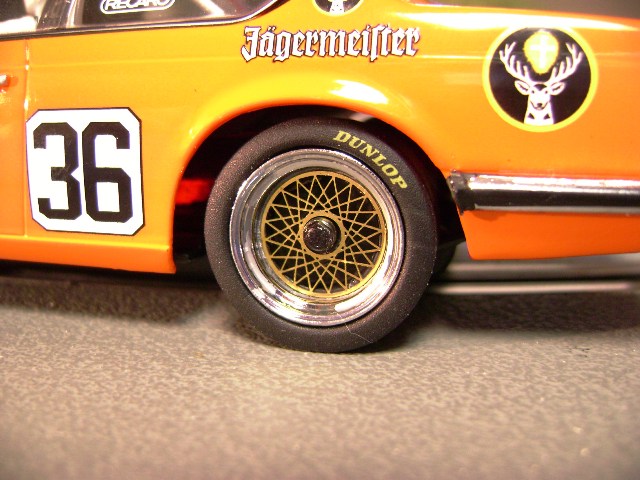 Rear rims of the car I think look great. The chrome lips of the wheel framing the gold lace design and being wrapped in Dunlop printed rubber is a nice effect. 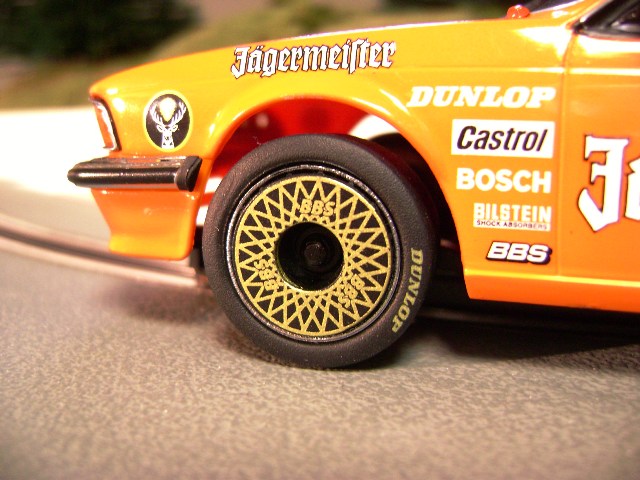 Front wheels have the braking cooling discs installed and before you ask no you can not pop these off and hope for the same inner rim design of the rear wheels. These simulated BBS brake disks are the full insert so removing them gives you an empty front wheel hub crying for you to glue the insert back in. 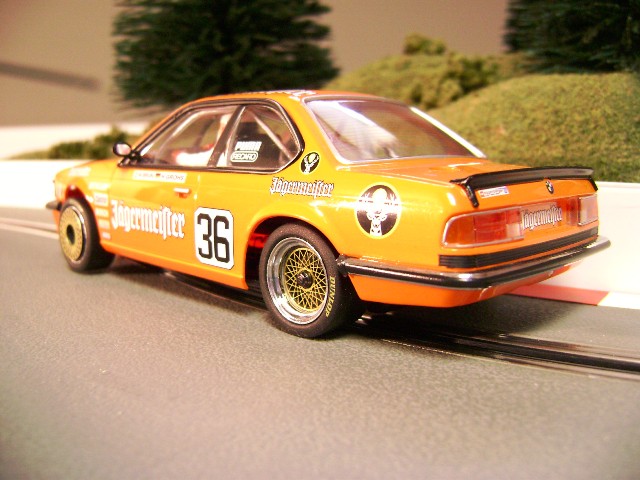 So now comes the moment where I adjust the car’s braids and set it out for a couple test laps just to see if a car is going to run as good as it looks. Braids adjusted I place the car in the slot and give it about 25-percent throttle and… hold on a second! 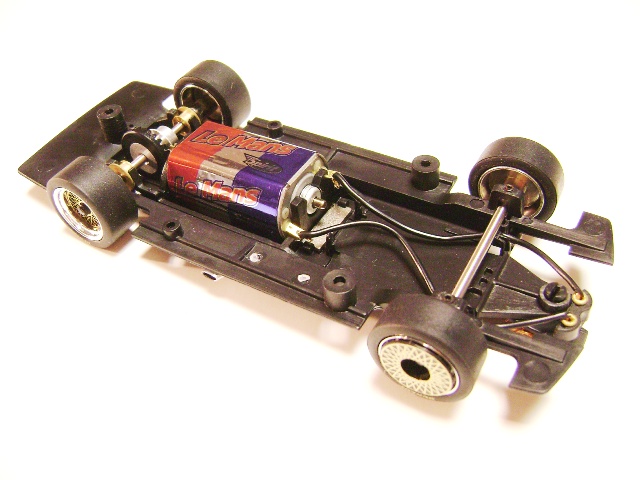 Off comes the body, not that I normally don’t do that with each review anyway, but this time because it’s ‘needed’. The initial trigger pull showed an instant glaring issue, the car both had a wicked hop at the back but also felt far too sluggish considering the motor and parts supposed to be in this car. Removing the body the chassis looks good and has a familiar set up but something is wrong and we have to find it. 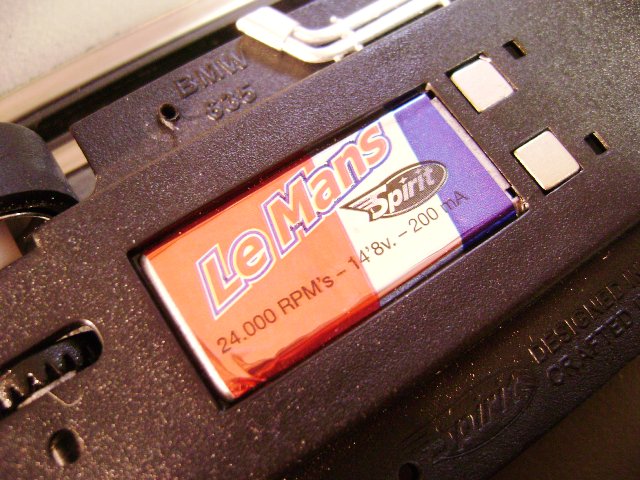 Boasting 24,000 RPM’s at 14.8v I know the car should have some legs. Too much magnetic down force was likely not the issue as the magnet is mounted ahead of mid-chassis and while exposed on the bottom I didn’t feel an unusual amount of pull on the track rails lifting and setting the car back down a few times. 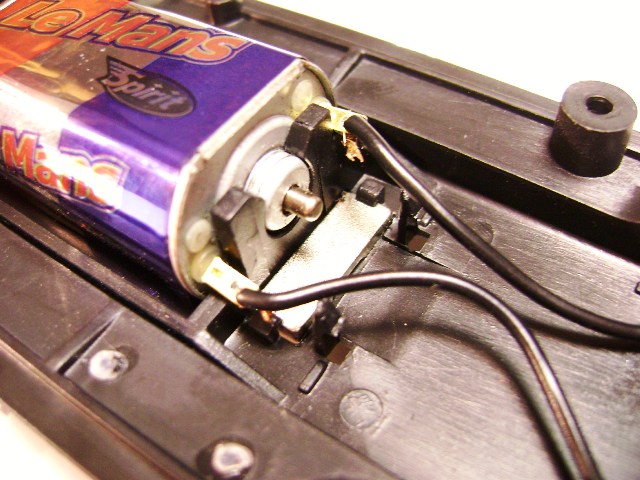  The motor is also very secure in the chassis, held tightly by two motor mount screws on either side of the can. A nice brass pinion sits ready to turn the back plastic set-screw crown however turning the axle assembly by hand its clear that it doesn’t want to move freely. If you look close enough around the gear hub you’ll get a hint at one possible issue. 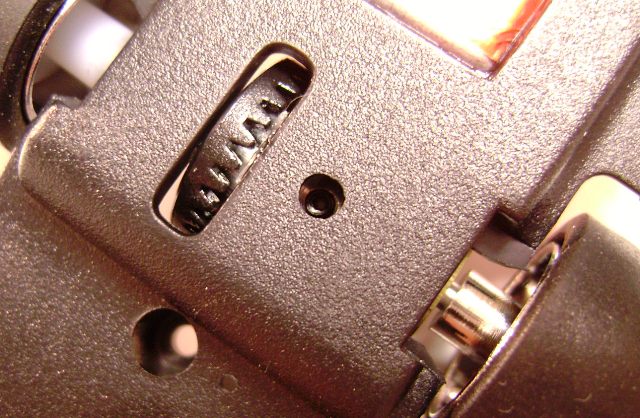 The mentioned set screw crown gear does have a complementary set screw adjusting hole drilled through the bottom of the chassis. No need to remove the body if you need a slight adjustment but I need to stress that how much ‘adjustment’ in this case is debatable and the real benefit of this that I can see is if you feel the gear needs retightenging... which mine actually did. 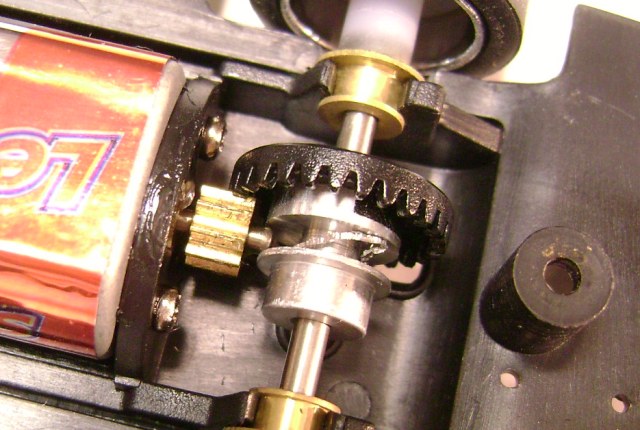 A couple of things troubling to me at this point as the gear is both loose on the axle and as you can see we have a bit of gear damage being indicated by the excess metal inside the hub. Certainly gear fitment and mesh would hamper a car and yes a loose gear on the axle would contribute to a slow acting car as well and spinning the axle by finger pressure again it seems we have other forces working against us. Turning the wheel the axle is trying to turn the gear, and it does turn although with some slipping inside of the crown but having removed the residual metal shaving and having loosened and repositioned the crown something still is causing some friction. 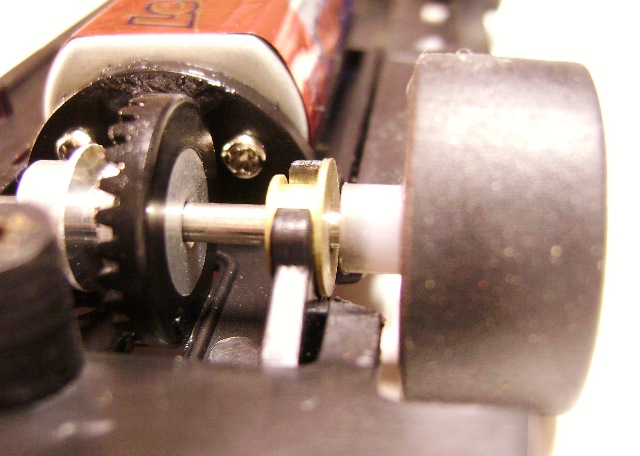 It is time for me to look at the car’s bushings and axle. Having come with ‘calibrated components’ I really didn’t think the axle was going to be the cause of the friction, or the earlier mentioned hop on the track, so I next turned to the bushings and wheels to see if we had an issue. Notice above how we have wheel clearance between the right side wheel and the large outer diameter bushings yet below we have zero clearance. 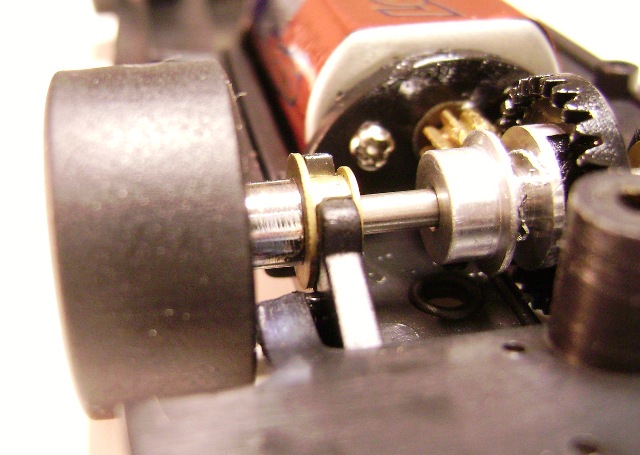 This left side wheel was firmly pressed on to the axle and in to the bushing. Holding the gear with my thumb I attempted to spin the rim back away from the bushing but to my surprise it didn’t want to budge. With needle nose pliers now in hand I gripped the axle and ‘snapped’ the rim loose now allowing me to back the wheel off a bit. Spinning the axle was far easier now so seems the wheel pressed on too tightly was contributing to our axle not wanting to spin freely. 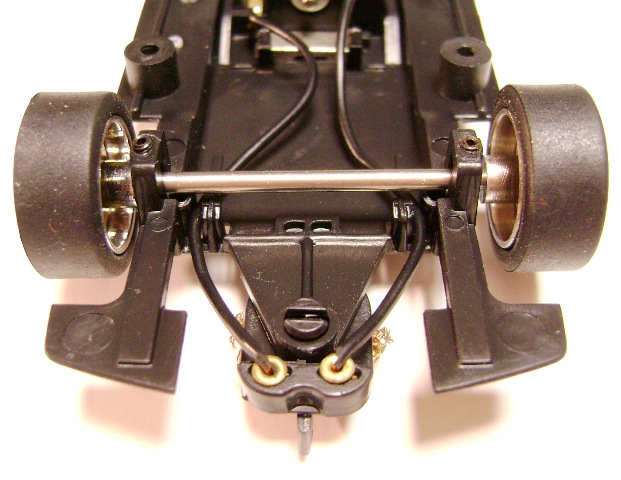 Back to the front and here I have no issues! Well… that’s not entirely true. Sure there are no real problems to speak of, and front axle spins freely and the wheels appear to spin fairly true on the axle. The axle mount even has set screw adjustments allowing you to limit the axles up and down movement. What I would like to see however is slightly longer screws here though as I really don’t want to hold the axle ‘down’, as much as I would like to lift the axle ‘up’.  Under the axle there are two round openings in the mount where you can remove the screws from above the axle and screw them in to the chassis below the axle. This will allow you to ‘slightly raise’ the axle but only slightly as the screws aren’t tall enough to lift them as much as I would like to see. 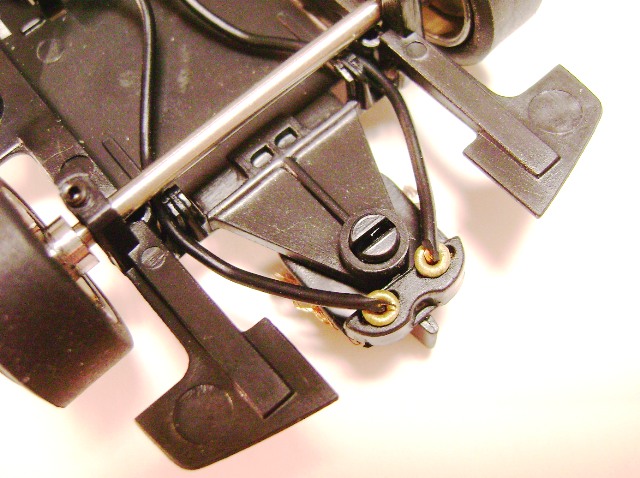 I found the guide design to be an interesting one. As you can see here the chassis looks oddly incomplete, not sure I see much of a reason for the extra legs of chassis plastic coming off of the front axle mounts and they do nothing to support or protect the guide system in any form. That said the guide tongue itself is very rigid and the actual guide felt very snug, loosened a little with a drop of oil around the guide shaft. 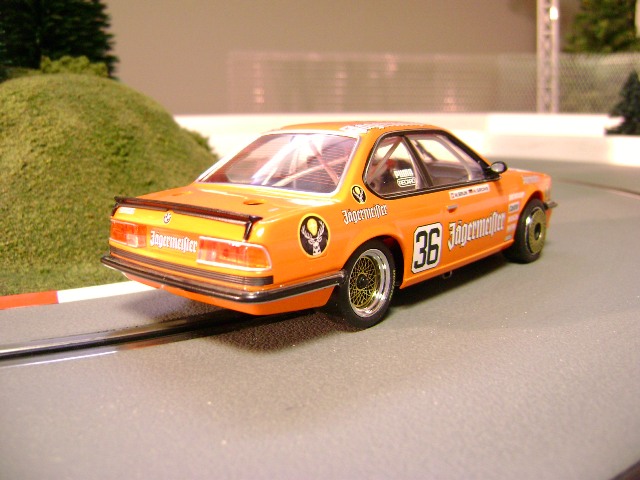 Rebuilt and put back on the track I raised the back end and gave it a light squeeze and you could audibly hear more RPMs that it has originally. The now reset and retightened gear, as well as the freed wheel, was allowing the axle to take and deliver the power as it should so its time to go back to test lapping. Oh that’s right… the ‘hop’. Not even three feet down the straight I stopped and frowned at myself for not sanding the tires before trying again. Out came the sand paper and down went the rear rims and as it sanded the rubber down I could feel the vibration from the left side rubber struggling against the grip of the paper... and then I found the wheel no longer spinning while the axle happily rotated along. Seems my loosening the 'stuck' rim now proved to provide me with a wheel I was going to have to glue on to to make it fit tight on the axle again. Good grief I thought to myself and I laughed a little bit at the comedy of errors, mostly with the same side of the axle. Now back to sanding and a few more burst of power and still a bounce, a little more and still some bounce.  Off came the rubber and an inspection of the wheels found no flashing that needed to be corrected. Rims actually looked nice and smooth so I refit the rubber and checked the fit around the hub. Sure enough that darned left tire was bulging away from the back side of the wheel and some massaging the pushing proved it was on correctly just sadly not well molded. Finding a pair of aftermarket tires the stock Dunlop rubber came off and better fitting tires went on and another quick shot down the straight proved I was now both faster and smoother. 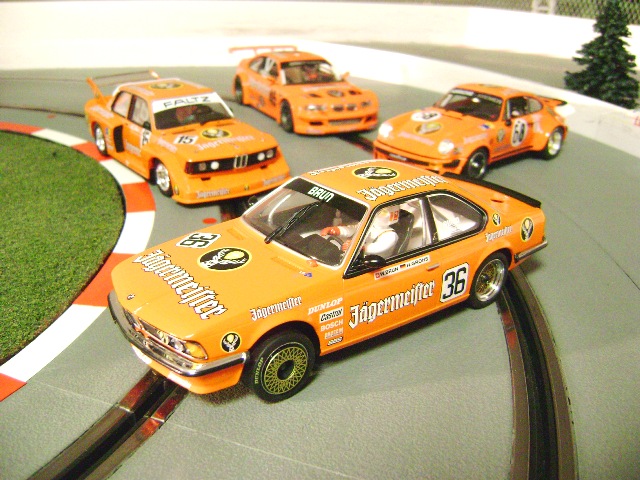 So... this is always a conflicting time for me when I love the looks and finish of a model but have experienced some issues that would likely send the rookie back to their dealer asking for an exchange or a refund. Nothing 'terminal' about the issues, frustrating yes but certainly fixable and now having the car sorted out it's running very well and of course I love having yet another orange Jager-car to run around the track. Hopefully the issues are isolated; I have the same hope each time I come across a car I like with similar problems. If you love the looks of this car as I do, and you decide to get one just make sure to give it a thorough once over to make certain your model is as it should be. As always HomeRacingWorld.com would like to thank SCX Worldwide for sponsoring this review. If you have any questions feel free to contact me via my email link below. Shawn Smith - SJSlots shawn@homeracingworld.com Thanks Go To SCX Worldwide For Sponsoring This Review!
|