
Last Updated: Wednesday July 23, 2003
Project: NOMAD!
 On
their recent trip to visit us here in Missouri, Dave Dobner and Rich McMahon
decided to surprise me with a unique gift: A 1955
Chevrolet Nomad. But they didn't stop there...while they WERE DRIVING
...they actually had the chassis modified for me with a 2nd generation
Scalextric NASCAR chassis! So for those interested, I thought I would do a
"play-by play" of its completion.
On
their recent trip to visit us here in Missouri, Dave Dobner and Rich McMahon
decided to surprise me with a unique gift: A 1955
Chevrolet Nomad. But they didn't stop there...while they WERE DRIVING
...they actually had the chassis modified for me with a 2nd generation
Scalextric NASCAR chassis! So for those interested, I thought I would do a
"play-by play" of its completion.
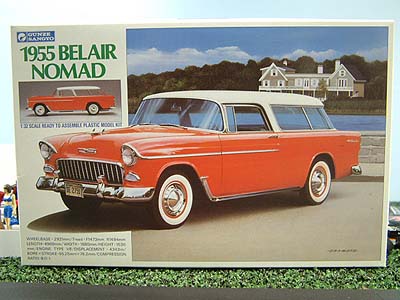
I am not sure what it is about me, but these old Chevy's, both 55' and 57' versions are some of my favorites. Most likely it is the hours I have spent in my youth, and recently as well, racing the old A/FX HO versions. These guys have known this about me for a while now, and hence they decided it was time for me to have a 1/32nd scale slot car version. My skills at kit conversions are limited to say the least, but thanks to the help and head-start they have given me, I am looking forward to the completed model.
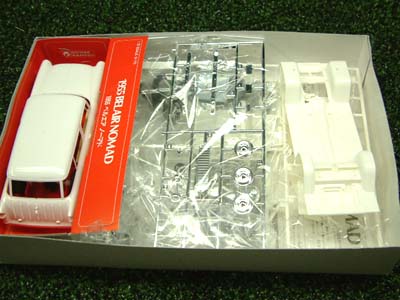
The kit is a Gunze Sangyo and is 1/32nd scale. It is very well detailed with the moldings and parts being at a very high standard. This project will utilize the models interior and I will try and show the best way I can how to modify this interior to fit over the Scalextric slot car chassis. You could easily just add the glass and paint the inside black, basically giving it the old "tinted window" treatment, but I wanted to see how well I could get this kit to include as much detail as possible...however...if I mess this up there is always that option:)
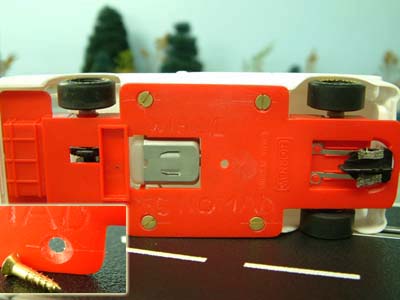
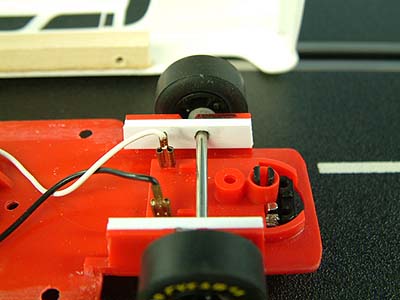
The photos show the body with the modification, which is simply 2 blocks of wood glued in place, then 4 holes drilled to accept the self-tapping screws with the added bevel in the chassis making a clean, flush fit of these screws. The chassis itself still needs some trimming of course, but the "hard" part is finished. This just shows how simple a model conversion can really be and makes me start looking closer at the other kits I have collecting dust on the workbench.
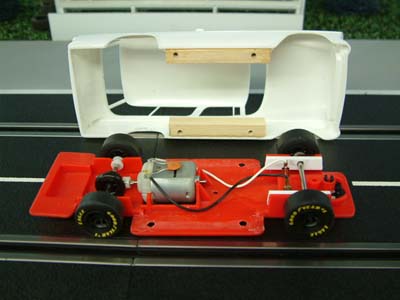
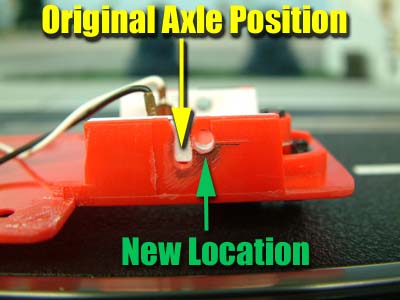
The front wheelbase needed to be stretched a little, and this too was very easy. They used 2 strips of styrene plastic and mounted them on the inside of the chassis as shown. Then they mounted the chassis to the body and marked where the axle needed to be moved to, not only in length but to make sure the wheels were at the proper height with the track allowing the front guide to ride flush with the rails. This model has the wheels set almost perfect with just the slightest amount of the wheels touching the track, providing an excellent Tri-pod effect.
This car will be non-magnet of course, and already it is extremely fun to drive. It takes little effort to hang the rear end out and slide all the way through the corners. Again, there is just something about sliding these little machines like this that makes this hobby as much fun as it is for me. Further testing certainly shows it will get some lead added and most likely Indy Grips or Super Tires to get it even better.
I want to thank these 2 guys again for this fantastic surprise. This past weekend was filled with some great slot racing, and this model was one of just many highlights. Hopefully this series will inspire some of you to write in and show us your model conversions and your techniques in building it. The knowledge you have would be appreciated by all of those just starting out in our great hobby, so give it a try!
That's it for this installment! Next will be the modification of the interior (hopefully) and chassis trimming.
Until Next Time! - Harry