
February 18, 2009
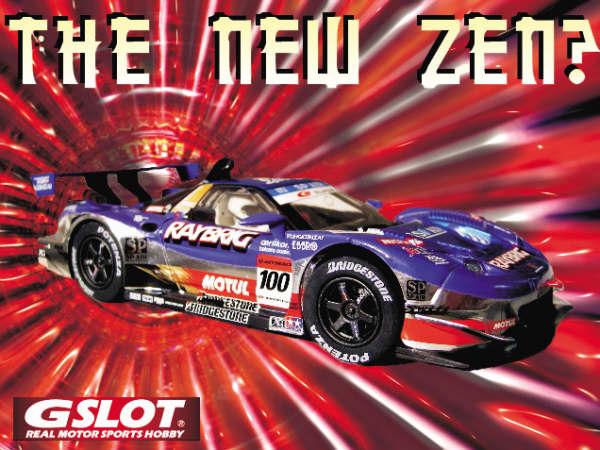 GSLOT Raybrig NSX Super GT 500 Review By Eric Cropper I remember seeing the Lexus GT release in a thread here on HRW last year and their cars looked very interesting with all those screws for tuning and such. I expected that the Lexus would be what I had on the way, but was glad to see something new. The Raybrig NSX has been done before and we will obviously use those other brands as a comparison to the GSLOT version later in the review. This car has traveled from Japan to Germany and half way around the world for me to put through the ringer. So, I grab some chop sticks and open wide to see if I can stomach the #5 on the GSLOT menu. FYI if you’re wondering what the heck N.T.I.N.S.N. is…Need To Import New Slots Network. 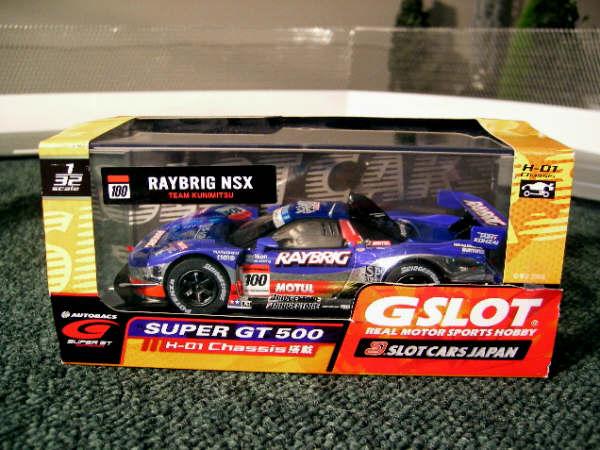 GSLOT has a presentation like a lot of other brands. The cardboard sleeve didn’t fair well from the trip. I can just imagine Michael’s suitcase being scanned at the airport on the way back. However, this case has something more to offer than any other brand. You get a base that can be used in more ways than one. The base has authentic metal rails just like a slot car track. So, for those looking for an easy and cheap tire sanding station…you got it. Just hook up a power supply and add sand paper. Others have also thrown around the idea of using it to display a car with its lights on. Pretty cool ideas coming from GSLOT and we’re just talking about the case. 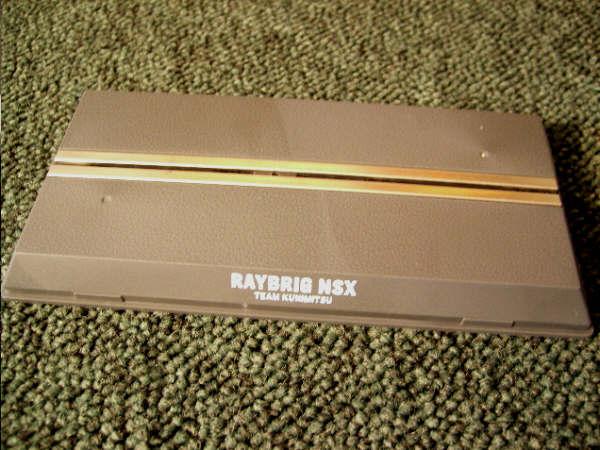 APPEARANCE 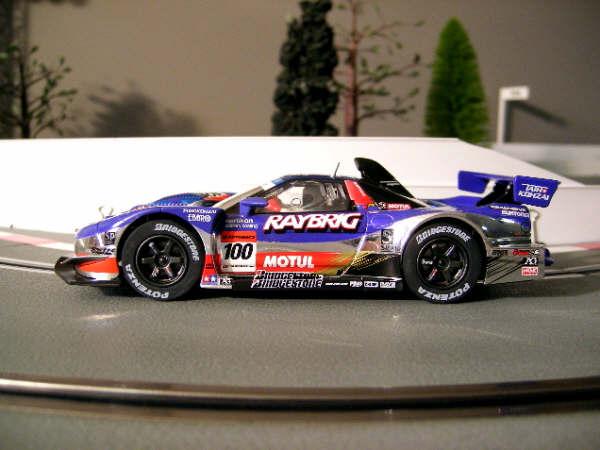 I already know what everyone is thinking. “What the heck is wrong with the tires?” Usually, I leave the tires alone until later in the review. However, they’re the first thing my eyes gravitated too when I pulled it out of the packing peanuts. Plus, I knew what to expect from the previous discussion about the Lexus on HRW. THE TIRES ARE HUGE!!! There I said it and the rest will come out later in the review. Some of it will be good and some of it will be bad in regards to the GSLOT tires. Looking away from the tires and back to the car itself you’ll quickly notice a very shiny finish. Much like one of the Lexus’ this NSX livery has a lot of chrome. It’s different from the other versions of the Raybrig that have been done by the likes of Scalextric and Ninco. Personally, I like it and it really stands out from the others. There doesn’t appear to be any clear coat to protect the paint, but nothing that can’t be done by those who want too. The paint does have a shine to it since it’s applied over a body that was first chromed. The logos are done very well and only in areas like the vents on the hood contained some slight runs. Dust did end up in the blue and purple paint areas of the rear end. Also, the edge of the purple that meets with the chrome section of the body had some rough spots. Nothing to scream about and we’ve seen worse in other reviews. One other thing you can see from the side view is that the NSX is quite high off the track. We’ll address this later in the testing area of the review. 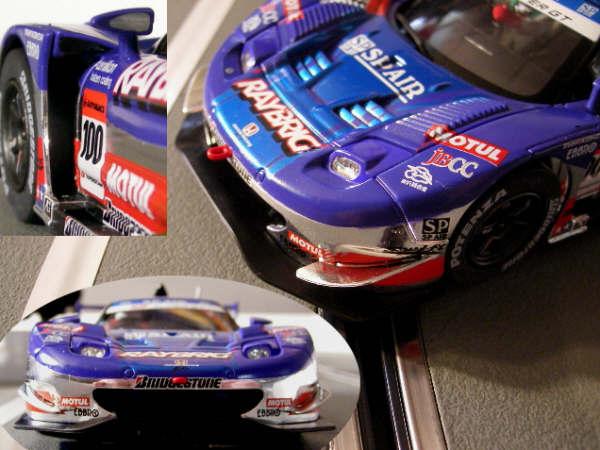 The front of the Raybrig is where all the little details reside. It almost takes on the appearance of a snake head. The headlights are the eyes, the various vents make up the scales, and the red tow hook a flickering tongue. It would have been nice to have some openings in the larger center vents of the hood. Below is a good shot of the more than ample fenders and mirrors. NOTE: The lights DO NOT work on this model. 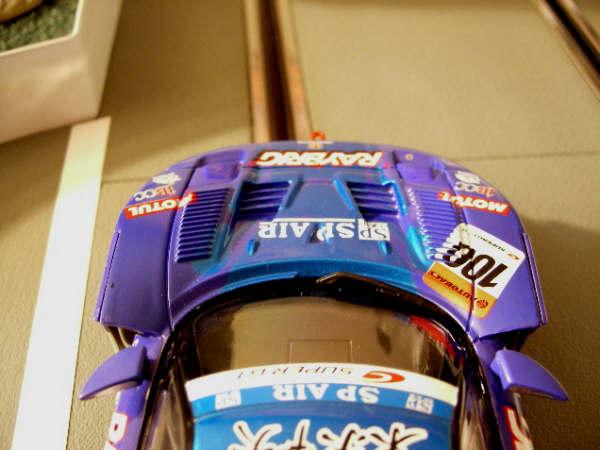 Sliding around the rear there are multiple opens in the body for the air to channel, two large silver painted exhaust pipes, and an exclamation point of a rear wing. 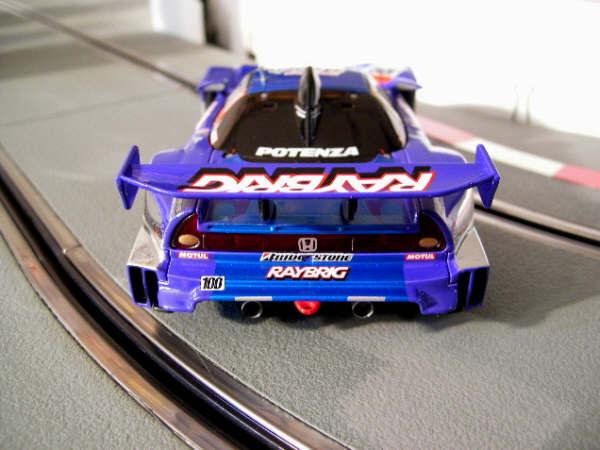 In the photo below, you get a feel for the width of the rear fender flares and a peek at the intake stack. There are 4 silver painted retainer clips for added detail and a silver roof antenna made of rubber. Though the antenna is rubber the intake stack takes away any real chance of it being damaged when the NSX ends up on its roof.  Above and below are shots of the many various sponsor logos covering the Raybrig. I love the calligraphy on the roof and wish there was more of it throughout the cars livery. The side of the NSX is a real exercise in varied font sizes and logo dimensions. All of which are very well executed. The side window has 3 vents cut into it for a nice touch of detail. 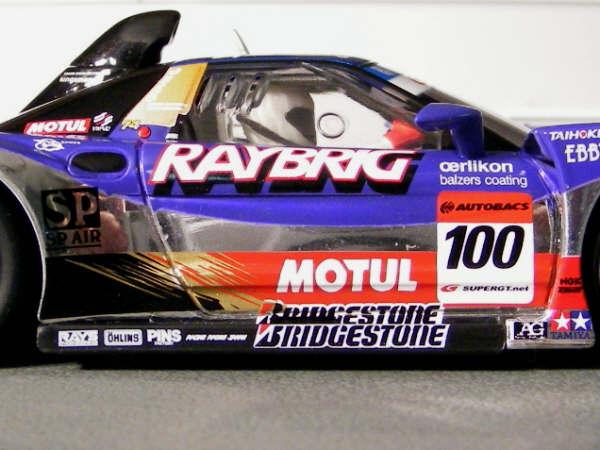 The white clad driver is strapped into a white racing seat inside this right-hand driven car and gives the only contrast to the limited detail of the all black plastic interior.  The wheels of the GSLOT are the standard six spoke Asian car fare with some seriously small logos printed on them. The disk brake is a separate piece and remains stationary while the wheel spins. The Bridgestone and Potenza logos printed on the tires are opaque and crisp. 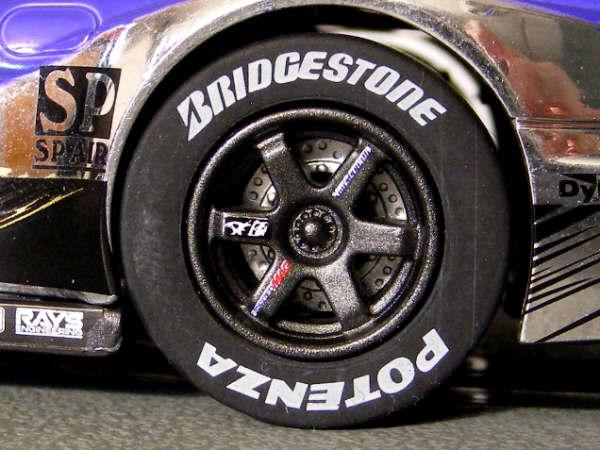 BRAND SIZE COMPARISONS This is where the scale purist will start to light their torches and reach for their pitchforks. The GSLOT line is suppose to be 1/32 scale and sadly it isn’t. These cars seem more in line with Ninco’s recently announced XLOT line of 1/28 scale cars. I’m not going to debate the size issue. I’ll just let the following pictures do the talking. Just as an FYI the cars are pictured on a piece of Artin track. GSLOT VS Scalextric  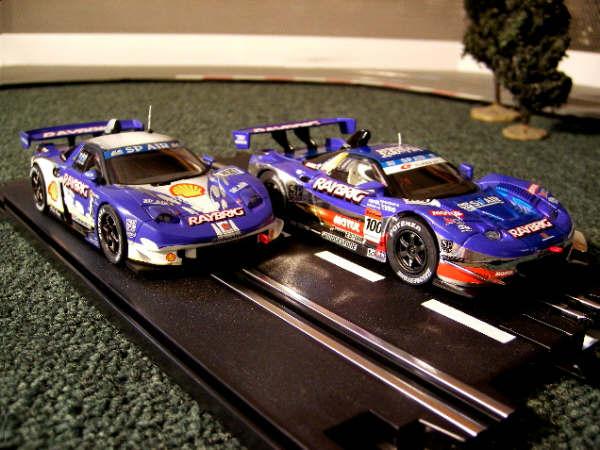 GSLOT VS Ninco 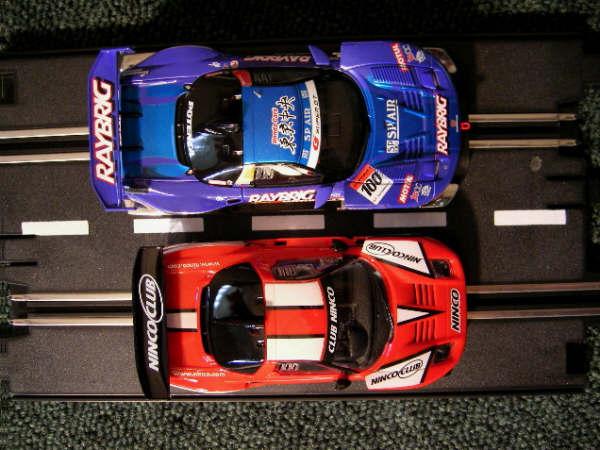 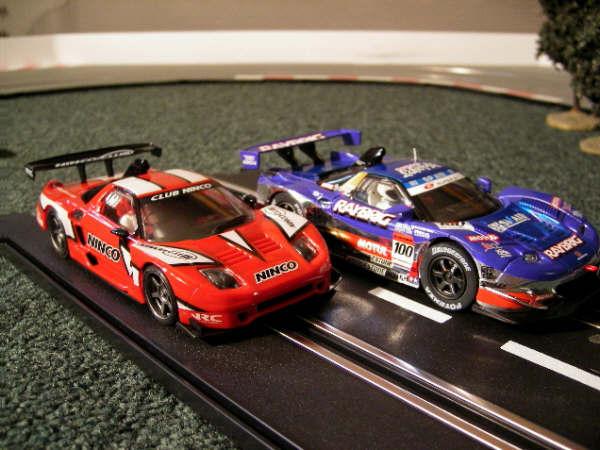 GSLOT VS 1/28 XMOD RC Car  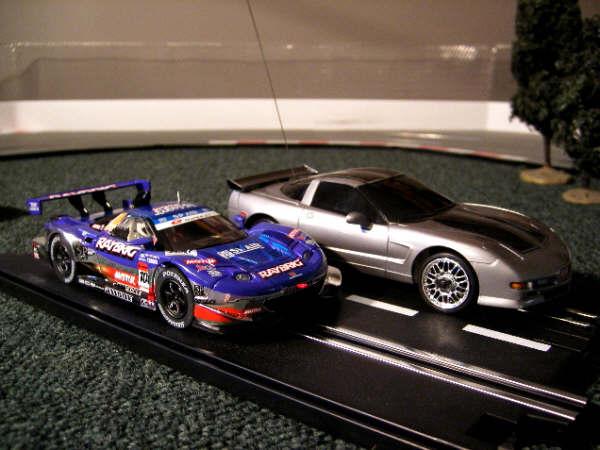 THE BELLY OF THE BEAST (and the belly if full) Place hand under your chin and brace yourself if you’ve never seen the underside of one of the Super GT cars from GSLOT. 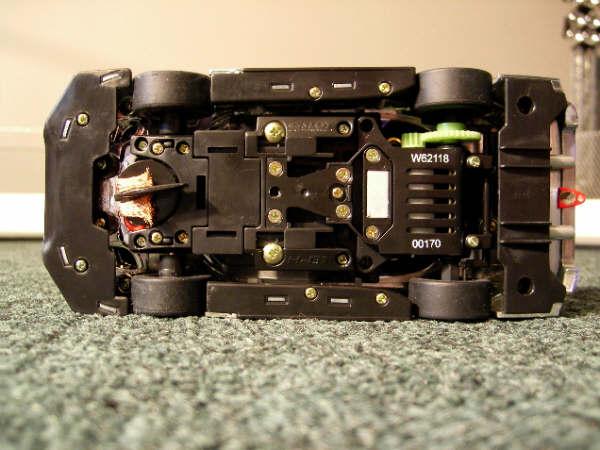 Holy metal detector!!! Usually we’re looking at 2 to 8 screws max on most slot cars when we flip them on their tops. GSLOT’s H-01 chassis is a new adventure to say the least. (stop counting already) My first view of the underside was intimidating. Plus, it doesn’t help that the 2 included instruction sheets are only in Japanese. Luckily, Michael included a full color brochure from the GSLOT Toy Fair Booth that had a little English on it. Remember, I said it had a little bit on it. What’s first? How the heck do I get the body off? After some visual investigation I figured out the following 4 screws hold the body in place. These are pointed out by the yellow arrows in the picture below. 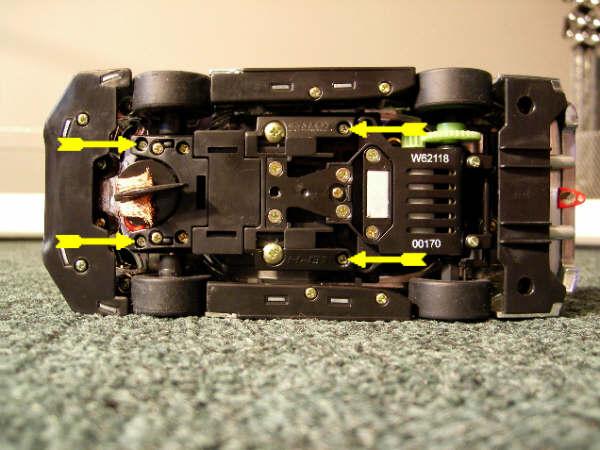 NOTE: The first time you attempt to take the body off you will need to do one of 2 things to make this possible. Either removed the front tires or the black front air splitter. The diameter of the stock tires makes it difficult to get them through the fender openings of the body. 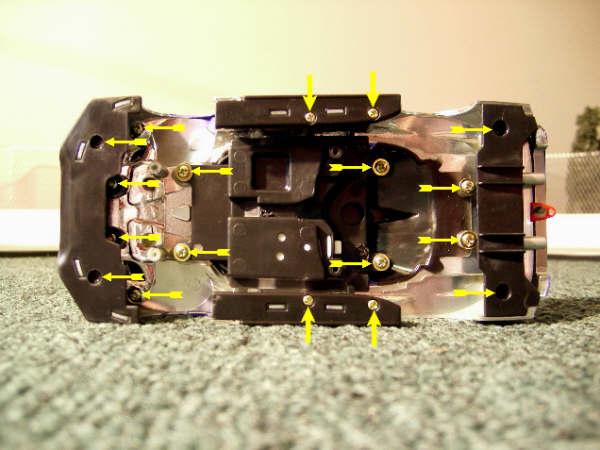 Above is the body minus the H-01 chassis. It’s not an optical illusion. There are more screws. All the extra body pieces and the interior are held in place with screws. This could be a place to save some weight by gluing these pieces into place instead of using the hardware. 1, 2, 3...I count 18 screws and that’s if I didn’t miss any. It all seems like overkill and a chance to actually wear out a screw driver tip unscrewing them all. This next shot of the chassis shows the screws that allow you to change the up and down play of the front axle pointed out by the blue arrows. The yellow arrows point to the screws that allow you to change the overall chassis length. This is really only valuable to GSLOT. Thus, allowing them to make the necessary adjustment for the different bodies they will be using with the H-01 chassis. The green arrows point to the piece that holds the rear disc brakes in place on the backside of the rear wheels. 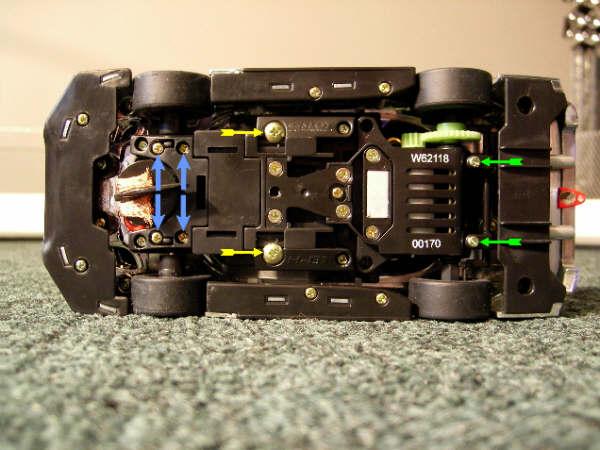 Now in the following shot the yellow arrows point to the magnet pod adjustment screws. This magnet pod travels a considerable distance up or down. The best thing is that a spring is mounted under the pod which keeps a constant pressure against the screws and should keep them from rattling loose while racing. The spring is very strong and I had to hold the pod down with my thumb while tightening or loosening the screws. I can say this feature is very adjustable to meet everyone’s taste in down force. 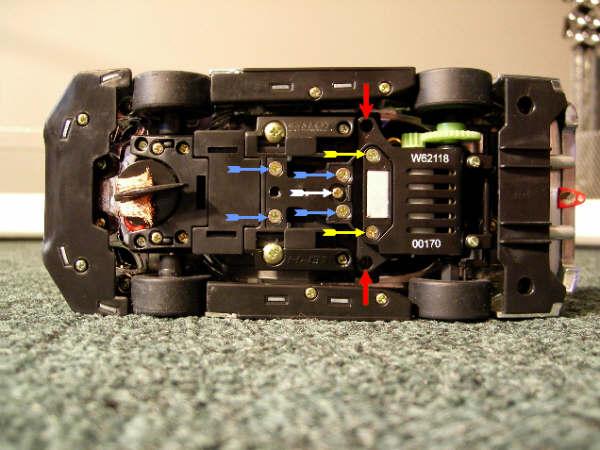 The blue arrows above point out all the screws involved with connecting the suspension to the chassis. This is similar to a RC chassis like a Mini Z. Honestly I didn’t expect this to make a difference in how the car ran. However, I’ll cover later just how wrong I was thinking negative about this feature. The lone white arrow points to the suspension adjustment screw. Turning it will loosen or tighten up the rear end of the car. Finally, the red arrows point to holes that allow some additional type of suspension to be added to the chassis. This is a hop up part that GSLOT sells separately. However, I couldn’t find any info on it and if I did it wouldn’t have mattered written in Japanese. Now you’ve seen all these screws and are probably wondering if I completely took this car apart. No way. I didn’t want to risk losing a screw to get a picture of all the parts. Luckily, GSLOT had a photo of the Lexus that saved me from having to dismantle the NSX. 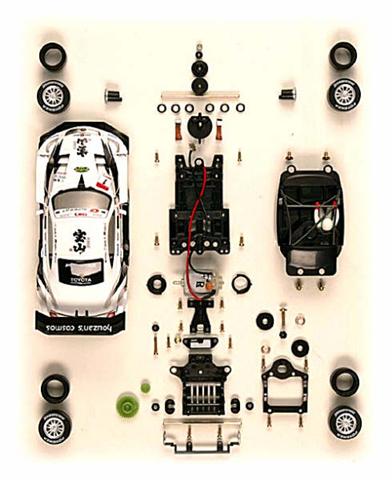 Quit counting!!! I did it already for you. There are 71 individual items in the above picture of the Lexus. After taking the body off you see just how different the H-01 Chassis is from the typical brand chassis. As you can view below the chassis is actually rather small compare to the body. However, that’s only because we’re expecting there to be plastic everywhere it’s not. I got to give GSLOT a thumb up for thinking outside the box with the chassis design. The motor is mounted at an angle. However, I can’t say what the reason is behind it.  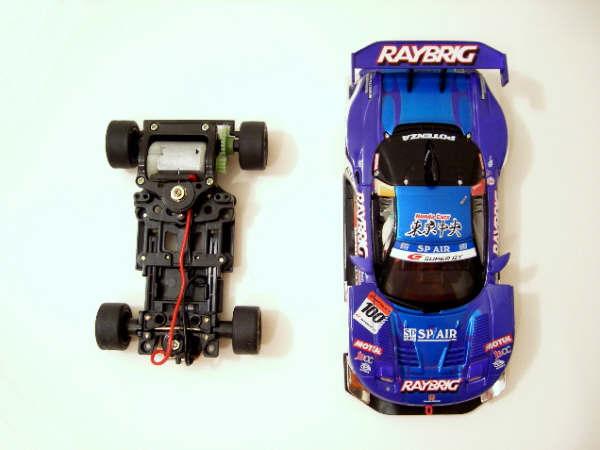 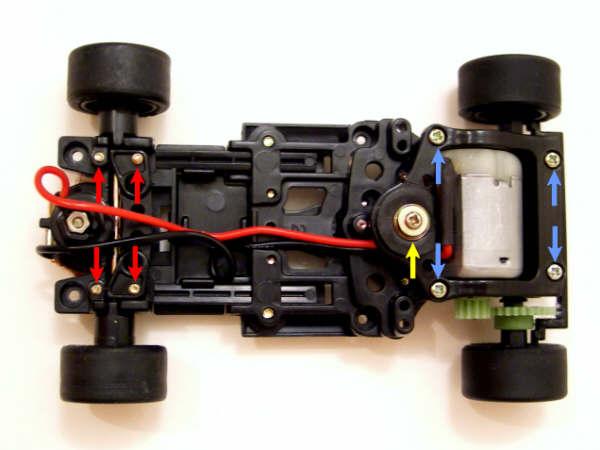 In the photo above I have more screws to discuss. The red arrows point out the axle adjustment screws. The big black plastic post coming from the wheel is actually the disc brake detail. It also tabs into the axle adjustment plates. Thus, as the screws are loosened the plates rise and allow the axle to travel more vertically. The result of this lowers the front of the chassis too. The 4 blue arrows screw into the chassis around the motor and help keep it locked down. However, the motor could be rolled front to back in its pod about a 1/8 of an inch. It’s nothing a little bead of hot glue couldn’t fix, but I didn’t think it was necessary. The green arrow points to the screw that holds the suspension spring all in place. We first tried adjusting this screw and didn’t see anything changing in the movement of the rear of the chassis. Lack of English directions didn’t help, but I finally figured out that the screw on the bottom pointed out by the white arrow in an above photo was the screw to turn for this adjustment option. 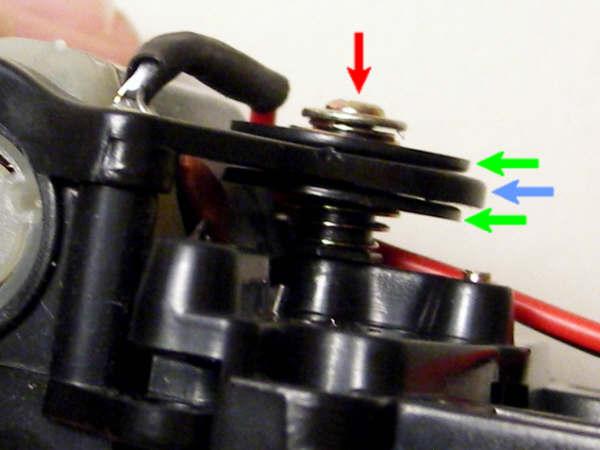 Above is a close up of the suspension system. At first Shawn and I were loosening the screw with the red arrow and it still might be what you’re supposed to use for adjustments. Personally, after looking at it more I think this screw is what keeps a constant tension on the spring and should be left alone. Plus, it makes more sense to adjust a screw on the bottom of the chassis than having to remove the body to make the change to the suspension. As I mentioned earlier the screw pointed out by the white arrow on the bottom of the chassis is the screw for making the suspension adjustments. It just makes sense after thinking and fooling with it a bit. So, loosening the bottom screw creates a gap with the top and bottom plates pointed out by the green arrows. This gap allows the chassis section in the middle (blue arrow) to move up and down. Below are close ups of the adjustable guide system. The guide I assume can be raised and lowered. Again, lack of English directions came into play. Besides, I didn’t find any need to change the stock setting. If it can be lowered this ability will prove useful to those running on routed tracks allowing the guide blade to sit deeper into the groove. 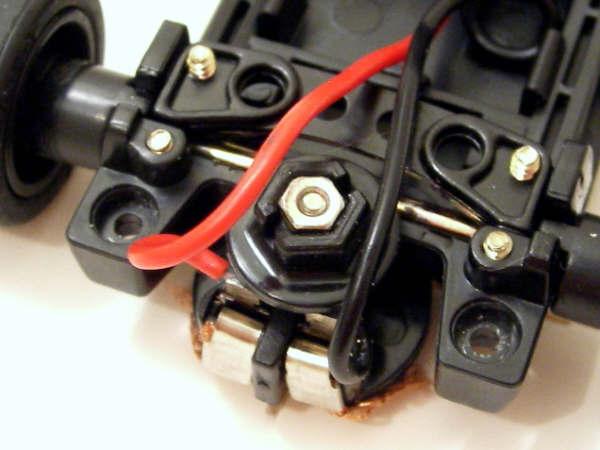 The wires have a brass tab soldered on their ends and this slides into a slot in the rear of the guide. The braids are the same way. My only complaint is that GSLOT didn’t include any replacement braids since they are different in design from most other brands. However, if EMI starts to import them and all the parts it won’t become an issue.  The braid material is on the softer side and nicely fans out with little effort. The guide blade is in around 3/4 of an inch long and 5/16 of an inch deep. It did fine on Carrera and Sport track when it came to staying planted in the groove. 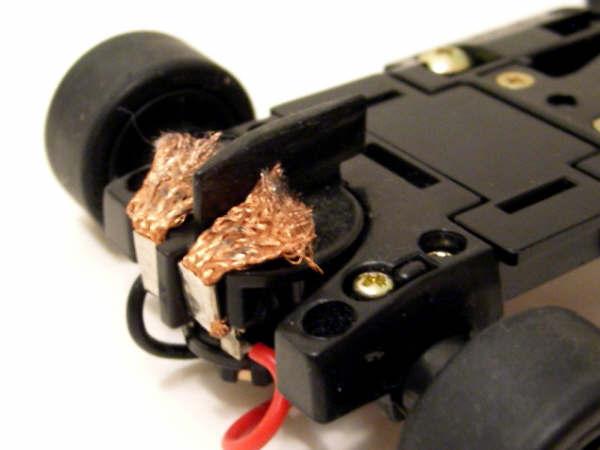 DIGITAL? I can’t say for sure, but I see a possibility for it. Since this chassis’ length is adjustable it has a plate that snaps into place to fill in the gap and help strengthen the front section of the chassis. The picture below shows this plate in place and removed. There’s room for a chip system in there. So, digital runners might have another option for their stable of cars. Plus, the body, mirrors, and wing are very solid for when things get out of hand.  NSX SPECS Wheel Base: adjustable from 66 mm to 83 mm or 2.59 to 3.26 inches Axle Diameter: 2.38 mm Motor RPM: 18K Pinion: 12T Gear: 32T Gear Pitch: 2.67 Tire Diameter: 18 mm Tire Width: 8 mm H-01 Chassis Weight: 60 grams Total Weight w/Body: 104 grams compared to Ninco at 82 grams & Scaley at 92 grams I think gluing in the body parts would bring the GSLOT closer to the overall weights of the other brands. Car Length: 6 inches Car Width: 2.75 inches FINALLY, TRACK TIME In the box stock configuration I couldn’t complete a single lap with the NSX. The gearing and ride height give the GSLOT zero braking. I was off the trigger more than I was on it. The rear end slid out fast and the lack of braking made it impossible to correct the slide. Coming out of the last turn before the main straightway of Shawn’s track I would punch the trigger and when the NSX got a third of the way down the straightway I took my finger off the trigger. This car continued to roll the rest of the way and half way through the first turn of the track before I had to get back on the power. Brakes? Not even close. In this configuration the car was a big disappointment. Let’s get to the nitty gritty with the tires. I’ll call it like I see it and as I try to do with each and every review regardless of brand or sponsor. The stock tires on both the NSX and I assume the Lexus models are USELESS!!! Forget the larger than life 4mm tall tire profile. Forget that the tire diameter is 7/8 of an inch. That’s pretty big for a car that’s suppose to be 1/32 scale. After not getting around the track once without spinning out Shawn says, “Try scuffing up the tires.” I thought the same thing and figured this would be the fix the stock tires needed. “You got to be kidding me!” The sandpaper didn’t make a dent in the stock rubber. As a matter of fact, it was a handful to keep the car in place to sand the tires. “These tires get incredible grip on sandpaper,” I jokingly say to Shawn. What’s next? I dropped the magnet pod about 3.5 mm and then back to the track. It helped; however, it was obvious that the stock tires kept the car too far from the track and even with the lowered magnet just didn’t have any grip. Luckily, GSLOT included a set of lower profile front and rear tires taped to the base of the case. It was time to pull them out and hopefully get a lap out of the NSX. 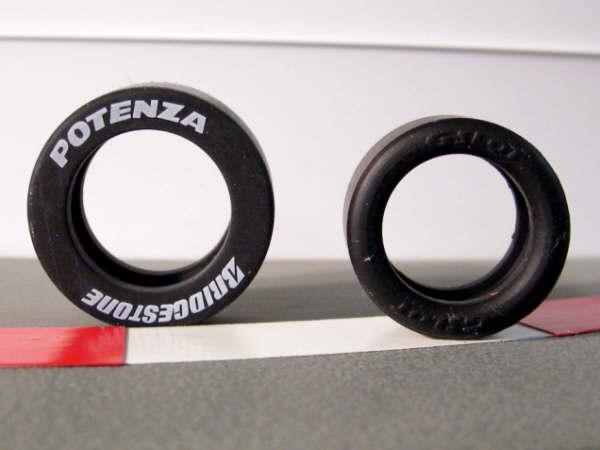 Above are a stock tire and the silicone rear lower profile tire for comparison. The extra tire set contains front tires made of a harder slick compound. Their profiles are a hair less than 3 mm and are suppose to work like Slot It’s Zero Grips. The rear tires are more of a silicone material and have a profile of 3 mm. They’re a heck of a lot stickier than the stock tires too. Plus, they lowered the NSX’s ride height. So, the lowered magnet came into play and was too much. I put the magnet back to where it was only lowered around 2 mm from it’s out of the box location. 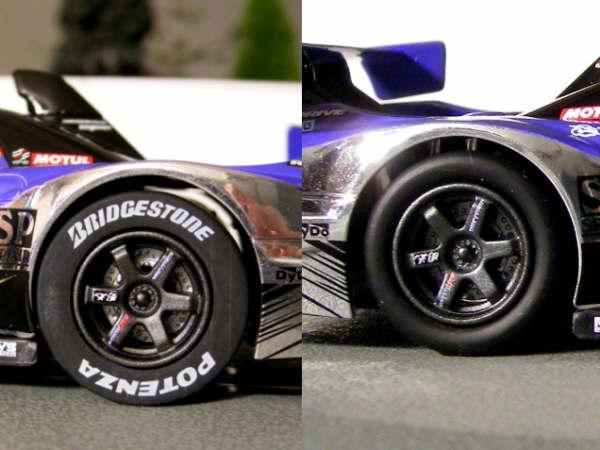 As you can see in the above photo the new tires on the right create a good amount of fender gap. I know folks pointed towards this fact just as much as the tall profile of the stock tires in the HRW Lexus thread. I think it could be lessened with some sanding of the body posts. It’s nothing people haven’t done to other brand cars before such as Carrera’s Vintage Nascar line. Luckily, the front axle is adjustable and can help eliminate some of the fender gap with just the twist of 4 screws. Some folks will simply say it’s just too much gap for their liking and I agree it’s a good amount. However, it’s not enough for me to really go off the handle about it. I got to test the Raybrig NSX on both Shawn’s painted Carrera track and my Scaley Sport track. We already discussed what the car didn’t do in straight from the box form. Let’s move along to after the lower profiled tires where put into play and the magnet being 2 mm lower than the stock location. TESTING ON CARRERA On The Carrera track the car finally had some good grip and braking to where you could actually control the NSX and getting lucky sometimes after the rear slid out in a turn. Again, I have to say the braking is solely because of the lowered tires and magnet. I think driving and tuning this car for non-magnet racing would be a challenge. Magnet racers you can’t just hold the trigger down either. You will still have to drive this car unless you totally lower the magnet to what I would consider a ridiculous level. Lap Times w/the new tires and magnet in the box stock location got down to 6.43 seconds. Not bad, but not outstanding either. Dropping the magnet about 1.5 mm dropped the time to 5.90 seconds. Final lowering of the pod to around 2 mm is where the driving got more controlled. Shawn got to 5.74 seconds as the best lap time. TESTING ON SPORT I always test in lane #2 of my Sport track setup which runs 57 feet in lane length and has a mix of rolling curves to hairpins throughout its length. I had the NSX in the same configuration as we tested it on the Carrera. I must say on the Sport track the car really came to life. It seemed to get much better grip. I don’t know if it was because of the tires or the magnet get more attraction from the Sport rails. It could be both. The car was flying around the track and the rear end wasn’t as prone to losing its hold as on the Carrera. The NSX consistently ran in the 6.1 seconds range. So much so, I was getting ticked off that I couldn’t get under that lap time. So, after finally figuring out the suspension and backing off the bottom screw a full turn I went back to the track to see if anything changed. Obviously the adjustment helped the car to get around the turns smoother and I swear on occasion I saw the rear compress a little bit. Guess what? I finally beat that consistent 6.1 seconds with 5.98 seconds on the first try after the change. I didn’t mess with it any further. I might get more time shaved by freeing up the suspension more. You could spend an hour just testing different settings a quarter of the turn at a time. Scalextic in my opinion makes some of the fastest box stock magnet cars on the market. Here are some comparison lap times in the same lane. Nissan Skyline 5.7 seconds Maserati Trofeo 6.1 seconds Jaguar Trans Am XKRS 6.0 seconds Ford GT40 6.0 seconds AMG Mercedes DTM 5.9 seconds. Shawn said the best time for a Ninco NSX on his track was 5.8 seconds. I think as far as magnet racing goes the GSLOT falls in line with the other brands just fine. Click here to watch Hot Laps Click here to watch the Bud Blimp Video Oh yeah, I screwed up on the Hot Laps and titled the camera. Tilt head to view. Sorry. FOLLOW UP ON THE STOCK TIRES I talked to Kurt “My Hero” Moser a little bit via email about my findings with the NSX’s stock tires. I know he runs on plastic and wood tracks. I also know he had the Lexus. Keep in mind that Kurt runs on stock tires 99.9% of the time. He’s not into silicone too much. This is one of the many reasons I believe he is a KING on the track. How was that for an ego boost, Kurt? He replaced the front tires to lower the front of the car and help keep the guide seating in the groove. He said he likes the stock tires and that they are respectable on wood tracks. Again, he agreed the only real thing hampering performance was the lack of braking, but different gearing can always change that too. He also hasn’t added any weight to the car. He also said he’s run it on unpainted Carrera track and he felt the stock tire grip was fine. Also, that he was able to sand his stock tires. So, we are thinking that maybe the stock tires are inconsistent or that maybe I just happen to get a bad set. Shawn had put one of the tires around a finger and dragged it across his wood oval. He said, “The tire glided over the surface as if it had a little bit of oil on the tire. This leaves an open question on the difference in the stock tires Kurt got on his Lexus compared to the ones on the NSX.  JUDGEMENT DAY What’s my final opinion about the GSLOT Raybrig NSX? I like it and I think Michael of EMI should give the line a shot here in the States. New blood is a good thing. There are issues with the car, but then every car we review here on HRW has its own particular issues. The stock tire issue is still got Kurt, Shawn and I baffled, but the second set of tires did the trick for my NSX. Yes, they’re closer to 1/28 scale than 1/32 scale. However, compared to the possible $100+ price of Ninco’s soon to be released XLOT line of 1/28 slots the $60 price range of GSLOT will fit more buyers budgets. Magnet racers will have a good amount of adjustments to make the car suit their personal tastes and driving styles. Those of you who pitch the magnets all together might have more work ahead of you that the Mag-Nuts. However, Kurt says it’s good on wood without any weight added to it. So, what do I know? I’ll tell you what I know. Decent looks, multiple adjustments that function, good handling even though braking could be much better, and a $60 price range equal a car that many could find enjoyable to put on their track. I apologize if some of you found this review to be of a Biblical length. I just wanted to cover all I could about this new line of slots and I hope I helped folks swing towards wanting to give them a try in the future. If the review has swayed you away from giving them a try that fact is okay too. I’d rather help someone say “Nah.” Instead of getting them into something they ended up wishing they didn’t get into. I’d like to thank Michael of Euro Model Imports, for valuing my opinions and supplying the GSLOT Raybrig NSX for this review. He said, “Run it and tell me what you think about it.” I don’t think he expect me to do a full blown review of it. I hope I made your decision easier, but then after this monster review I might have made it harder. Here’s what GSLOT is doing next. Cool little cars and it seems you can buy the H-01 chassis separately.  Slot Cars Japan link:http://www.slotcars.jp/index.html Tracks link: http:http://www.slotcars.jp/circuit.html The folks in Japan are doing it right!!! Feel free to direct any questions or comments to the email below. Eric Cropper AKA legionofone AKA HRW Minion ecropper@hotmail.com
Copyright © 2009 HomeRacingWorld.com All Rights Reserved |
