
Tuesday November 27, 2007
Tuesday November 27, 2007
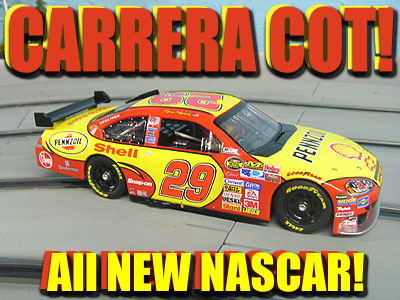
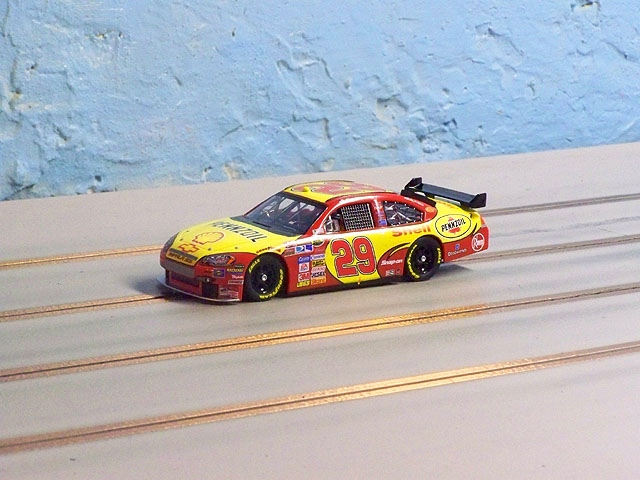
This is perhaps one of the most anticipated reviews of the year for many enthusiasts. The announcement of the Carrera COT (Car of Tomorrow) NASCARS coming our way had fans of the series impatiently awaiting their arrival and I admit I was one of them. Finally they have landed and it is time to get busy looking at this all new hot rod!
This version is the new digital edition but we will be testing it in stock analog form as the model can be easily raced on either digital or standard tracks. The outside is all the same so that is all that matters when looking at the overall appearance.
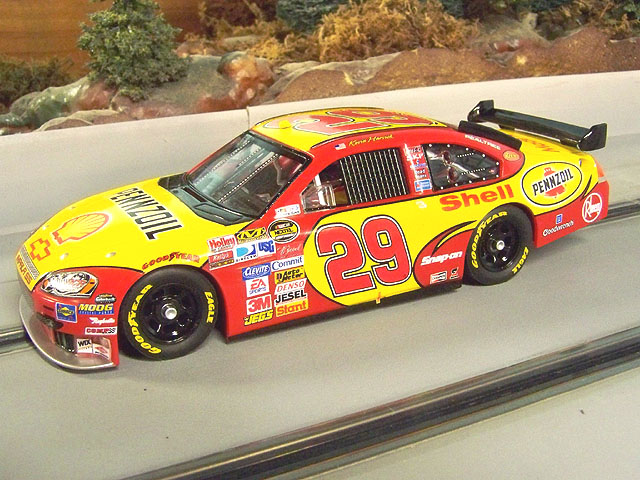
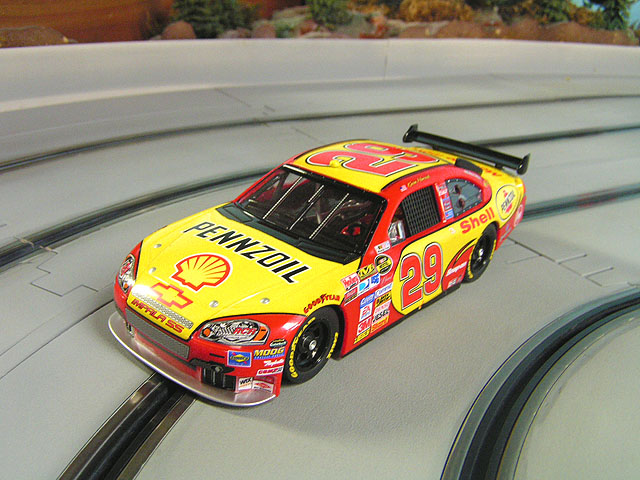
And with that said I think Carrera has done a great job capturing it in our scale. As with most models, nothing is perfect however and one of the first items you might notice that is missing is the front air splitter support rods. I spoke with Carrera about this and the reason is pretty simple: Durability. The location of these rods and how fragile they would be if they did make them would only lend themselves to being broken rather quickly. You could make your own if you just had to have them to increase the scale appeal, but I will leave mine alone. At speed on the track the cars fits the role and these missing rods will not stop me from enjoying the rest of what this model has to offer.
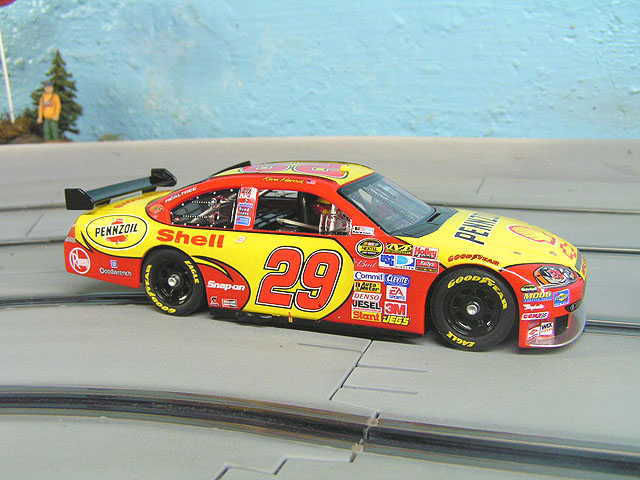
And the rest is pretty impressive. The paint work here is as nice as you could ask for. Clean and crisp markings are found throughout the model with an even, dirt free clear-coat that provides a very nice finish. As we do in every review, we let the photos do most of the work and allow you to come to your own conclusions.
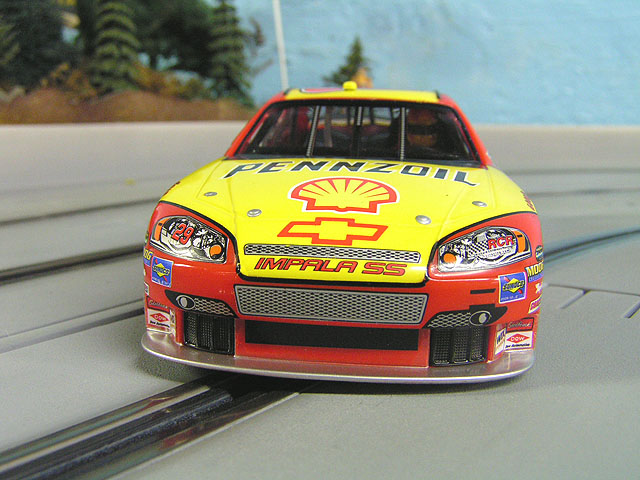
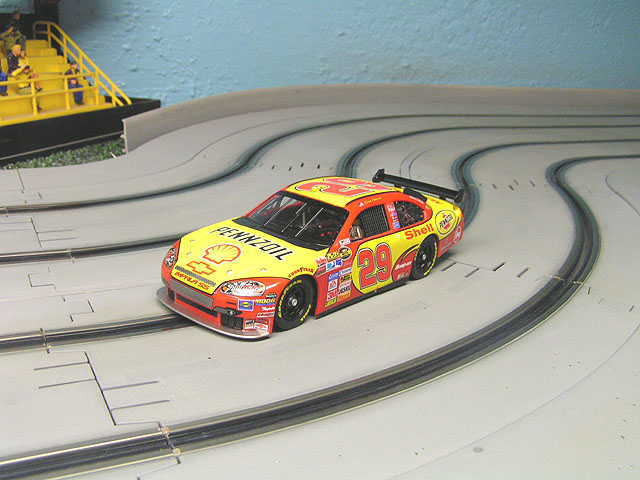
The overall shape of the model seems accurate enough and placement of sponsors and numbers are also well done. There is no mistaking what this model is and although not everyone likes the idea of the COT, it appears to be here to stay. It makes me wonder how long these molds can be utilized as what changes will be made may be so slight that we will see more 2008 editions sooner than expected.
You might wonder how durable the rear wing is. Well, it is designed to snap off instead of break so if you want, you can remove it during racing. I leave mine in place as it just does not look right without it.
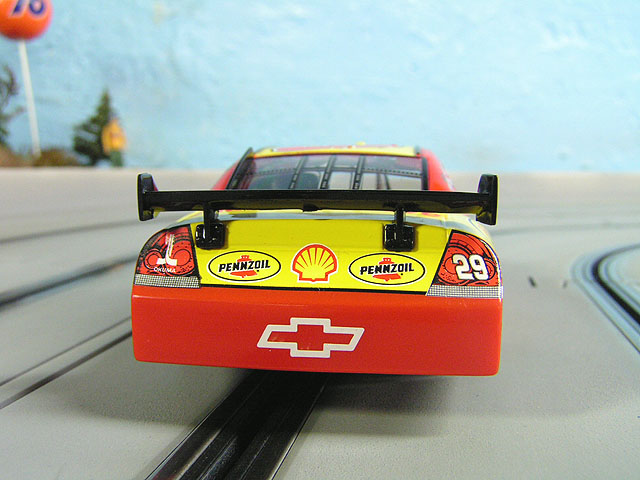
The interior is also very well done with enough detail to satisfy most enthusiasts. Plenty of fine detail here that draws you in closer and gives the model a very finished look. We have come a long way in the past 10 years as far as scale detail is concerned and I am more than pleased with interior work such as this. Our driver is painted nicely too with the small Shell logo in place and just adds even more to the detail.
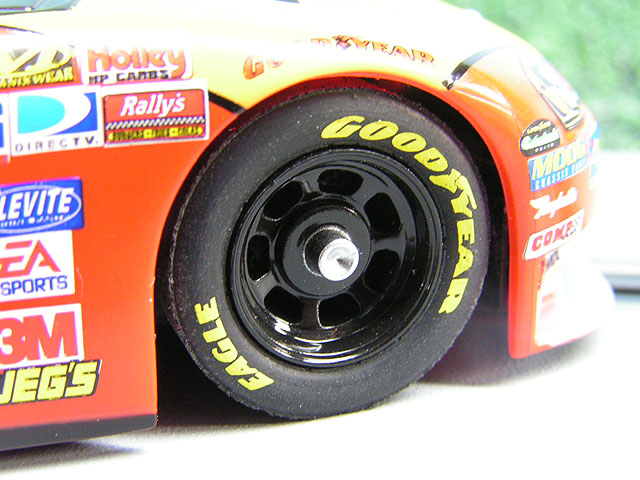
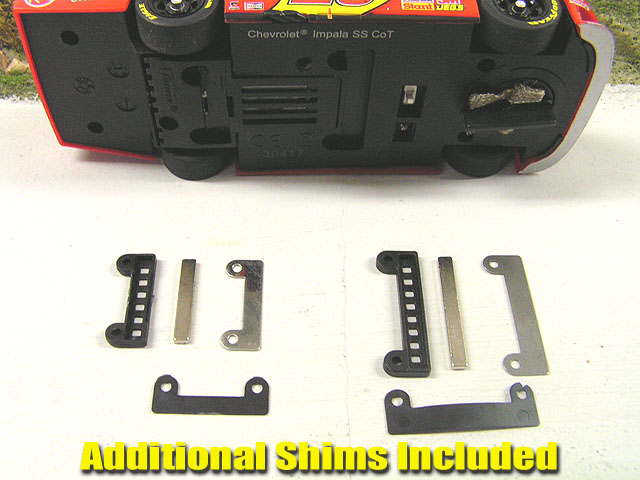
Wheels and tires look well enough and seemed round and true. There is going to be some sanding required to make things just right, but that can be said for almost every model. After market tires are already being made for these models so if you want to change them out, look for these in the next few months. The car also comes with an extra guide for the PRO-X timing system and braid along with additional shims for the magnets.
Green Flag!
Box Stock Testing
Artin Plastic Track - Aftermarket Power @ 12 Volts - PARMA 25 OHM Control
NOTE - Although this is a Digital model, you do not need to do anything but place it on the track and go. It is fully analog compatible.
The first few laps with this car were pleasing overall. I am not a heavy magnet racer so the car had more downforce than I care for. However, it ran fair enough and functioned as intended which is the important part. It is still a very fun race car with decent acceleration and with the dual magnets braking is clearly distinct. But do not think these magnets do not give you a correction window of recovery. The center magnet helps a great deal in this regard. I had several spins which I easily corrected without de-slotting. I was surprised at this action and again all this magnet is not my style, but it was still a fun run.
One thing I did notice was that in a wider spin the guide travel is limited and would cause the car to pop out of the slot. I will investigate this later on after our testing. Lap times were in the 4.5 second range which is decent on our plastic track but I knew we could do better after some tire work. I say this I did notice a slight hop to the car. Nothing major, but it was clear attention was needed in the tire department.
Perhaps I am biased because I am a NASCAR fan, but this was a great time for me. I just appreciate the fact we even have these models to enjoy and the sight of it on the track brings a smile to my face. These cars will be ideal for beginners or veterans just the way they come out of the box and I am betting they are easily tuned for more advanced tracks and enthusiasts.
Pop The Hood!
Post-Race Inspection
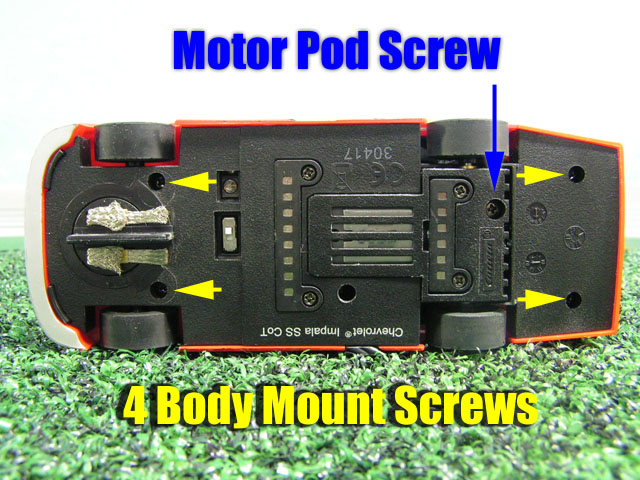
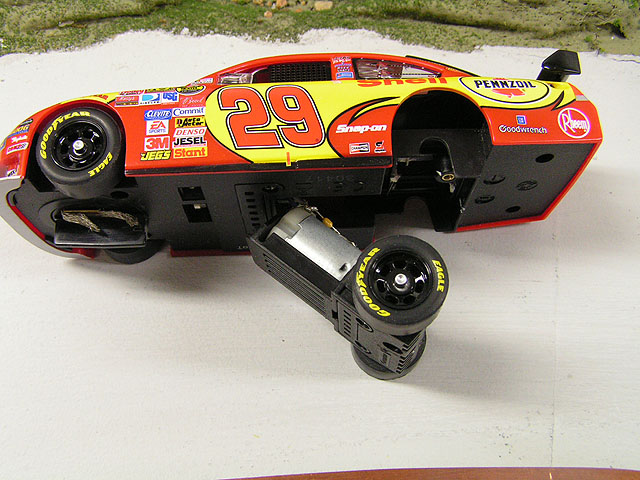
Turning the model over we see that 4 screws mount the body to the chassis. The switch you see behind the guide is for polarity to change direction. We also see the motor pod is separate from the rest of the chassis and can be removed for maintenance or to swap out pods with different gearing or motor combinations. And to be very honest, if you do not have to remove the entire body, then don't. Most of the maintenance you will need to perform is accessible right from the pod area and just makes things easier on you.
The Garage Area
Tuning/Adjustments
Although the model has more magnet than I would like, that is easily adjusted. Simply remove one of the magnets and head back to the track to see if you like the overall control. If not, play around with the shims (2 shims are included in the case) for height adjustment or swap the magnets and try again. I like the fact it has these magnets as young racers or enthusiasts who enjoy heavy magnet racing can start trading paint right out of the box. It is easier to take away than to add. So those of us who do not like a lot of magnet, or none at all can just remove them.
The main tuning though was I wanted to address the slight wheel hop I noticed in testing. As I inspected the rear wheels I could notice the right side seemed a little "off". It appeared as though the outside of the tire edge was slightly egg shaped and some serious sanding would be needed.
However, before that I looked at the wheels to see if there was any excess flash molding causing this issue. We see this a lot with other wheels so it is a good idea to check. What I found was that these wheels are a 2 piece design and that the outer part of the wheel was not glued on evenly with the other half of the wheel.
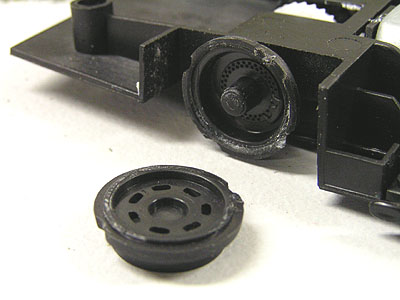
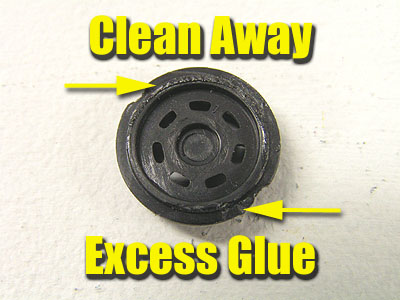
I used a small flat tip screwdriver and popped off the outer part of the wheel and inspected it. I cleaned the excess glue off with a hobby knife on both parts and then tried to place the outer portion of the wheel evenly. Yes, all went well and looked good. After this test fit, I then removed the outer part of the wheel again and added a light amount of Testors model cement and then re-attached the wheel checking again to make sure it was true.
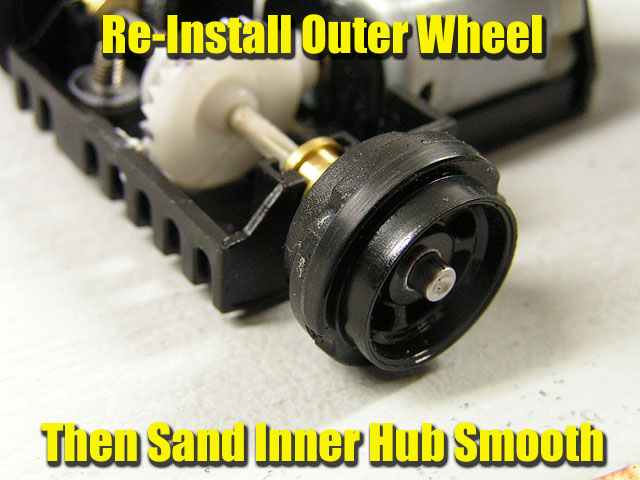
After this I left the tires off and sanded the inner ring of the hubs smooth. After this I installed the tires and checked it. Perfect...or as good as I needed it for my tire sanding to clean the rest up.
Tire sanding will be needed to get things just right and is again easily accomplished. We use a sanding station here and in just a few seconds we had these tires as true as we would like. Again, after-market tires will become available for those that desire them so the tuning possibilities will just increase over time.
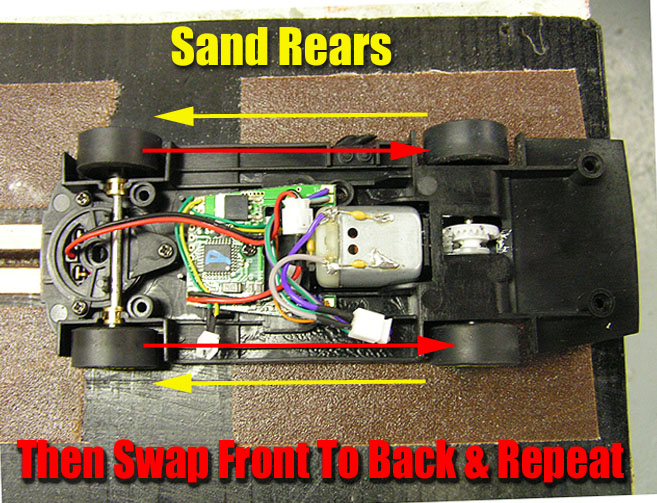
Although the front axle height is close to an ideal tripod, you can smooth your operation out even more by sanding the rear tires first, then move the fronts to the rear and repeat. This will get your front tires as concentric as possible and makes it almost an ideal set up.
Next I wanted to look at the guide. The self centering spring is stronger than I expected and some enthusiasts will not care for this. I also wanted to try and increase the guide travel a little to allow more room in a slide.
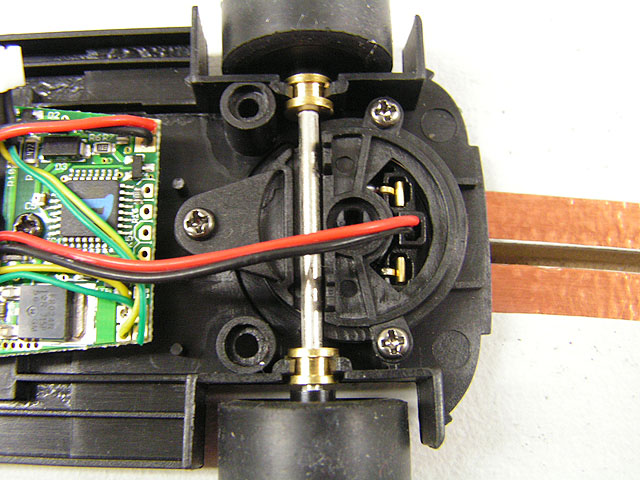
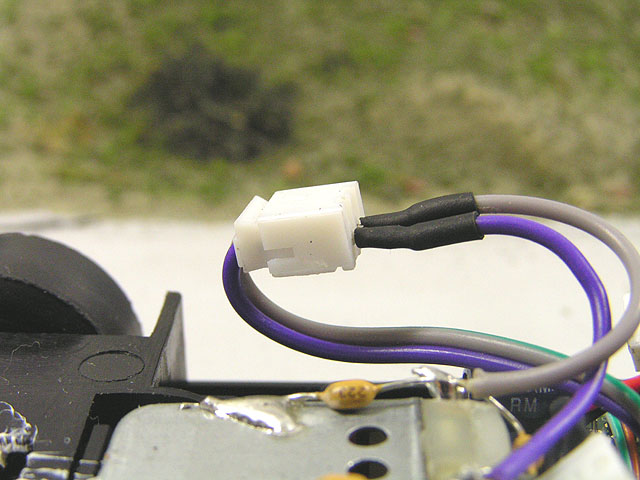
What I found was a large circular spring that when removed, helps not only to allow the guide to swing freely, it also allows you a little more guide travel. This was easily done by first removing the guide blade (it snaps right out).

Then disconnect the wires from the plug. Finally remove the 3 screws holding the top guide plate in place. Remove the spring and check your guide travel. What you will find is that some sanding of the top plate will increase the travel even more giving you plenty of room.
Wood Track Testing
4 Lane MDF Routed Wood Oval 5 1/2 by 16 Feet - Flat Latex Surface
Copper Tape Conductivity - Aftermarket Power @ 12 Volts PARMA 25 OHM Control
After the quick tuning it was onto our wood oval where this car will find it's home. All I can say this car is all the fun I expected to be and more. Smooth acceleration with no signs of wheel hop and very crisp braking letting you dive deep into the corners. Control was right where I wanted and it was time unleash this beast and let it eat!
Lap times were an average of 3.4 seconds which is very good for a car with this little break in time or driver practice. Lap after lap I kept pushing it to see what I could do to squeeze a little more out of her. A quick trip back to the sanding block to clean things up again and back to the track. 3.3 seconds was now the average and I knew things would just get better.
But in reality, these lap times means nothing for us. These cars will race against other COT models so the field will be very even. If I have not said it yet, I am very pleased.
Final Thoughts
Winners In My Book
Although these models are not perfect, let us look at one significant factor that might mean a great deal to some: PRICE. Cincyslots.com has these new models (analog versions) listed for $36.99. This is a great price for tighter budgets and honestly most of us do have a budget. These new NASCARS are very well finished, look good and run well. With the cost of other brands going well over $50...sometimes over $60 or more, the value of the Carrera line is hard to ignore. With after-market decals being available, I could re-paint virtually any of my favorite drivers. And I could do it with a price tag well under many other new releases.
Yes, the car needed some work but what ready to run model does not at some point? I asked several other friends who have these models and none of them reported and any issues with the wheels. It could be my model was very isolated. Track reports from other enthusiasts will tell the tale. I do plenty of tire and wheel work on models that cost much more than this one and it simply is a maintenance procedure we have come accustomed to.
Our oval racing here is the most popular racing we have and these new models have been anxiously awaited to join the action. If you are a NASCAR fan then of course you should have these on your wish list. If you have a tighter budget and looking for some great cars to get started in this hobby with, these cars should also get a second look.
Advanced enthusiasts who like to tinker and adjust will like them as well, or they should given the start up investment. If you are the type that feels most all ready to run cars need new aluminum wheels, higher grade axles, motors, tires and gears then why not save money on the original platform?
I am biased of course because I love the 1:1 sport, but I am a bigger fan of it in scale! I cannot help but look at the good quality of these cars then add the value they offer. I think anyone in this hobby should grab a pair of them and start enjoying the racing action they can provide. They are simple fun right out of the box and fun has always been what our hobby is all about!
-Harry
As always feel free to contact me about this article or just the hobby in general at harry@homeracingworld.com, or better yet drop into our Message Forum and share your thoughts with other enthusiasts!
Thanks Go To CINCYSLOTS For Sponsoring This Review!

Click Here To Direct To The Carrera Online Store